

Please help with head rebuild!


Thread Starter
Registered User
Joined: Oct 2007
Posts: 30
Please help with head rebuild!
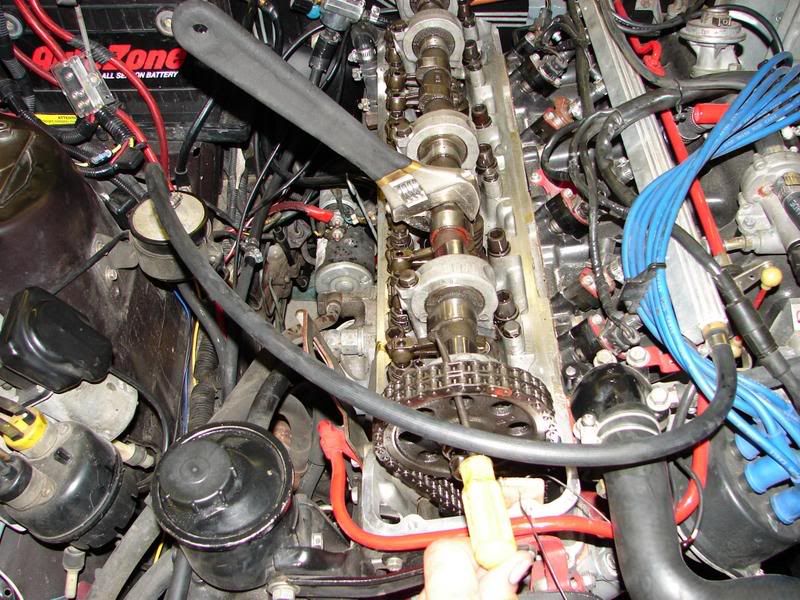
I blew a head gasket so I had my head milled and have the new gaskets and bolts so I started to put the car back together and I can't get my timing chain and sprocket back onto the cam. I have a manual so I made the little wood block to hold the chain and tensioner into place. I just cant get it on the cam and the book sais that if the chain doesn't stretch to go on then there is a problom with the tensioner. I really really hope I don't have to take the front of the motor apart! Does anybody have any suggestions??
I would really appreciate some advice
I would really appreciate some advice

Big Poppa
Joined: Jan 2005
Posts: 4,499
From: Mission, British Columbia
did you put the chain on the tensioner first? i would assume you did, you can use a pry bar to hold the gear up, and you gotta make sure that cam is lined up perfect for the dowel pin to go into the gear, otherwise it just wont go.

The Good Twin
Joined: Aug 2005
Posts: 20,639
From: Wild Wild West, UTAH!
https://www.zdriver.com/forums/240z-280zxt-s30-s130-tech-tips-275/aftermarket-cams-cam-removal-installation-pics-19939/
If the chain has not slipped past the temp holding block, do this:
Install is just the opposite of removal. One thing... to get the cam to align w/ the sprocket again, use a crescent wrench on the boxed ***** of the cam to turn it. Also use a flathead screwdriver to pull the sprocket onto the cam dowel.
If the chain has not slipped past the temp holding block, do this:
Originally Posted by NismoPick
Install is just the opposite of removal. One thing... to get the cam to align w/ the sprocket again, use a crescent wrench on the boxed ***** of the cam to turn it. Also use a flathead screwdriver to pull the sprocket onto the cam dowel.
The Good Twin
Joined: Aug 2005
Posts: 20,639
From: Wild Wild West, UTAH!
Did you put the wood block in tight enough so the chain cannot move below eyesight? Has the crank pulley moved? If nothing has changed on the chain since you removed the cam... the sprocket should go back on.
Wait... did you put the block in BEFORE or AFTER you removed the cam sprocket?
Wait... did you put the block in BEFORE or AFTER you removed the cam sprocket?
The Good Twin
Joined: Aug 2005
Posts: 20,639
From: Wild Wild West, UTAH!
uh... yeah... the block won't do much good AFTER you have taken the sprocket off.  The reason you put it in is to hold the bottom of the chain tight like it is still on the sprocket. If you let it loose, the tensioner pops out and you get to take the timing cover off to reset it.
The reason you put it in is to hold the bottom of the chain tight like it is still on the sprocket. If you let it loose, the tensioner pops out and you get to take the timing cover off to reset it.


Grumpy & Helpful
Joined: Sep 2006
Posts: 1,415
From: Mill Creek WA
There is a post somewhere on one of the other sites where a fella claims two long thin screwdrivers can be used to tease the tensioner back into place. Taking off the front cover isn't fun unless you got the engine out and on a stand. That wood block should be about 1 & 1/8 wide out of 1x material. Tie a rope to it so you can pull it out. It doens't need to be tapered or anything just about six inches long and rectangular. If you make it too long it will get in your way and need to cut some more off. Keep the block and mark it for future use as a special tool.

Doesn't post much...
Joined: Dec 2004
Posts: 3,617
From: Escondido (San Diego) California
Everyone needs to read this:
Timing Chain Replacement
Respectfully taken from www.zcar.com: Author: Sue Wilkinson 79 280ZX WARNING: This is definetly not to be tried by someone as stupid and inexperienced as me. It was only through divine providence and having help from someone who had done this before that I managed it. This is to be used as a guide only and not as a manual. This was written from memory, and is likely to have errors in it. If you are not experienced enough to recognize those errors, you are not experienced enough to attempt this. I cannot be held liable for the outcome of following this guide.
Here's what I needed, you may be able to get it in a kit: timing chain and tensioner, valve cover gasket, water pump gasket, oil pan gasket if you're going to remove the oil pan all the way, 2 side gaskets for the front cover, oil pump gasket, front oil seal (in timing cover, big round donut seal), white out for the timing mark, silicone gasket maker (I used 3 kinds: copper high temp stuff for the valve cover, grey regular stuff for everything else, and blue for the water pump). I also wanted to change the chain guides, but they were unavailable.
First, park the car where you won't have to move it, where you can work on it and be able to put it on jackstands.
Remove the hood. On either side, there are 3 bolts that hold the hood onto a plate - remove those bolts rather than the bolts that hold the bracket to the frame.
Drain rad fluid and oil.
Remove the radiator, taking off all the hoses, unhooking the overflow bottle hose from the rad neck. There are four bolts on the corners of the rad which must be loosened from the outside, and one in the center bottom. If you can't get the bottom bolt, you need to remove the fan first.
Loosen and remove the belts, looking at the side of the fan, you should see small bolts with nuts holding the fan onto the coupling. Unscrew those nuts and you should be able to remove the fan. If you need to then, remove the rad.
Unbolt the water pump from the block, being very careful as they are really long really skinny, really expensive bolts if you break them. Remove the water pump and scrape off the gasket.
Unbolt the powersteering pump from it's bracket and move it out of the way. Unbolt the bracket from the block. Drop it on the ground, cause it's real heavy.
Unbolt the alternator from it's tensioner guide, and allow it to swing down, remove the tensioner guide.
Unbolt the huge bloody crankshaft bolt (not the way I did it which was to use a breaker bar and crank the engine...) and remove the harmonic balancer/pully.
Remove the bolts from the front half of the oil pan, and loosen off the ones in back. Don't loosen them too much, they are really short bolts. Make sure you've drained the oil! If you do end up having to take off the oil pan, make sure you separate the longer bolts from the shorter ones, and hang onto the metal strips that sit between the bolts and the oilpan -- these longer bolts are needed for those metal strips. Luckily enough, if you lose some of your bolts, most of the holes go straight through, so you can buy the longer bolts and they will fit where the shorter ones did -- although you can't use the shorter ones where the longer ones need to fit.
Drop the oil pan down enough so that when you remove the front cover, it has enough room to clear the edge of the oil pan - it's expensive to replace!
Take everything off the top of the valve cover (vacuum hoses, plug wires, that blower fan thing that nobody has any idea what it does) and unbolt the valve cover and remove it.
To get at the front cover, you first need to remove your distributor, and the two bolts underneath that go into the front cover.
Unbolt the a/c compressor and it's mounting bracket (two bolts you need to get at from underneath), and move them out of the way.
Unbolt every bolt that looks like it could even possibly go near the front cover. Especially important: You need to unbolt the oil pump from the front cover (don't worry, there's just a long shaft that goes through it into the front cover, no funny stuff will fall out) and lower it a bit so that you can get at one bolt that just between the oil pump and the front cover. I almost broke that before I realized it was there, so don't miss that one!
I unbolted the distributor and took it right off, although I'm not sure that its needed -- the oil pump shaft goes through the front cover into the distributor, and I can't remember if it comes straight out if the distributor is still attached. Make sure you mark where the distrib/front cover line up, and where the rotor is at #1! (Important because we had to spin the shaft within the oil pump (after removing it again for the 3rd time AARGH!) because we hadn't marked it.
On the underside of the front cover there are pry spots to stick a screwdriver in and pry the cover loose. (my favorite part of mechanics - use big tools and lots of testosterone)
REALLY IMPORTANT: Be very very careful when you remove the front cover. At the top, the head gasket meets the front cover, and you ABSOLUTELY MUST NOT break that gasket. Unfortunately I did, and I had to fill it with silicon gasket maker, which is a very chancy situation at best.
Okay, take the cover off, unbolt the 2 bolts holding the tensioner in, and remove the 2 guide plates from the chain. Take the "gear thing" and the oil thrower off of the crankshaft spindle. You should be able to move the crankshaft sprocket around, and be able to pry the chain off. Take the new chain, and check to see if it has the two "marker" links (they should be shinier than the rest) if not, you need to lay the two chains on their side and mark the new chain on the corresponding links. You can use whiteout, nailpolish, or my personal favorite (because it doesn't work worth stink) white pencil crayon. You can mark any 2 links if they're not marked, just make sure they are exactly the right links.
Okay, to find how to line it up: On the cam shaft, there should be a marker hole on the gear that has the number 1 stamped below it. Put one of the marker links so that the hole marked 1 lines up with the *middle* of one of the marker links.
On the crankshaft, there should be a divot or mark on the gear. Turn the cam and crank (slowly and gently otherwise you're gonna have some messed valves) so that the marker on the crankshaft lines up again with the *middle* of the second marker link. The 2 marker links should be on the "right" or driver's side of the engine, otherwise you are directly opposed! Voila! They're lined up!
Put the gear thingy and the oil thrower on the crank.
Scrape the old gasket off your timing cover & valve cover. I used an exacto knife and some 120 grit or higher sand paper to get the little bits off. Use some brake cleaner on a clean rag to get off any oil, and make sure the block and head are clean of old gasket as well.
Using new gaskets and some gasket maker, put the front cover back on. If you haven't broken the head gasket, you should use aviation gasket sealer -- it's really sticky, and helps line it up better by sticking it to the front cover. Make sure it doesn't come into contact with the silicone gasket maker you use on the sides, because the two types of gasket stuff aren't compatible.
To get the oil pump back on, you have to hold the bolts in as you're lining it up, because they are impossible to put in otherwise, with the belly pan on. Have someone hold the oil pump shaft that goes between the distributor and the oil pump in through the distributor shaft, and line up the oil pump and put it in.
Put on your valve cover. (really easy)
Line up the old gasket, or put on the new one and put your oil pan back on. Don't torque the oil pan too tight, otherwise you'll break the bolts. You don't even need to tighten them as tight as your spark plugs. Remember the metal strips and the long bolts.
Put your water pump back on, don't forget to use the gasket, and some of that blue gasket stuff.
Put your crank pully on, and USE A TORQUE WRENCH!! and tighten it to correct torque (check your manual). For my car, we put it in 5th, and sweated and grunted and got it up to 115 ftlbs.
Put on your distributor - make sure you have it set to #1
Mark your timing notch with whiteout, and clean off your timing (mental blank) plate thingy.
Remount all your various accessories: a/c compressor, alternator and power steering pump.
Remount your fan/coupling, put on your belts, put in the rad, and hook up the hoses. Hook up any misc stuff that you took off, ie auxilliary fan thing that goes over the valve cover, plug wires, vacuum hoses.
Fill the rad and oil.
Crank it over. CHECK YOUR OIL PRESSURE! It took me cranking it over 3 times before I got oil pressure. If you've messed something up, you'll hear a nasty knock start up at the top because it's not getting any oil. If you get that, just stop, because you've done something wrong, and you'll mess your engine pretty bad if you keep trying to get pressure. Don't worry too much if it doesn't get pressure right away, I was getting really scared, but I didn't get the nasty knock, and it eventually came up.
At this point, do your timing, and adjust as necessary.
After that, if it works, remount your hood, (ha ha, good luck) and you're good to go.
__________________________________________________
Rod.
Timing Chain Replacement
Respectfully taken from www.zcar.com: Author: Sue Wilkinson 79 280ZX
Here's what I needed, you may be able to get it in a kit: timing chain and tensioner, valve cover gasket, water pump gasket, oil pan gasket if you're going to remove the oil pan all the way, 2 side gaskets for the front cover, oil pump gasket, front oil seal (in timing cover, big round donut seal), white out for the timing mark, silicone gasket maker (I used 3 kinds: copper high temp stuff for the valve cover, grey regular stuff for everything else, and blue for the water pump). I also wanted to change the chain guides, but they were unavailable.
First, park the car where you won't have to move it, where you can work on it and be able to put it on jackstands.
Remove the hood. On either side, there are 3 bolts that hold the hood onto a plate - remove those bolts rather than the bolts that hold the bracket to the frame.
Drain rad fluid and oil.
Remove the radiator, taking off all the hoses, unhooking the overflow bottle hose from the rad neck. There are four bolts on the corners of the rad which must be loosened from the outside, and one in the center bottom. If you can't get the bottom bolt, you need to remove the fan first.
Loosen and remove the belts, looking at the side of the fan, you should see small bolts with nuts holding the fan onto the coupling. Unscrew those nuts and you should be able to remove the fan. If you need to then, remove the rad.
Unbolt the water pump from the block, being very careful as they are really long really skinny, really expensive bolts if you break them. Remove the water pump and scrape off the gasket.
Unbolt the powersteering pump from it's bracket and move it out of the way. Unbolt the bracket from the block. Drop it on the ground, cause it's real heavy.
Unbolt the alternator from it's tensioner guide, and allow it to swing down, remove the tensioner guide.
Unbolt the huge bloody crankshaft bolt (not the way I did it which was to use a breaker bar and crank the engine...) and remove the harmonic balancer/pully.
Remove the bolts from the front half of the oil pan, and loosen off the ones in back. Don't loosen them too much, they are really short bolts. Make sure you've drained the oil! If you do end up having to take off the oil pan, make sure you separate the longer bolts from the shorter ones, and hang onto the metal strips that sit between the bolts and the oilpan -- these longer bolts are needed for those metal strips. Luckily enough, if you lose some of your bolts, most of the holes go straight through, so you can buy the longer bolts and they will fit where the shorter ones did -- although you can't use the shorter ones where the longer ones need to fit.
Drop the oil pan down enough so that when you remove the front cover, it has enough room to clear the edge of the oil pan - it's expensive to replace!
Take everything off the top of the valve cover (vacuum hoses, plug wires, that blower fan thing that nobody has any idea what it does) and unbolt the valve cover and remove it.
To get at the front cover, you first need to remove your distributor, and the two bolts underneath that go into the front cover.
Unbolt the a/c compressor and it's mounting bracket (two bolts you need to get at from underneath), and move them out of the way.
Unbolt every bolt that looks like it could even possibly go near the front cover. Especially important: You need to unbolt the oil pump from the front cover (don't worry, there's just a long shaft that goes through it into the front cover, no funny stuff will fall out) and lower it a bit so that you can get at one bolt that just between the oil pump and the front cover. I almost broke that before I realized it was there, so don't miss that one!
I unbolted the distributor and took it right off, although I'm not sure that its needed -- the oil pump shaft goes through the front cover into the distributor, and I can't remember if it comes straight out if the distributor is still attached. Make sure you mark where the distrib/front cover line up, and where the rotor is at #1! (Important because we had to spin the shaft within the oil pump (after removing it again for the 3rd time AARGH!) because we hadn't marked it.
On the underside of the front cover there are pry spots to stick a screwdriver in and pry the cover loose. (my favorite part of mechanics - use big tools and lots of testosterone)
REALLY IMPORTANT: Be very very careful when you remove the front cover. At the top, the head gasket meets the front cover, and you ABSOLUTELY MUST NOT break that gasket. Unfortunately I did, and I had to fill it with silicon gasket maker, which is a very chancy situation at best.
Okay, take the cover off, unbolt the 2 bolts holding the tensioner in, and remove the 2 guide plates from the chain. Take the "gear thing" and the oil thrower off of the crankshaft spindle. You should be able to move the crankshaft sprocket around, and be able to pry the chain off. Take the new chain, and check to see if it has the two "marker" links (they should be shinier than the rest) if not, you need to lay the two chains on their side and mark the new chain on the corresponding links. You can use whiteout, nailpolish, or my personal favorite (because it doesn't work worth stink) white pencil crayon. You can mark any 2 links if they're not marked, just make sure they are exactly the right links.
Okay, to find how to line it up: On the cam shaft, there should be a marker hole on the gear that has the number 1 stamped below it. Put one of the marker links so that the hole marked 1 lines up with the *middle* of one of the marker links.
On the crankshaft, there should be a divot or mark on the gear. Turn the cam and crank (slowly and gently otherwise you're gonna have some messed valves) so that the marker on the crankshaft lines up again with the *middle* of the second marker link. The 2 marker links should be on the "right" or driver's side of the engine, otherwise you are directly opposed! Voila! They're lined up!
Put the gear thingy and the oil thrower on the crank.
Scrape the old gasket off your timing cover & valve cover. I used an exacto knife and some 120 grit or higher sand paper to get the little bits off. Use some brake cleaner on a clean rag to get off any oil, and make sure the block and head are clean of old gasket as well.
Using new gaskets and some gasket maker, put the front cover back on. If you haven't broken the head gasket, you should use aviation gasket sealer -- it's really sticky, and helps line it up better by sticking it to the front cover. Make sure it doesn't come into contact with the silicone gasket maker you use on the sides, because the two types of gasket stuff aren't compatible.
To get the oil pump back on, you have to hold the bolts in as you're lining it up, because they are impossible to put in otherwise, with the belly pan on. Have someone hold the oil pump shaft that goes between the distributor and the oil pump in through the distributor shaft, and line up the oil pump and put it in.
Put on your valve cover. (really easy)
Line up the old gasket, or put on the new one and put your oil pan back on. Don't torque the oil pan too tight, otherwise you'll break the bolts. You don't even need to tighten them as tight as your spark plugs. Remember the metal strips and the long bolts.
Put your water pump back on, don't forget to use the gasket, and some of that blue gasket stuff.
Put your crank pully on, and USE A TORQUE WRENCH!! and tighten it to correct torque (check your manual). For my car, we put it in 5th, and sweated and grunted and got it up to 115 ftlbs.
Put on your distributor - make sure you have it set to #1
Mark your timing notch with whiteout, and clean off your timing (mental blank) plate thingy.
Remount all your various accessories: a/c compressor, alternator and power steering pump.
Remount your fan/coupling, put on your belts, put in the rad, and hook up the hoses. Hook up any misc stuff that you took off, ie auxilliary fan thing that goes over the valve cover, plug wires, vacuum hoses.
Fill the rad and oil.
Crank it over. CHECK YOUR OIL PRESSURE! It took me cranking it over 3 times before I got oil pressure. If you've messed something up, you'll hear a nasty knock start up at the top because it's not getting any oil. If you get that, just stop, because you've done something wrong, and you'll mess your engine pretty bad if you keep trying to get pressure. Don't worry too much if it doesn't get pressure right away, I was getting really scared, but I didn't get the nasty knock, and it eventually came up.
At this point, do your timing, and adjust as necessary.
After that, if it works, remount your hood, (ha ha, good luck) and you're good to go.
__________________________________________________
Rod.

Thread
Thread Starter
Forum
Replies
Last Post
Lesnocker
280ZX (S130) Forums
42
Nov 1, 2012 02:11 PM
NismoPick
280ZX Performance / Technical
47
Jun 11, 2008 08:18 AM
280zExTURBO
FS: 240Z,260Z,280Z & 280ZX (70-83)
5
Oct 10, 2005 12:27 AM
Bookmarks


