
Z31 Suspension rebuild - with pics


Thread Starter
Registered User
Joined: Jan 2015
Posts: 55
From: Mesa, AZ
Z31 Suspension rebuild - with pics
I'd posted this up over on the other Zcar site....these sites just aren't as active as they used to be, but hopefully this will be useful (or at least entertaining) to those contemplating a suspension rebuild on their Z....
This stuff has all been posted before I'm sure, but here's my experience with this project.
Parts List: (prices do not include shipping charges)
Amazon List:
Moog Lower Ball Joints - $55.64
Moog Tie Rod Ends - $45.64
Moog Variable Rate Rear Springs - $43.99
KYB Front Strut Cartridges - $72.80
KYB Strut Boots - $23.86
KYB Strut Mounts - $42.54
KYB Strut Bearings - $23.86
KYB Rear Shock kit (bumpstops) - $41.21
KYB Rear Shocks - $76.80
Prothane Total Kit (bushings) - $144.68
From MSA...
Cuzco Strut Tower Brace - $214.95
Parts store stuff:
Duralast Ceramic Brake Pads front and rear - $61.98
Remanufactured Rear Calipers - $159.98 (after core return)
Timken Front Hub Grease Seals - $11.38
Upper and lower OEM rear coil insulators - $100
One pair of OEM rear control arm bushings (because I inadvertently cut them out of one of the A- arms before realizing I needed the sleeves - $32.82
Grand Total: $1152.13. Add sales tax and shipping to all this stuff and it's north of $1200.
So I started with a rust free 1985 300ZX NA car with 104k on the clock. This is a dry AZ car. For you guys who do this job on rusty cars, that's all you. I wouldn't even try it.
Here's the initial parts pile. Not everything is there....

Old rear setup. All bone stock with sagging springs and a set of ancient Monroe shocks, one of which was completely blown out.

Check out the awesome rotten bumpstops

Disassembly started. I did the rear first because it looked harder. I was right.

To remove the rear control arms there's a section of hard line attached to the arm itself, and the soft lines need to be removed from each end. Turns out I had a seized caliper on one side, and the rubber dust boots were shot, hence the need for new calipers. I was thankfully able to find the last set in Mesa, AZ at an O'Reilly's.

One side gutted, sans shock. The upper shock mount has to be unbolted inside the car. The rear speaker grill and speakers need to come out to get to the mounting bolts. I found it easier to drop the whole mount rather than just the shock, and then reassemble as a unit.

Arm is out! Pay attention to the bolts you take out. The inner mount has cam washers on it to set toe when the car gets aligned.

After applying much fire to the rubber bushings, I was able to push out the inner sleeve. I learned as I went that if I'd burned it longer, it would have fallen out. I used a 1 lb Coleman propane cylinder with a torch head to do the bushing burning.

So I have done bushings before on leaf spring setups, and you always had to remove the inner sleeve as well. Not so for the Prothane kit (whoops!). So I had to buy a couple new OEM bushings so I could salvage the sleeves. The rubber had to be burned out of these as well.

So here's an extra step that I did on the first arm that I didn't have to do on the second. Pressing the new sleeves into the arm. That took just about all my little 12 ton press had!

Nice shiny new rear sway bar end links from the Prothane kit. Note the cracking on the OEM rubber bushings.

So since I naturally have ADD (ha!), I figured I already had the rear speakers out, and popping off the door panels isn't that hard, so out with the old stock Hitachi 20w paper speakers and in with something that sounds much better. These are a good match to the Alpine 50w x 4 head unit I have.

So the stock rear spring seats were shot, so a call to Motorsports procured me some NOS pieces....

What do you think....Was it a good decision?

Same for the shock bumpstops....

Rear shocks assembled and ready to install

Passenger side arm back in the car with new bushings

New rear coil. These Moogs were physically shorter than the stockers, but because they're progressives, the first 3 coils are more tightly wound and don't compress as much under the weight of the car. I gained back a couple inches of ride height with the new springs and have perfect camber now. It's sad that the springs were $44 and the new rubber pads cost more than twice that....

Closer to being fully assembled....

This stuff has all been posted before I'm sure, but here's my experience with this project.
Parts List: (prices do not include shipping charges)
Amazon List:
Moog Lower Ball Joints - $55.64
Moog Tie Rod Ends - $45.64
Moog Variable Rate Rear Springs - $43.99
KYB Front Strut Cartridges - $72.80
KYB Strut Boots - $23.86
KYB Strut Mounts - $42.54
KYB Strut Bearings - $23.86
KYB Rear Shock kit (bumpstops) - $41.21
KYB Rear Shocks - $76.80
Prothane Total Kit (bushings) - $144.68
From MSA...
Cuzco Strut Tower Brace - $214.95
Parts store stuff:
Duralast Ceramic Brake Pads front and rear - $61.98
Remanufactured Rear Calipers - $159.98 (after core return)
Timken Front Hub Grease Seals - $11.38
Upper and lower OEM rear coil insulators - $100
One pair of OEM rear control arm bushings (because I inadvertently cut them out of one of the A- arms before realizing I needed the sleeves - $32.82
Grand Total: $1152.13. Add sales tax and shipping to all this stuff and it's north of $1200.
So I started with a rust free 1985 300ZX NA car with 104k on the clock. This is a dry AZ car. For you guys who do this job on rusty cars, that's all you. I wouldn't even try it.
Here's the initial parts pile. Not everything is there....
Old rear setup. All bone stock with sagging springs and a set of ancient Monroe shocks, one of which was completely blown out.
Check out the awesome rotten bumpstops
Disassembly started. I did the rear first because it looked harder. I was right.
To remove the rear control arms there's a section of hard line attached to the arm itself, and the soft lines need to be removed from each end. Turns out I had a seized caliper on one side, and the rubber dust boots were shot, hence the need for new calipers. I was thankfully able to find the last set in Mesa, AZ at an O'Reilly's.
One side gutted, sans shock. The upper shock mount has to be unbolted inside the car. The rear speaker grill and speakers need to come out to get to the mounting bolts. I found it easier to drop the whole mount rather than just the shock, and then reassemble as a unit.
Arm is out! Pay attention to the bolts you take out. The inner mount has cam washers on it to set toe when the car gets aligned.
After applying much fire to the rubber bushings, I was able to push out the inner sleeve. I learned as I went that if I'd burned it longer, it would have fallen out. I used a 1 lb Coleman propane cylinder with a torch head to do the bushing burning.
So I have done bushings before on leaf spring setups, and you always had to remove the inner sleeve as well. Not so for the Prothane kit (whoops!). So I had to buy a couple new OEM bushings so I could salvage the sleeves. The rubber had to be burned out of these as well.
So here's an extra step that I did on the first arm that I didn't have to do on the second. Pressing the new sleeves into the arm. That took just about all my little 12 ton press had!
Nice shiny new rear sway bar end links from the Prothane kit. Note the cracking on the OEM rubber bushings.
So since I naturally have ADD (ha!), I figured I already had the rear speakers out, and popping off the door panels isn't that hard, so out with the old stock Hitachi 20w paper speakers and in with something that sounds much better. These are a good match to the Alpine 50w x 4 head unit I have.
So the stock rear spring seats were shot, so a call to Motorsports procured me some NOS pieces....
What do you think....Was it a good decision?
Same for the shock bumpstops....
Rear shocks assembled and ready to install
Passenger side arm back in the car with new bushings
New rear coil. These Moogs were physically shorter than the stockers, but because they're progressives, the first 3 coils are more tightly wound and don't compress as much under the weight of the car. I gained back a couple inches of ride height with the new springs and have perfect camber now. It's sad that the springs were $44 and the new rubber pads cost more than twice that....
Closer to being fully assembled....
Thread Starter
Registered User
Joined: Jan 2015
Posts: 55
From: Mesa, AZ
A note on the half shafts....they don't necessarily have to come out, but getting them out of the way makes it a lot easier. There's 6 bolts holding them to the outer flange, and plan on these suckers being TIGHT! I had to use my foot to get them broke loose...To remove from the diff, a prybar works to pop them loose. To reinstall, you need to smack them into the rear diff (a dead blow hammer works well, and monkey them around to get them to bolt up to the flange. It's easiest if the control arm is up in its compressed position when doing this rather than hanging all the way down.
Here's the shiny new rear ceramic pads...

Fully assembled. I would end up removing this caliper and putting on new ones once I discovered the one on the other side was hosed. I don't believe in replacing a single caliper....if one goes bad, I replace them in pairs.

OK, learning curve out of the way. I moved on to the other side and burned the bushings out and left the sleeves!

New bushings installed in driver side rear arm. Use the supplied grease liberally. A vice works well for squeezing them in. Then have fun getting that sticky nasty grease off your hands.....

Now fully assembled with new shiny calipers....


And finally, here's my junk pile from the rear half of the car.

So, the next day I tore into the front. Doesn't take long to gut the front.
- Remove the caliper first. I used a piece of wire and hung it from the fender brace out of the way so it wasn't hanging on the brake line. You'll need to remove the retainer clip on the strut housing to free the soft line from that.
- Break the tie rod jamb nut loose.
- Remove the hubcap, cotter pin, retainer, hub nut, washer, and slide the rotor and bearings off all as one unit. A repack is a good idea since you'll have it apart.
- Remove the sway bar
- Use a BFH to hit the spindle where the tie rod end goes through to pop it loose. Some guys like to use a pickle fork for this, but I never do.
- Remove the tierod end from the steering rack
- Unbolt the lower Control arm
- Remove the 3 nuts underhood to drop the strut, steering arm, and control arm with ball joint all in one chunk and move to your work bench.


I didn't get pics of separating the steering arm and control arm from the strut.
On the bottom of the strut there's 2 17mm bolts to remove the steering arm from it. Once you do that, you need to separate the steering arm from the ball joint. I used a ball joint press for this. Be careful when you do this...there's a lot of energy stored in that press when it pops loose and it can shoot it across the garage!
Once that's apart, remove the snap ring on the top of the balljoint, and press the balljoint out of the control arm.

Time for more fire....Burn out them front bushings.

To hone out any remaining rubber, I used a rudimentary method of a dremel with a cutoff wheel and pulled it back and forth inside to smooth up the inner sleeve. There are better tools for this, but this worked.

New ball joints need to be pressed in. If you don't have a shop press, most auto shops will do this for you for a few bucks. Once in, put the snap ring on, then the grease boot, and then bolt the steering arm back on. Also install those nice new pieces of Urethane. I used my vice to push those in.

Here's the shiny new rear ceramic pads...
Fully assembled. I would end up removing this caliper and putting on new ones once I discovered the one on the other side was hosed. I don't believe in replacing a single caliper....if one goes bad, I replace them in pairs.
OK, learning curve out of the way. I moved on to the other side and burned the bushings out and left the sleeves!
New bushings installed in driver side rear arm. Use the supplied grease liberally. A vice works well for squeezing them in. Then have fun getting that sticky nasty grease off your hands.....
Now fully assembled with new shiny calipers....
And finally, here's my junk pile from the rear half of the car.
So, the next day I tore into the front. Doesn't take long to gut the front.
- Remove the caliper first. I used a piece of wire and hung it from the fender brace out of the way so it wasn't hanging on the brake line. You'll need to remove the retainer clip on the strut housing to free the soft line from that.
- Break the tie rod jamb nut loose.
- Remove the hubcap, cotter pin, retainer, hub nut, washer, and slide the rotor and bearings off all as one unit. A repack is a good idea since you'll have it apart.
- Remove the sway bar
- Use a BFH to hit the spindle where the tie rod end goes through to pop it loose. Some guys like to use a pickle fork for this, but I never do.
- Remove the tierod end from the steering rack
- Unbolt the lower Control arm
- Remove the 3 nuts underhood to drop the strut, steering arm, and control arm with ball joint all in one chunk and move to your work bench.
I didn't get pics of separating the steering arm and control arm from the strut.
On the bottom of the strut there's 2 17mm bolts to remove the steering arm from it. Once you do that, you need to separate the steering arm from the ball joint. I used a ball joint press for this. Be careful when you do this...there's a lot of energy stored in that press when it pops loose and it can shoot it across the garage!
Once that's apart, remove the snap ring on the top of the balljoint, and press the balljoint out of the control arm.
Time for more fire....Burn out them front bushings.
To hone out any remaining rubber, I used a rudimentary method of a dremel with a cutoff wheel and pulled it back and forth inside to smooth up the inner sleeve. There are better tools for this, but this worked.
New ball joints need to be pressed in. If you don't have a shop press, most auto shops will do this for you for a few bucks. Once in, put the snap ring on, then the grease boot, and then bolt the steering arm back on. Also install those nice new pieces of Urethane. I used my vice to push those in.
Thread Starter
Registered User
Joined: Jan 2015
Posts: 55
From: Mesa, AZ
Now onto the strut rebuild.
Spring compressors are a must for this job. Air tools make this MUCH faster. Do note that this is the most dangerous part of this job. Make sure the compressors are hooked firmly to the spring. If they pop off, there's a lot of energy stored in that spring and it can break hands, fingers, wrists, arms....don't attempt this unless you're confident you're able to do this correctly.

The strut disassembly and reassembly is pretty straight forward. Once apart there's a big nut on top of the strut housing that holds the strut cartridge in place. Thankfully mine wasn't rusty and I was able to remove with a set of channel locks, but a pipe wrench might be a better tool if it's stuck real good. A replacement nut comes with the strut cartridge, so once it's off, it can be chucked.

Cartridge removed...only one side was crusty like this. The other wasn't. Weird.

You don't have to do the strut mount, but I'd recommend it. Note how collapsed my original is compared to the new one.

So, time to put it all back together again....pretty straight forward.


Sway bar goes on last....


So of course I have a junk pile from the front of the car too!

My final touch was the addition of the Cuzco strut tower brace. Hey, it looks cool, and these cars can all benefit from stiffening the chassis some.

Put the wheels back on, bleed the brakes, and get to an alignment shop immediately. My alignment specs all came in perfectly. The car drives great. No more rattles from worn tension rod bushings, no more wonky rear camber issues, no more rear bottoming, and cornering is nice and flat.
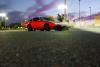
Finally a few shots of the car sitting on all its new parts.


Spring compressors are a must for this job. Air tools make this MUCH faster. Do note that this is the most dangerous part of this job. Make sure the compressors are hooked firmly to the spring. If they pop off, there's a lot of energy stored in that spring and it can break hands, fingers, wrists, arms....don't attempt this unless you're confident you're able to do this correctly.
The strut disassembly and reassembly is pretty straight forward. Once apart there's a big nut on top of the strut housing that holds the strut cartridge in place. Thankfully mine wasn't rusty and I was able to remove with a set of channel locks, but a pipe wrench might be a better tool if it's stuck real good. A replacement nut comes with the strut cartridge, so once it's off, it can be chucked.
Cartridge removed...only one side was crusty like this. The other wasn't. Weird.
You don't have to do the strut mount, but I'd recommend it. Note how collapsed my original is compared to the new one.
So, time to put it all back together again....pretty straight forward.
Sway bar goes on last....
So of course I have a junk pile from the front of the car too!
My final touch was the addition of the Cuzco strut tower brace. Hey, it looks cool, and these cars can all benefit from stiffening the chassis some.
Put the wheels back on, bleed the brakes, and get to an alignment shop immediately. My alignment specs all came in perfectly. The car drives great. No more rattles from worn tension rod bushings, no more wonky rear camber issues, no more rear bottoming, and cornering is nice and flat.
Finally a few shots of the car sitting on all its new parts.

Thread Starter
Registered User
Joined: Jan 2015
Posts: 55
From: Mesa, AZ
Another one would go faster than the first now that I know all the ins and outs....that said, it's a full weekend of work assuming you have all your parts lined up and you aren't fighting lots of rust. On that note, I think I'll keep my day job...haha!

Thread Starter
Registered User
Joined: Jan 2015
Posts: 55
From: Mesa, AZ
Having blown out shocks doesn't help either...lol


Thread Starter
Registered User
Joined: Jan 2015
Posts: 55
From: Mesa, AZ
Nice. I went with mostly stock replacement stuff from KYB. Then again, I have a slow N/A car....
Interesting weld job on those LCAs....Hope that proves strong. I do like the idea of the rigid tension rods.
Interesting weld job on those LCAs....Hope that proves strong. I do like the idea of the rigid tension rods.

Registered User
Joined: Nov 2012
Posts: 8
Thanks for all of this...
I am finally turning my attention back to my Z after letting her sit for so long. This was already at the top of my list and with all you put here, I'm just that much more prepared for this.
I'll clearly have to find a shop to press in those bushings but that seems like a must if you follow the ole 'while I'm in there' mentality...which I certainly do.
I'll clearly have to find a shop to press in those bushings but that seems like a must if you follow the ole 'while I'm in there' mentality...which I certainly do.

Thread
Thread Starter
Forum
Replies
Last Post
xcalib3r21
280ZX Brakes, Wheels, Suspension and Chassis
21
Mar 21, 2011 05:07 PM
BlueKitsune
280ZX Brakes, Wheels, Suspension and Chassis
29
Apr 4, 2009 07:35 PM
Bookmarks


