GF's 1982 280ZX Restoration
 03-24-2015, 08:40 PM
#1
Registered User
Thread Starter

Join Date: Jul 2014
Location: Marietta GA
Posts: 22
GF's 1982 280ZX Restoration
I figure it's time to introduce my self and start a thread on the girl friend's 280ZX restoration. My main area of experience is in mid 60's GM cars. I'm just finishing up a frame off restoration on a 1968 GTO. I have a very well equipped shop with just about any tool I might need to fabricate body panels. I have a English wheel, shrinker/stretcher, shears, sheet metal brake, MIG, TIG, Plasma and many other tools. Anyway my girl friend wants me to restore her car before I start another project for myself.
This is to be a high end restoration with the car being restored to as close to factory new as is possible.
My girl friend bought the car new in 1982 and has owned it since. The engine hydro-locked due to a failed head gasket about 20 years ago. The car had 180,xxx miles on it at that point. The car has sat outside and slowly deteriorated over the last 20 years.
The head gasket was replaced but the engine smoked and never ran right and she parked it a few hundred miles after the repair. All I remember is that it seized while she was driving and had to be towed to a shop.
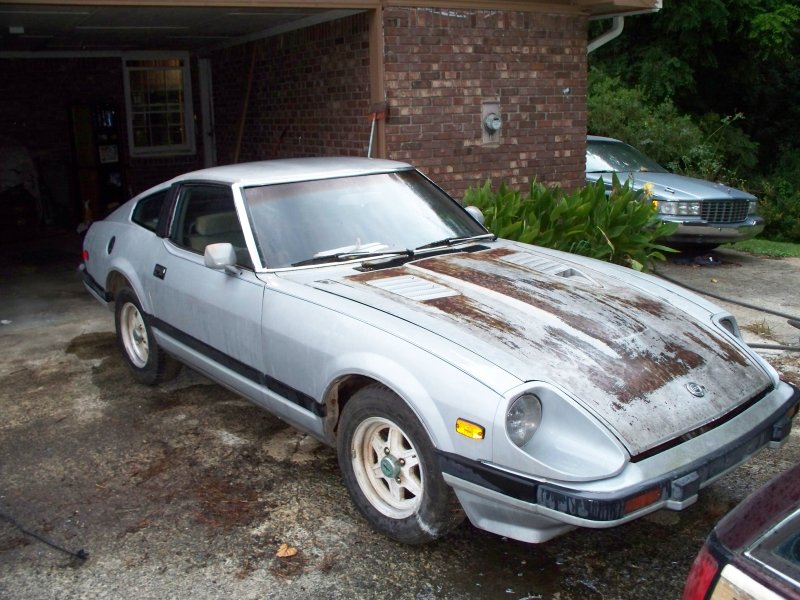
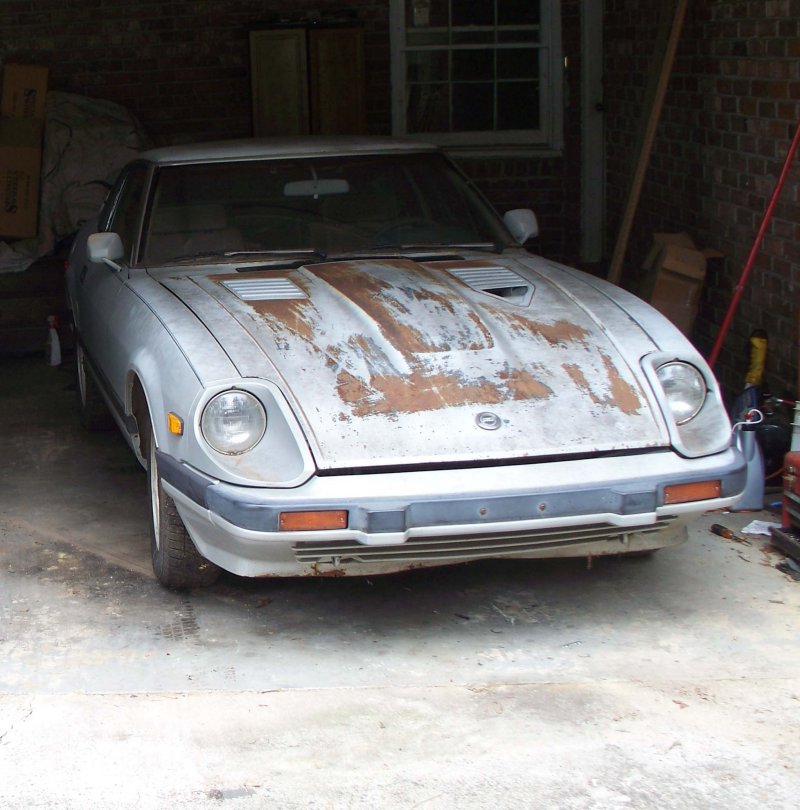
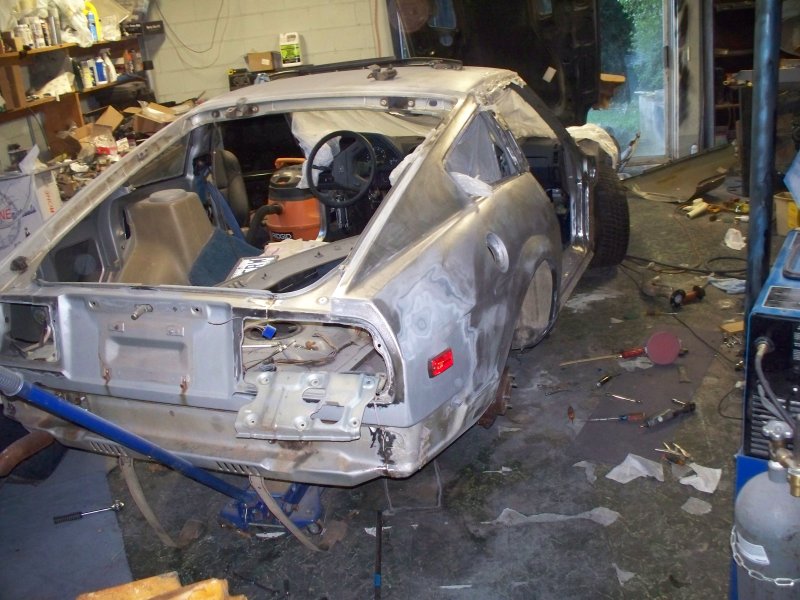
Now for some pictures of the car as it is now.
This is the best view
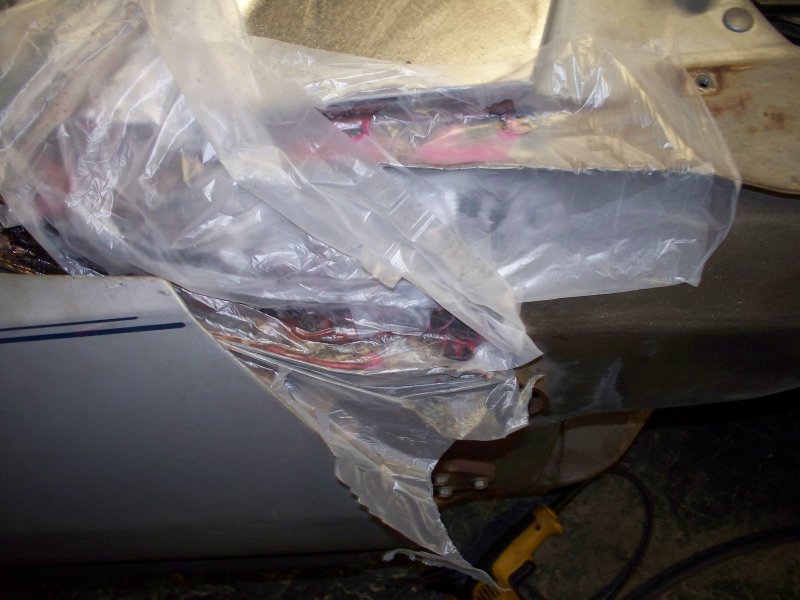
Not being able to find the rear window gasket I bought a replacement hatch at a local junk yard. Of course that gasket has now been reproduced. Anyway the $100 replacement saves a lot of time.
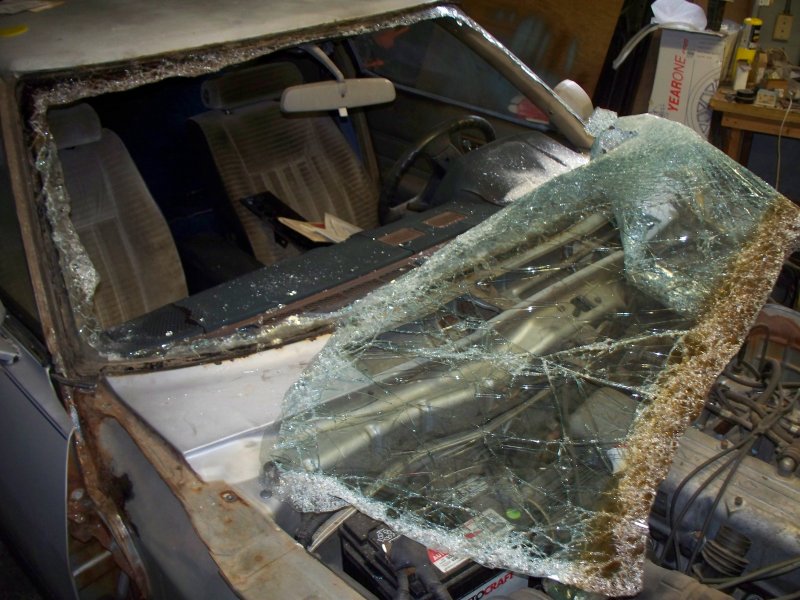
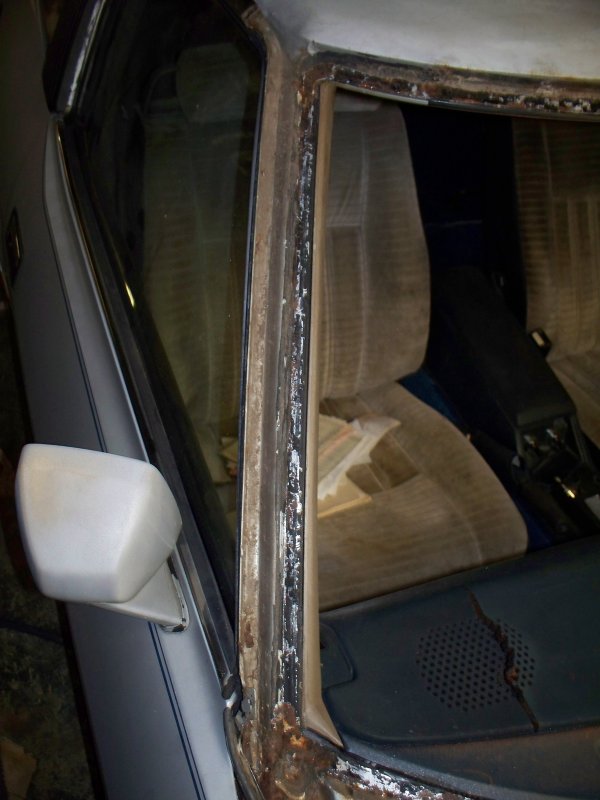
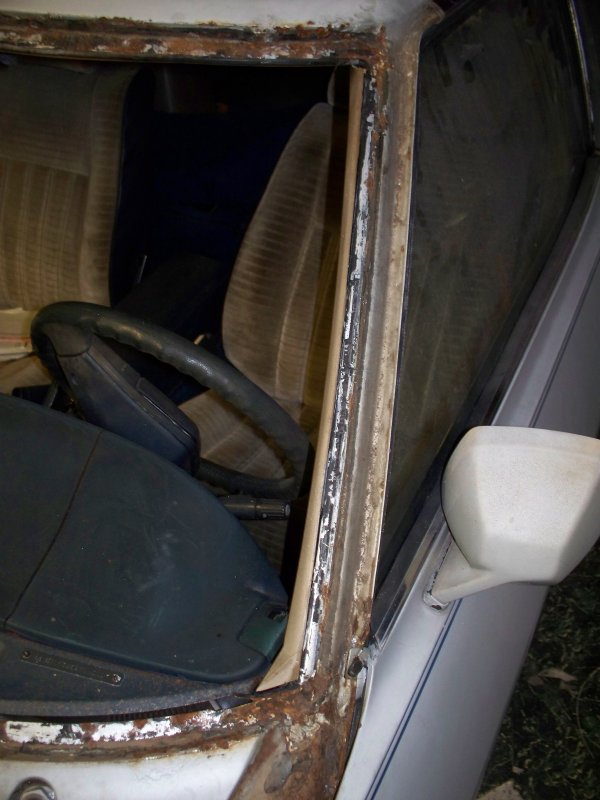
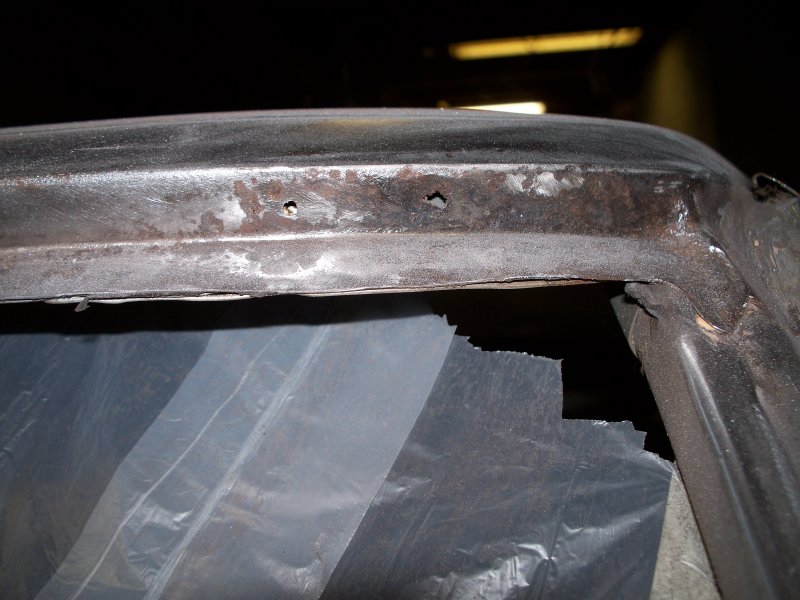
Windshield will have to come out to weld replacement metal along the entire top of the windshield.
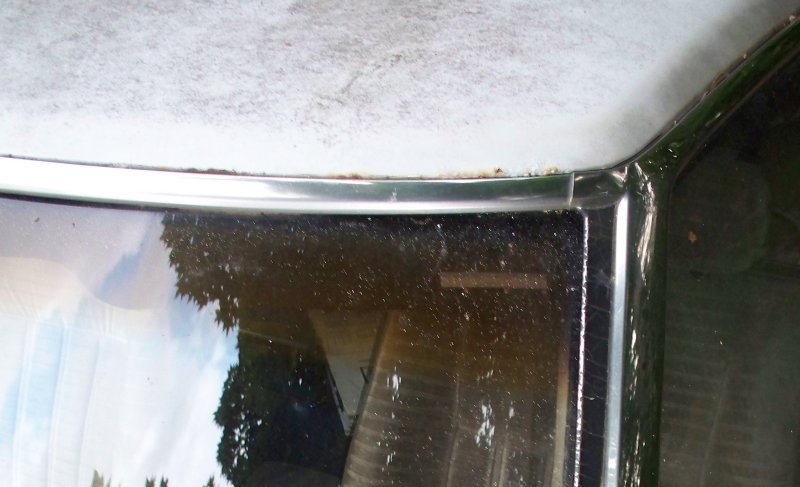
This should be repairable
Just Dashes gets another chuck of my money. GTO dash was the first
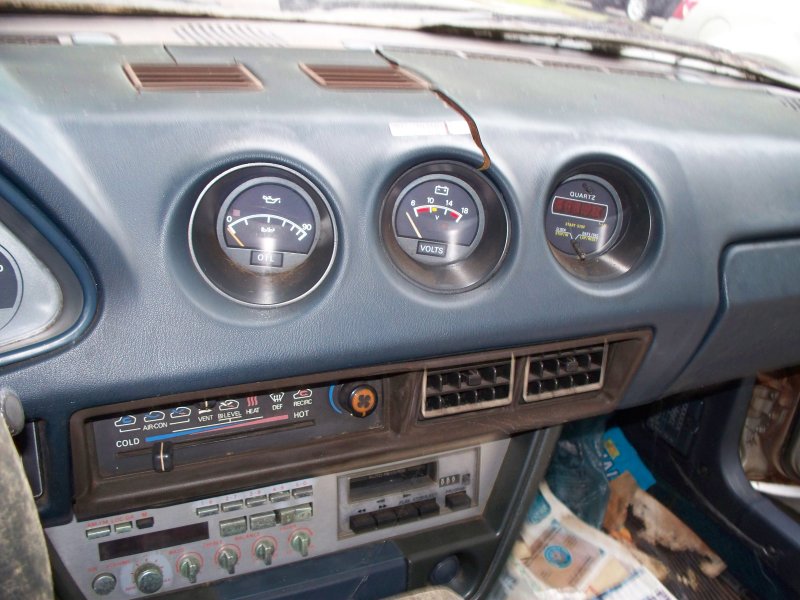
Dirty what else can I say
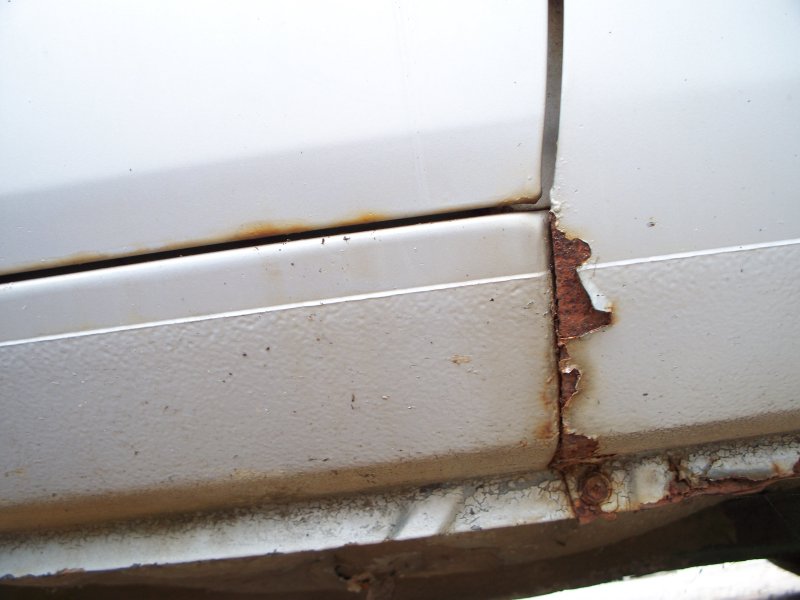
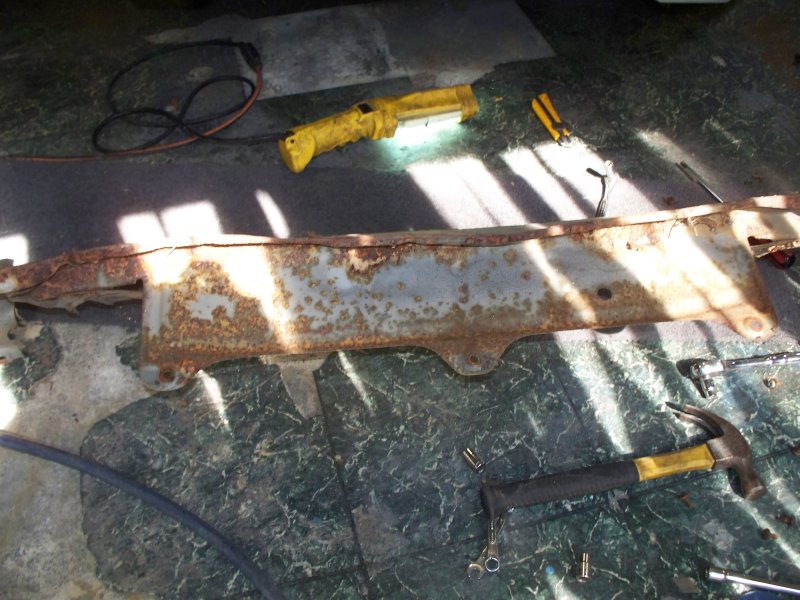
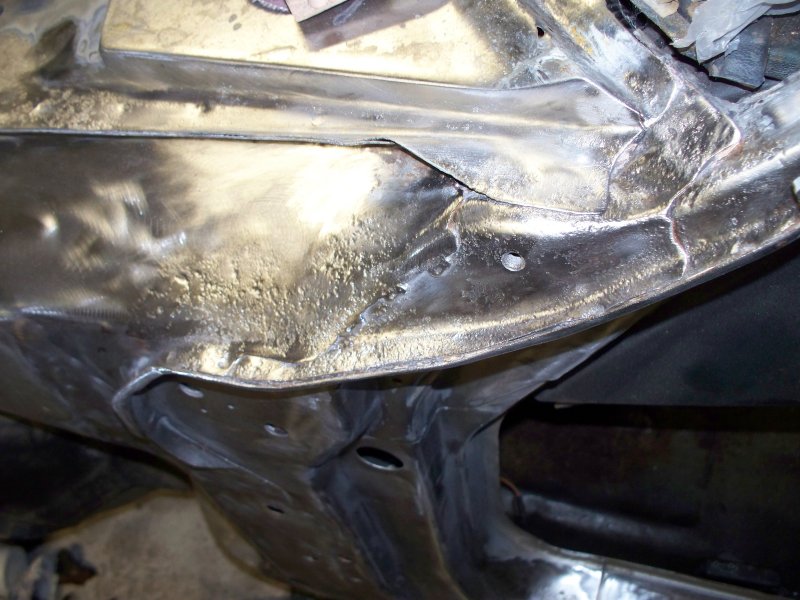
Front valence is both rusty and bent. Already acquired a aftermarket replacement.

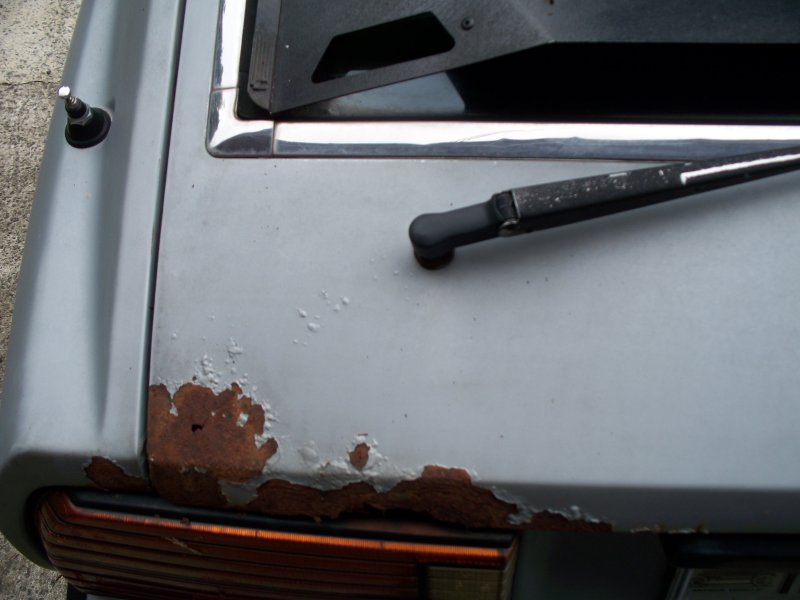
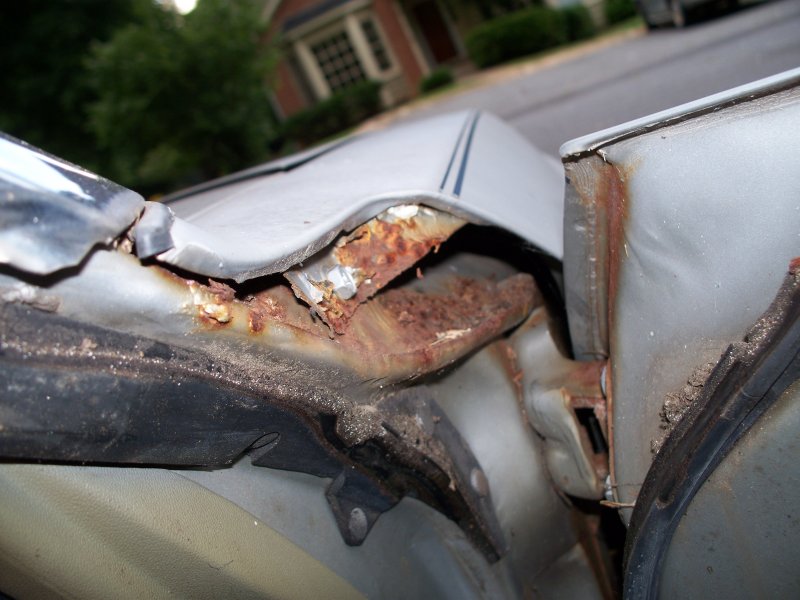
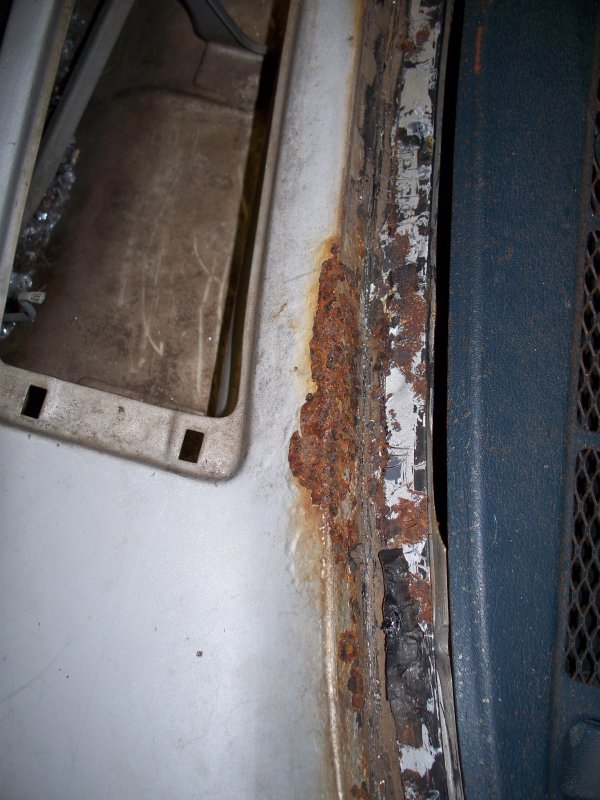
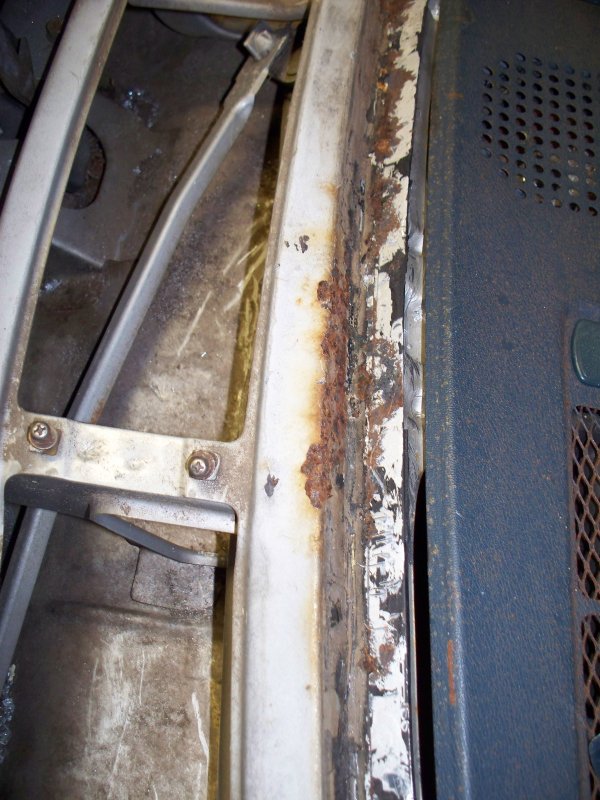
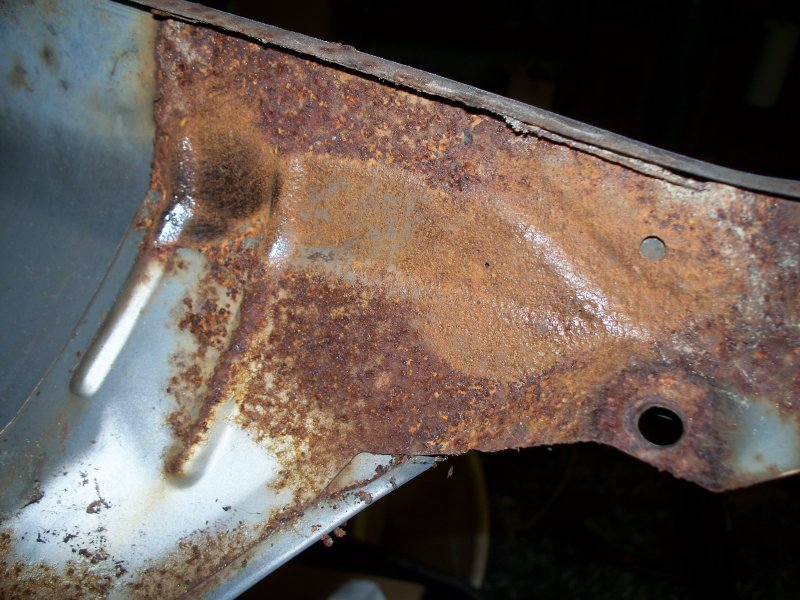
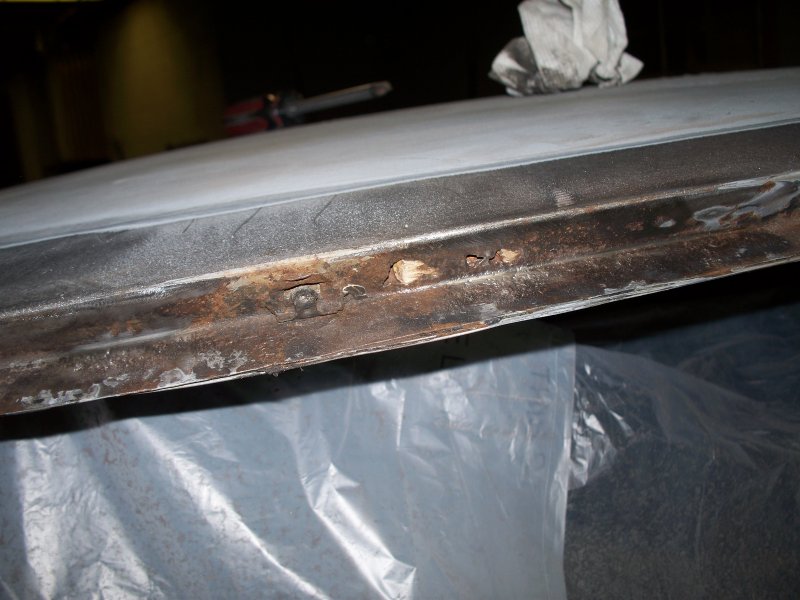
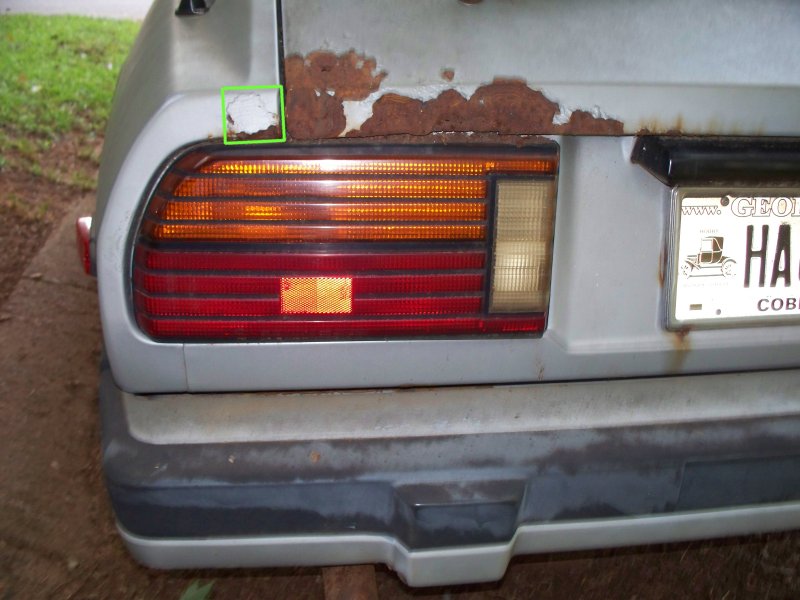
More rust to be repaired.

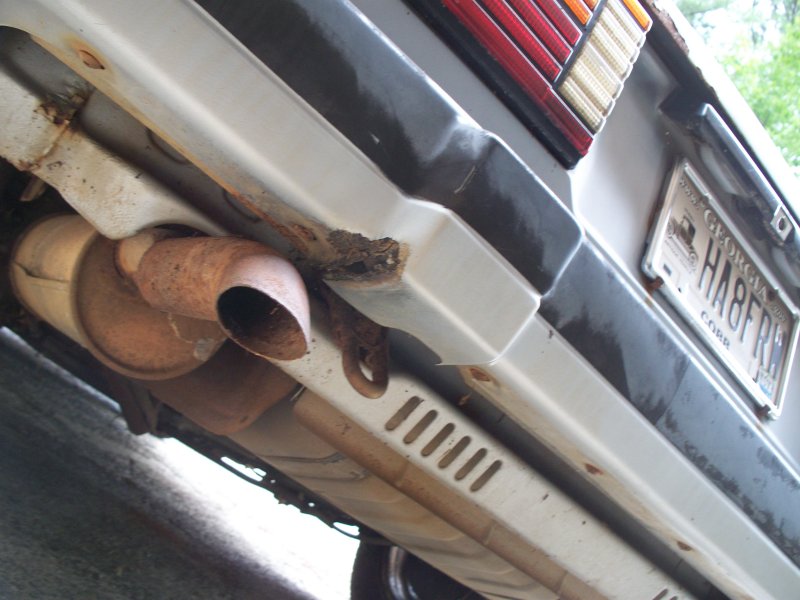
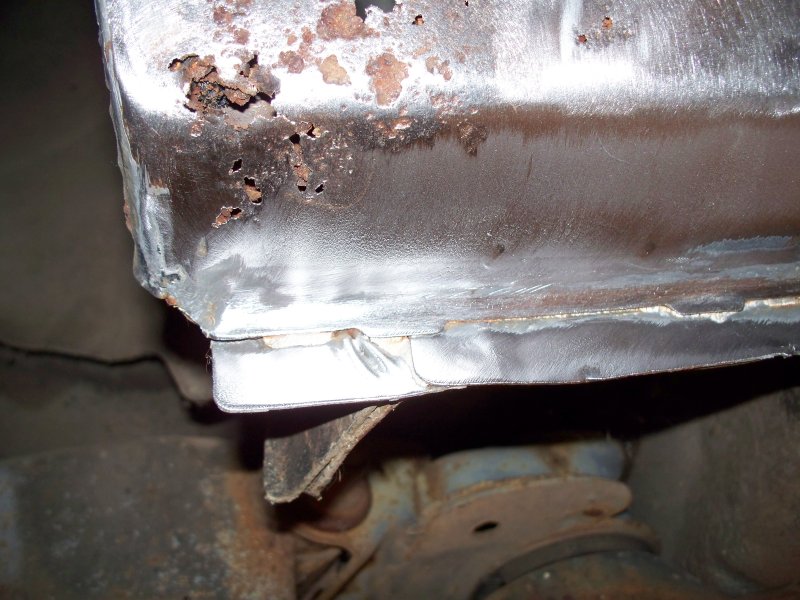
Rear bumper cover need repair.
More than a few people have tried to convince me to just buy my girl friend another 280ZX. This car has great sentimental value to her. She doesn't want another car just like it. Her 280zx was her favorite car, she liked it more than any car she owned before or after. however she does like her G35 coupe. She says it reminds her of the 280ZX.
For me the rust repair will just take time. It won't be expensive. I can generally butt weld sheet metal so good that filler is not required and it is impossible to tell where the metal was joined. This type of work however does take a lot of time. I will show the procedures while I am making the repairs.
I should be pulling the 280zx in my shop in a few weeks to start the restoration. I need to repaint the hood of my GTO first. Don't want all of the dust from the restoration in my shop before I repaint the hood. It should be warm enough for paint work within the next couple of weeks.
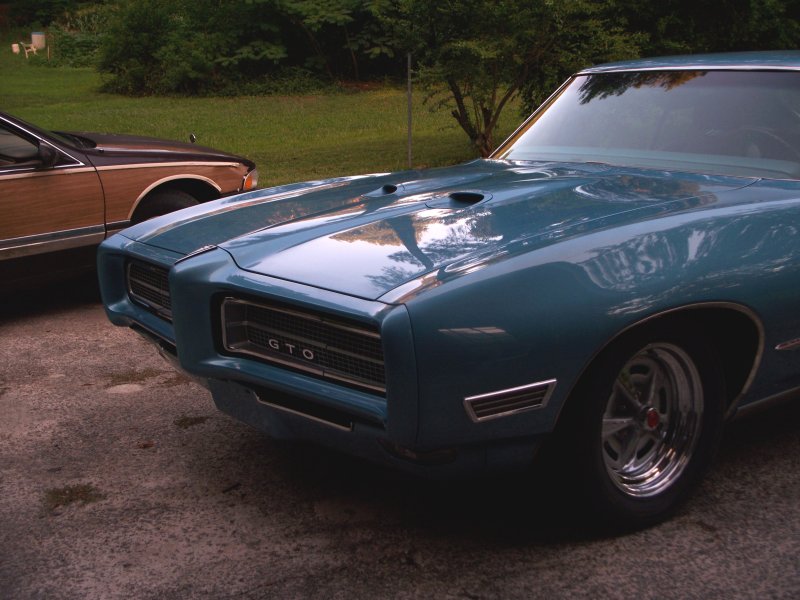
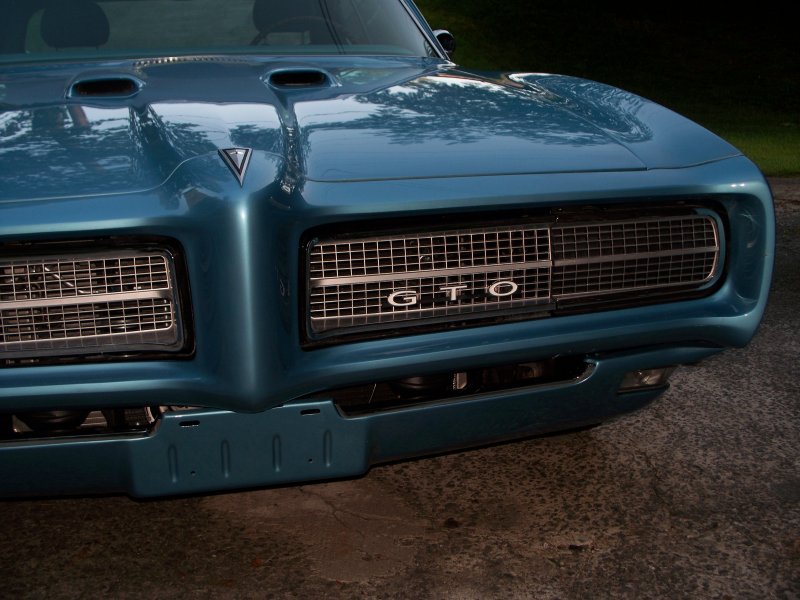
For those of you interested in other cars here is a couple of picture of the GTO. The LS3 engine was not liked by all on the Pontiac forum.
Purchased on Ebay. Replaced both quarter panels, hood, door repair along bottom, part of trunk lid fabricated and many other problems.
You can read about it here - LS3/4L70E into 68 Lemans - PY Online Forums
This is to be a high end restoration with the car being restored to as close to factory new as is possible.
My girl friend bought the car new in 1982 and has owned it since. The engine hydro-locked due to a failed head gasket about 20 years ago. The car had 180,xxx miles on it at that point. The car has sat outside and slowly deteriorated over the last 20 years.
The head gasket was replaced but the engine smoked and never ran right and she parked it a few hundred miles after the repair. All I remember is that it seized while she was driving and had to be towed to a shop.
Now for some pictures of the car as it is now.
This is the best view
Not being able to find the rear window gasket I bought a replacement hatch at a local junk yard. Of course that gasket has now been reproduced. Anyway the $100 replacement saves a lot of time.
Windshield will have to come out to weld replacement metal along the entire top of the windshield.
This should be repairable
Just Dashes gets another chuck of my money. GTO dash was the first
Dirty what else can I say
Front valence is both rusty and bent. Already acquired a aftermarket replacement.
More rust to be repaired.
Rear bumper cover need repair.
More than a few people have tried to convince me to just buy my girl friend another 280ZX. This car has great sentimental value to her. She doesn't want another car just like it. Her 280zx was her favorite car, she liked it more than any car she owned before or after. however she does like her G35 coupe. She says it reminds her of the 280ZX.
For me the rust repair will just take time. It won't be expensive. I can generally butt weld sheet metal so good that filler is not required and it is impossible to tell where the metal was joined. This type of work however does take a lot of time. I will show the procedures while I am making the repairs.
I should be pulling the 280zx in my shop in a few weeks to start the restoration. I need to repaint the hood of my GTO first. Don't want all of the dust from the restoration in my shop before I repaint the hood. It should be warm enough for paint work within the next couple of weeks.
For those of you interested in other cars here is a couple of picture of the GTO. The LS3 engine was not liked by all on the Pontiac forum.
Purchased on Ebay. Replaced both quarter panels, hood, door repair along bottom, part of trunk lid fabricated and many other problems.
You can read about it here - LS3/4L70E into 68 Lemans - PY Online Forums
 03-24-2015, 09:00 PM
#2
Registered User
Join Date: Aug 2013
Posts: 1,103
Welcome to ZDriver! 
Great Z project, lots of work to do. Keep us updated - and definitely share your secrets and short cuts on the body stuff! You definitely know your beans there.
Cheers and welcome! Should be a great thread.
Great Z project, lots of work to do. Keep us updated - and definitely share your secrets and short cuts on the body stuff! You definitely know your beans there.
Cheers and welcome! Should be a great thread.
03-24-2015, 10:16 PM
#3
Registered User
Thread Starter
Join Date: Jul 2014
Location: Marietta GA
Posts: 22
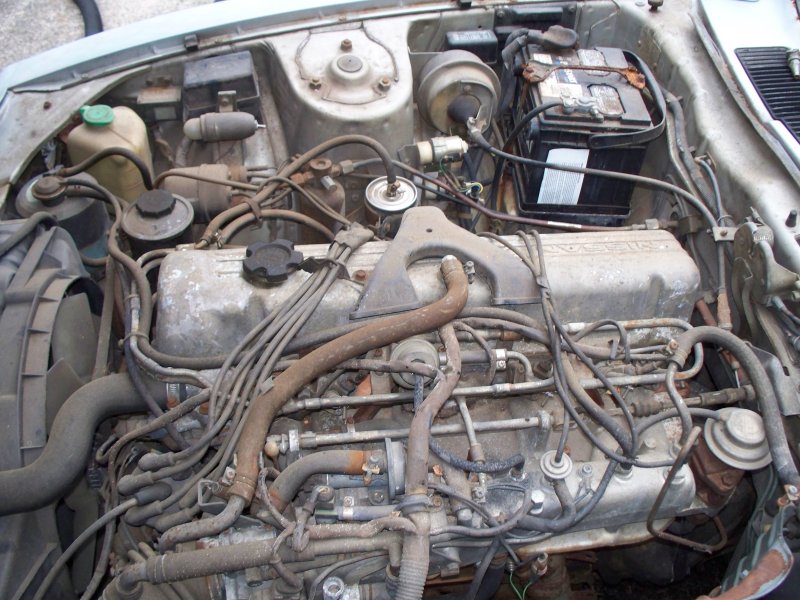
Here is some of the issues I have had so far.
Had the car towed to my house. Didn't even try to start it. One of the wheels war locked up, Pad was rusted to the rotor. The tow truck driver of course pulled the car on the flat bed, but we had quite a bit of trouble getting it off. Sprayed a whole can of WD40 on it, hit it with hammer and finely broke it loose. Now at least I can roll it around. It's still very hard to move and I'm not as strong as I once was so I use my Buick station wagon to pull the car out of the garage and to push it back in.
A few weeks later I bought a battery. Engine is not locked and will turn over.
I don't hear the fuel pump and I remember you could even hear the pump with the engine running. Got out my volt meter and found voltage to the pump, so pump is seized. Sprayed starting fluid in engine. Would run for a few seconds.
Ordered a close out special fuel pump from Rock Auto. Removed the OEM pump and used a vacuum pump to pull fuel from the tank. The junk that came out was darker than engine oil. Tried to order replacement tank and found out they are not available new. So I guess I will have to restore the existing tank. In the mean time I have flushed some of the junk out and installed a inline filter between the tank and the new fuel pump.
Attempt to start the engine. No start. Check fuel pressure. Only have 10 PSI, Don't know the correct pressure, but I'm guessing it to be near 40. Find out that there is too much air in the inline filter. Get some more of the air out and I read about 34 PSI. Should be good enough to start the engine.
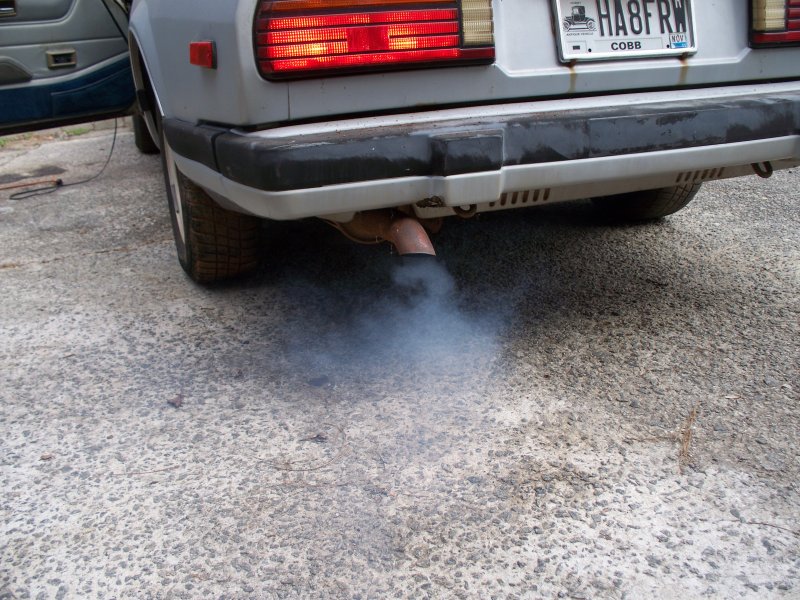
Several attempts to start with no luck, sounds like its trying to fire, not quite good enough. Spray some starting fluid in the intake tube and try again. Finally got it to fire. Holding my foot to the floor it is barely running. After about 30 seconds it seems to run a little faster but is still very rough. A little longer and the RPM is building from 1500 rpm toward 3000. Still rough though. A bit longer and its hitting near 4000 rpm and when I release the throttle it will idle very rough around 1000 rpm.
At least its running now. However there is a big cloud of smoke thick enough to hide in. With some more running the smoke is greatly reduced but is still present.
Stop for the day.
Another day - start engine, somewhat difficult but it does start, blows smoke and now making a much louder clicking under the valve cover. Stop for the day, this run was to show GF that engine would run.
Another day with some time to check things. Cranked car and pulled it out of garage under its own power. Clicking still louder. Change plugs. Crank engine. Not really running good. Decide to check compression.
Compression 140 142 136 147 144 168.
I don't think cylinder #6 the 168 is getting fuel. I had run a small amount of Sea foam through the engine before checking the compression and the #6 plug was clean and showed no evidence of firing. There was still some liquid sea foam in the tip of the plug. The other plugs were almost oil fouled. #6 is probably high because of some liquid sea foam being present in the cylinder.
This is what one of the plugs looked like. The others are similar.
This is constant smoke that the car produces. This is the least that it produces. If you rev the engine you could hide a battle ship.
Dummy me forgot that I have an inspection camera and could have looked in the cylinders when I had the plugs out. Something to do another day.
Clicking is very loud at this point. Take valve cover off. There is at least 1/8" clearance between rocker arm and valve stem on two valves. I'm not familiar with the workings of the zx valve train system.
I don't have a feeler gauge since I don't generally do this type of work. Ordered one, should be in before I can work on car again. I will make an attempt to adjust the valves.
On the smoke, my guess is all of the valve seals are bad. I acquired the gasket set for the mechanic that did installed the head gasket. I believe he told me he replaced all of the seals with the ones in the gasket set. Maybe all of the seals in the gasket set were of poor quality and failed.
Guys I winging the engine work, as I know almost nothing about the Nissan. If any you have suggestions, I'm all ears. I'm sure my GF would prefer too keep her original engine if possible. At the very minimum I would think the head would have to be pulled for some inspection work.
Had the car towed to my house. Didn't even try to start it. One of the wheels war locked up, Pad was rusted to the rotor. The tow truck driver of course pulled the car on the flat bed, but we had quite a bit of trouble getting it off. Sprayed a whole can of WD40 on it, hit it with hammer and finely broke it loose. Now at least I can roll it around. It's still very hard to move and I'm not as strong as I once was so I use my Buick station wagon to pull the car out of the garage and to push it back in.
A few weeks later I bought a battery. Engine is not locked and will turn over.
I don't hear the fuel pump and I remember you could even hear the pump with the engine running. Got out my volt meter and found voltage to the pump, so pump is seized. Sprayed starting fluid in engine. Would run for a few seconds.
Ordered a close out special fuel pump from Rock Auto. Removed the OEM pump and used a vacuum pump to pull fuel from the tank. The junk that came out was darker than engine oil. Tried to order replacement tank and found out they are not available new. So I guess I will have to restore the existing tank. In the mean time I have flushed some of the junk out and installed a inline filter between the tank and the new fuel pump.
Attempt to start the engine. No start. Check fuel pressure. Only have 10 PSI, Don't know the correct pressure, but I'm guessing it to be near 40. Find out that there is too much air in the inline filter. Get some more of the air out and I read about 34 PSI. Should be good enough to start the engine.
Several attempts to start with no luck, sounds like its trying to fire, not quite good enough. Spray some starting fluid in the intake tube and try again. Finally got it to fire. Holding my foot to the floor it is barely running. After about 30 seconds it seems to run a little faster but is still very rough. A little longer and the RPM is building from 1500 rpm toward 3000. Still rough though. A bit longer and its hitting near 4000 rpm and when I release the throttle it will idle very rough around 1000 rpm.
At least its running now. However there is a big cloud of smoke thick enough to hide in. With some more running the smoke is greatly reduced but is still present.
Stop for the day.
Another day - start engine, somewhat difficult but it does start, blows smoke and now making a much louder clicking under the valve cover. Stop for the day, this run was to show GF that engine would run.
Another day with some time to check things. Cranked car and pulled it out of garage under its own power. Clicking still louder. Change plugs. Crank engine. Not really running good. Decide to check compression.
Compression 140 142 136 147 144 168.
I don't think cylinder #6 the 168 is getting fuel. I had run a small amount of Sea foam through the engine before checking the compression and the #6 plug was clean and showed no evidence of firing. There was still some liquid sea foam in the tip of the plug. The other plugs were almost oil fouled. #6 is probably high because of some liquid sea foam being present in the cylinder.
This is what one of the plugs looked like. The others are similar.
This is constant smoke that the car produces. This is the least that it produces. If you rev the engine you could hide a battle ship.
Dummy me forgot that I have an inspection camera and could have looked in the cylinders when I had the plugs out. Something to do another day.
Clicking is very loud at this point. Take valve cover off. There is at least 1/8" clearance between rocker arm and valve stem on two valves. I'm not familiar with the workings of the zx valve train system.
I don't have a feeler gauge since I don't generally do this type of work. Ordered one, should be in before I can work on car again. I will make an attempt to adjust the valves.
On the smoke, my guess is all of the valve seals are bad. I acquired the gasket set for the mechanic that did installed the head gasket. I believe he told me he replaced all of the seals with the ones in the gasket set. Maybe all of the seals in the gasket set were of poor quality and failed.
Guys I winging the engine work, as I know almost nothing about the Nissan. If any you have suggestions, I'm all ears. I'm sure my GF would prefer too keep her original engine if possible. At the very minimum I would think the head would have to be pulled for some inspection work.
03-24-2015, 10:52 PM
#4
Registered User
Thread Starter
Join Date: Jul 2014
Location: Marietta GA
Posts: 22
Thanks for the welcome zxguy1986. From my looking around the internet I don't see much hard core restoration work on ZX's. I found one thread in Australia where two guys were restoring a ZX and I can only say their methods were very crude. There are of course many ways to achieve good results and every restoration shop will have their own methods. That is not to say that one shop is right or one is wrong, just different ways to achieve one's goal. I hope I can present an acceptable way to achieve a high quality restoration. Hopefully I can persuade some of you to take on rust repairs on your z's. When I started the GTO project I had not done any sheet metal welding. I knew how to weld thick stuff but not sheet metal. In the beginning my sheet metal welding skills were just barely passable but with some practice I am able to produce butt welds that require no filler. That said, I use a very thin coating of filler over the entire car so I can get a ultra flat surface. It's almost impossible to get a shine like the one on my GTO without s skim coating of filler.
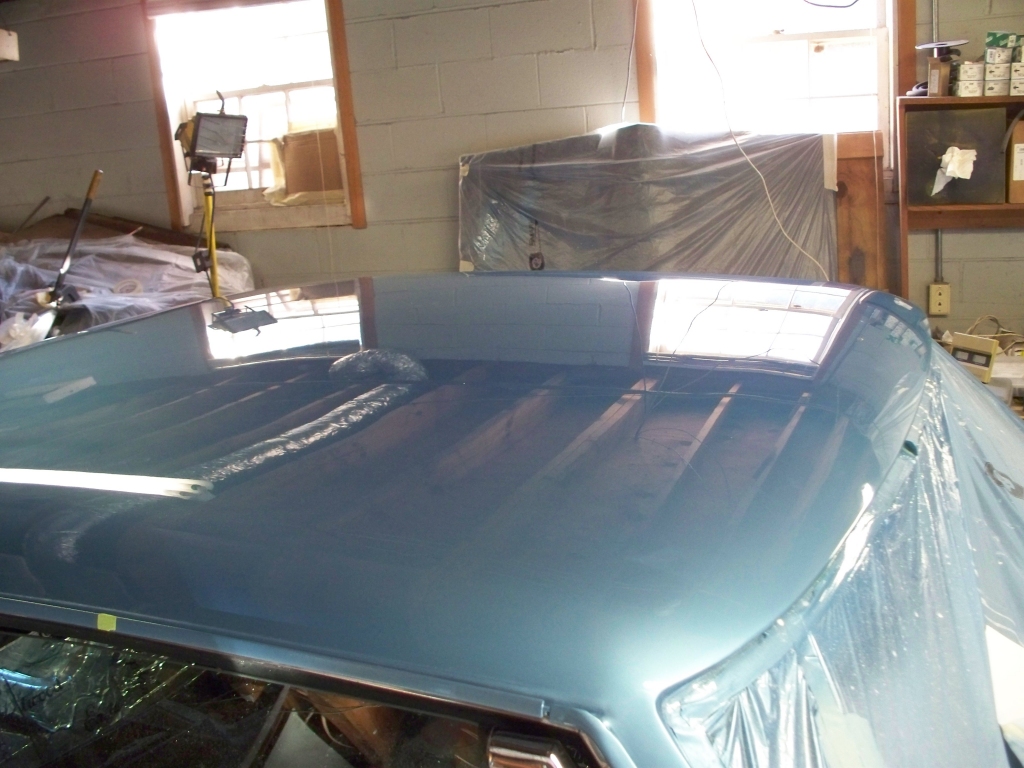
BTW this was before the clear was wet sanded and buffed. The reflection got even sharper after the cut and buff.
BTW this was before the clear was wet sanded and buffed. The reflection got even sharper after the cut and buff.
03-27-2015, 01:08 PM
#5
More Than Meets The Eye

Join Date: Feb 2005
Location: Mesa, Az
Posts: 5,120
Welcome to the forums, and thank you for sharing your projects with us. As for restoring 280zxs. I have four of them, and I daily drive one. It is also an '82 slicktop like your gf's. Was hers an original silver? And our interiors are almost identical, except her's is a silver and blue, and mine is a silver and black original. Although I will be converting it all to black down the road. I have all the interior parts to do it, minus the cracked dashboard which I will attempt to restore myself.
I to have a Pontiac, a '75 Firebird Trans Am clone. Basically I am cloning her to look like a '77 Trans Am. As it had the best interior and body parts in that year.
As for your '68 GTO, it is a sweet car. It is a shame that you didn't keep it Pontiac though. I have always been unhappy with the '69 Buick Skylark 350 big block engine that I put in my Firebird 11 years ago. That was what was available at the present time. And it saved me money, and got my Firebird alive again. But I have a '67 Pontiac big block 400 that I am going to build and put back in her in the future. My '83 280zx with T-tops is next to get running and going on the road. I have the engine all torn apart, just need to slowly gather the parts to rebuild the engine. Then after all that, my Firebird will get the restoration she has always deserved.
Don't want to rattle on too much. lol Good luck with your projects and stick around. A lot of friendly folks on this website.
Last edited by WildmaN; 03-27-2015 at 01:10 PM.
03-29-2015, 05:18 PM
#6
Registered User
Thread Starter
Join Date: Jul 2014
Location: Marietta GA
Posts: 22
Was hers an original silver?
It is a shame that you didn't keep it Pontiac though
Valve train noise.
Found the problem with the excessive clearance and noise.
Missing parts. Two valves were missing the guide.
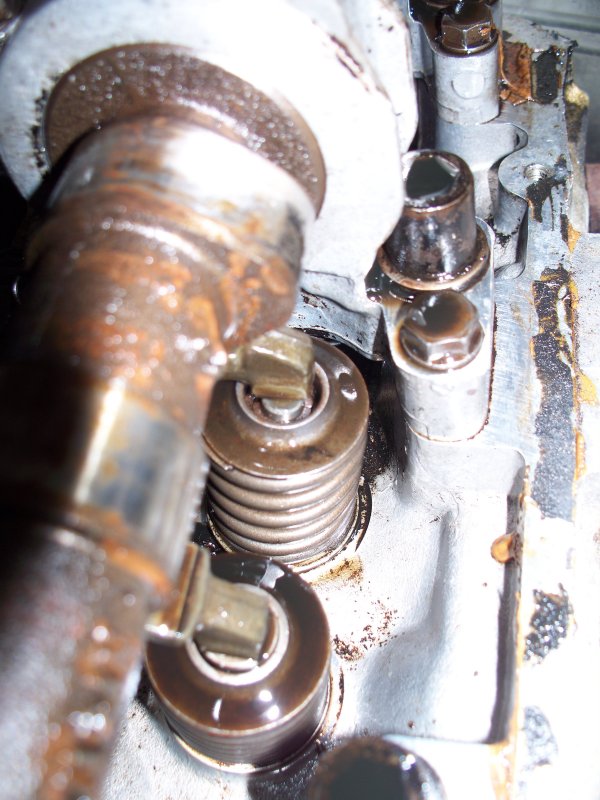
A little fishing found the missing parts

I didn't finish adjusting the valves. I need more tools. Don't have long metric wrenches and some gorilla tightened one of the locks so tight I couldn't break it loose. Anyway I won't try to run the engine again until the valves are adjusted. Some of the intakes have more than .030 clearance.
I have to say the cam looks shot. The top of the lobes are scored and cupped. Some of the lobes vary by .015 from the center to the edge.
04-16-2015, 12:53 PM
#7
Registered User
Join Date: Mar 2012
Posts: 39
In refrence to number 6 fouling, is your transmission fluid going disappearing? I had the same issue along time ago and I used anti fouling plugs, that temporarly solved the problem but my Trans fluid was disappearing. I ended up solving the problem, by changing the EGR valve. This may or may not be helpful to you.
I don't think cylinder #6 the 168 is getting fuel. I had run a small amount of Sea foam through the engine before checking the compression and the #6 plug was clean and showed no evidence of firing. There was still some liquid sea foam in the tip of the plug. The other plugs were almost oil fouled. #6 is probably high because of some liquid sea foam being present in the cylinder.
.
.
04-24-2015, 09:22 PM
#8
Registered User

Join Date: May 2014
Location: Texas
Posts: 137
Looks like time to pull the head. If you found the lash pads sitting in the head ide put money down that the valves are stuck or bent on that cylinder. A valve job on my 79 cost me 250$ awhile back. Just do it, and you can find another cam and rockers.
04-30-2015, 05:21 PM
#9
Registered User

Join Date: Jul 2013
Location: British Columbia
Posts: 30
Your experience starting it up sounds like mine: I picked up an 83' Turbo with a bad turbo. It sat for a couple years while I rebuilt the turbo, and when I finally got it running, I had to drain some bad gas, get some smoke clouds, very slowly get it to rev, and finally it idles and runs pretty happy by itself. Mind you, I don't have the broken bits... The smoking certainly sounds like it should be valve related!
06-21-2015, 01:08 AM
#10
Registered User

Join Date: Jun 2015
Location: Memphis Tenn
Posts: 3
Update on this car? I'm also knee deep in an 81 restoration and this thread has great potential. Once I get far enough along I will also start a resto thread. Don't want to lulz everyone asleep being progress is slow.
FYI if you search Zedd Findings the floorboards are available as well as the floor stiffeners (what some refer to as framerails). I imagine yours are rusted out as mine.
Black Dragon Auto offers rocker panels, lower door skin panels, etc. Keep us posted.
FYI if you search Zedd Findings the floorboards are available as well as the floor stiffeners (what some refer to as framerails). I imagine yours are rusted out as mine.
Black Dragon Auto offers rocker panels, lower door skin panels, etc. Keep us posted.
06-21-2015, 01:16 PM
#11
Registered User
Thread Starter
Join Date: Jul 2014
Location: Marietta GA
Posts: 22
Finishing the GTO has taken much longer than I though. Life and work got in the way. I just finished repainting the hood of the GTO. Should have GTO out of the shop shortly so I can start on the 280ZX.
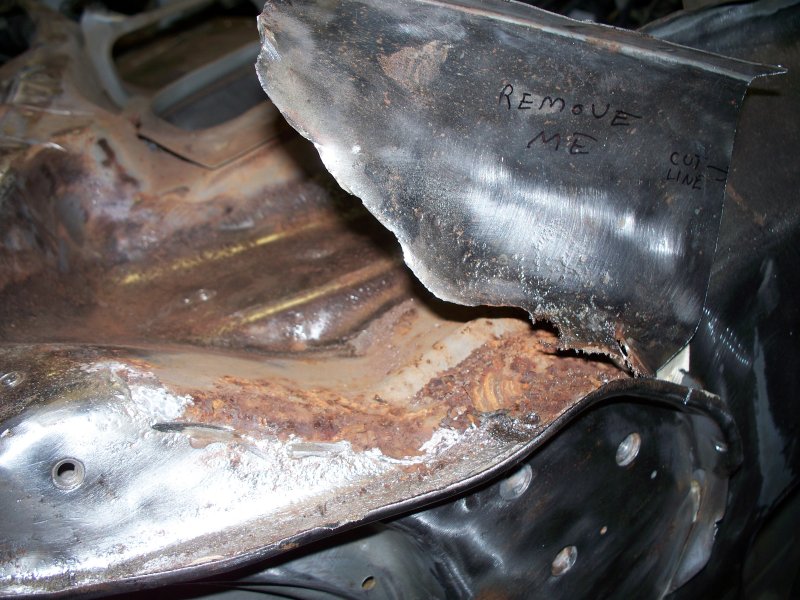
The frame rails are bent somewhat where someone used a floor jack to lift the car but they are not rusty. The only underside rust that I have found is a hole in the passenger side. Something that will be easy to make a patch and weld in. Most of the rust damage is up top. Bottom of the doors and metal around the front windshield. It would probably be easier to replace the cowl panel rather than fabricate replacement metal. I hope I can find a good one in a junk yard.
Actually I have been unable to find lower door patch panels anywhere. It looks like they used to be available but are no longer made. I'm basically lazy and would rather buy than make patch panels, but the lower door skin is a easy to form panel with an English wheel. (Which I have). The bottom of the door frame has rust holes, so this will have to be fabricated.
Parts that worry me the most are lack of door weatherstrip. I have to remove what's there to repair the doors. Can't weld around the weatherstrip and the weatherstrip is disintegrating.
The frame rails are bent somewhat where someone used a floor jack to lift the car but they are not rusty. The only underside rust that I have found is a hole in the passenger side. Something that will be easy to make a patch and weld in. Most of the rust damage is up top. Bottom of the doors and metal around the front windshield. It would probably be easier to replace the cowl panel rather than fabricate replacement metal. I hope I can find a good one in a junk yard.
Black Dragon Auto offers rocker panels, lower door skin panels
Parts that worry me the most are lack of door weatherstrip. I have to remove what's there to repair the doors. Can't weld around the weatherstrip and the weatherstrip is disintegrating.
06-21-2015, 08:03 PM
#12
Registered User
Join Date: Jun 2015
Location: Memphis Tenn
Posts: 3
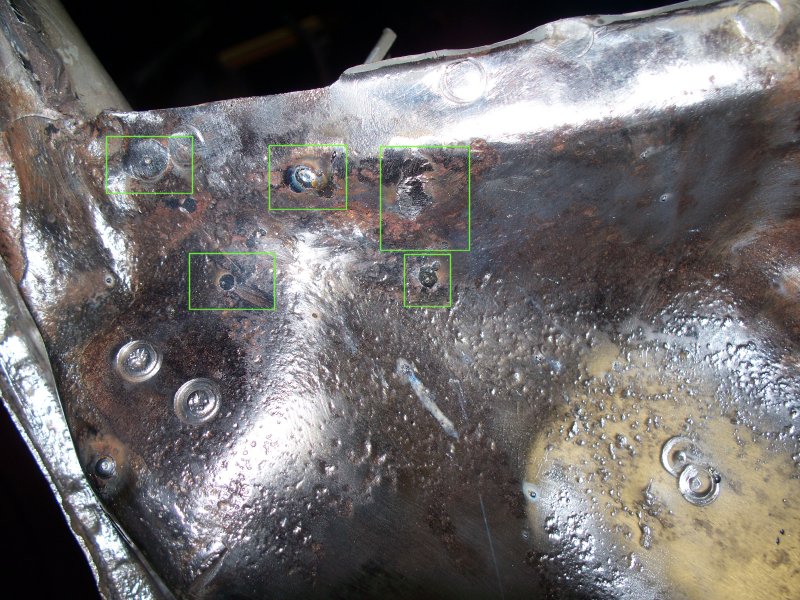
Might want to doublecheck the rails. Looking at your pictures you have rust in all the ususal areas that rust on these cars. I would be suprised if yours are not. There are floor plugs in both driver and pass. floorboards that give access to the rail from the inside. You could use your inspection camera and have a looksee.
When you say junkyard cowl panel you do realize that a ZX cowl is welded in as one piece, the top being part of the windshield pinchweld flange at the bottom.
Very cool that you have an english wheel, I don't know anyone including myself that has one in their garage, much less knows how to use it. You can stick a screwdriver through my rocker panel, so I was really hoping the panels shown in BDA catalog were available. Are you saying you have already contacted BDA and the lower door patch panels are NLA?
As far as the weatherstripping I have seen them available but expensive. zcarsource and motorsport auto come to mind. I wouldn't rule out zspecialties, either.
07-19-2015, 10:34 PM
#13
Registered User
Thread Starter
Join Date: Jul 2014
Location: Marietta GA
Posts: 22
I finally pulled the GTO out of the shop. It seemed to take a very long time for all of the final few things. Here are a couple of shots incase your interested. The hood and bumper had to be repainted.
Time to put the new patient in the shop. Had to pull it in with a cable puller. Couldn't get it to start. Not worth trouble shooting since it's getting a new engine.
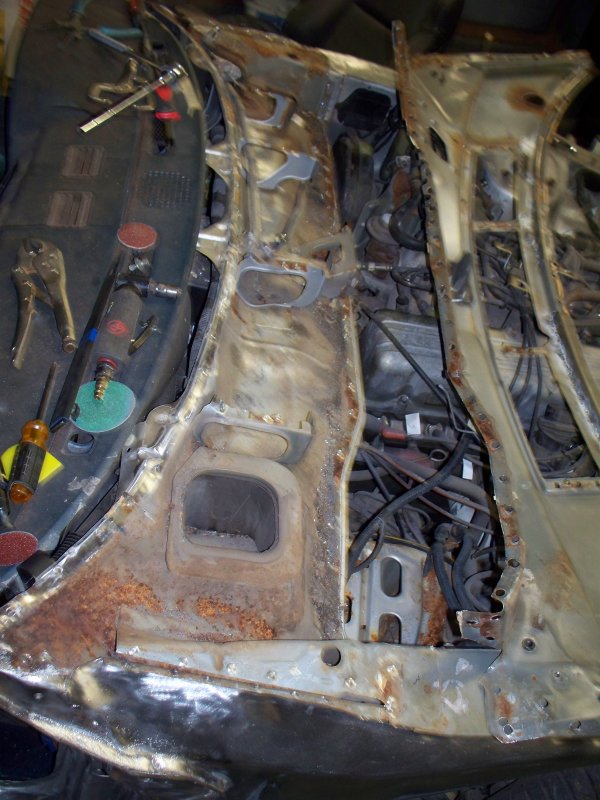
Started taking things apart.
Center valence shot. Have a replacement. Ends are good.
Windshield gone.
Windshield frame needs a lot of work.
Fenders need work. The bottom of both fenders needs patching and one of the has rusty bracing. I have located a new reproduction for the fender with bad bracing.
Some wire brushing shows pin holes.
Hood cleaned up good. Took about 40 sheets of DA paper 40,80 and 120 grit to clean hood up.
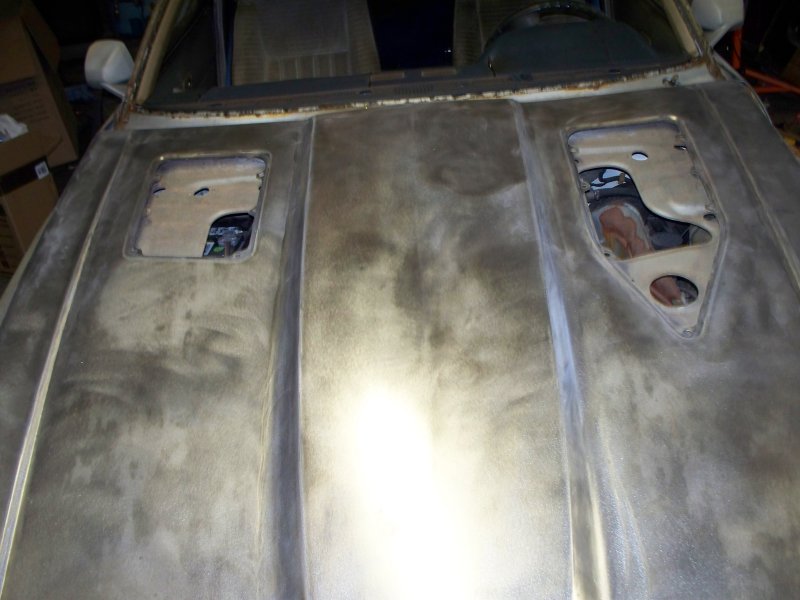
This is what it looked like before.
Many more updates to come.
Time to put the new patient in the shop. Had to pull it in with a cable puller. Couldn't get it to start. Not worth trouble shooting since it's getting a new engine.
Started taking things apart.
Center valence shot. Have a replacement. Ends are good.
Windshield gone.
Windshield frame needs a lot of work.
Fenders need work. The bottom of both fenders needs patching and one of the has rusty bracing. I have located a new reproduction for the fender with bad bracing.
Some wire brushing shows pin holes.
Hood cleaned up good. Took about 40 sheets of DA paper 40,80 and 120 grit to clean hood up.
This is what it looked like before.
Many more updates to come.
07-21-2015, 10:40 PM
#14
Registered User
Thread Starter
Join Date: Jul 2014
Location: Marietta GA
Posts: 22
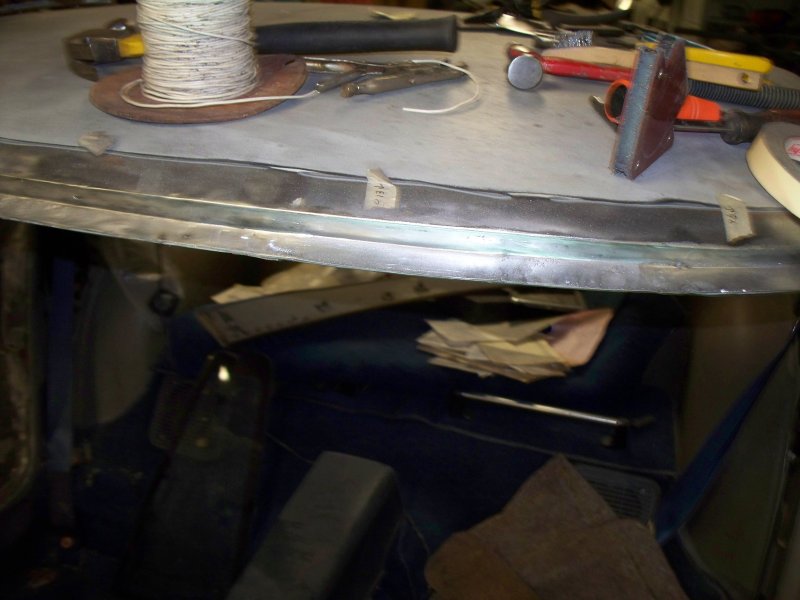
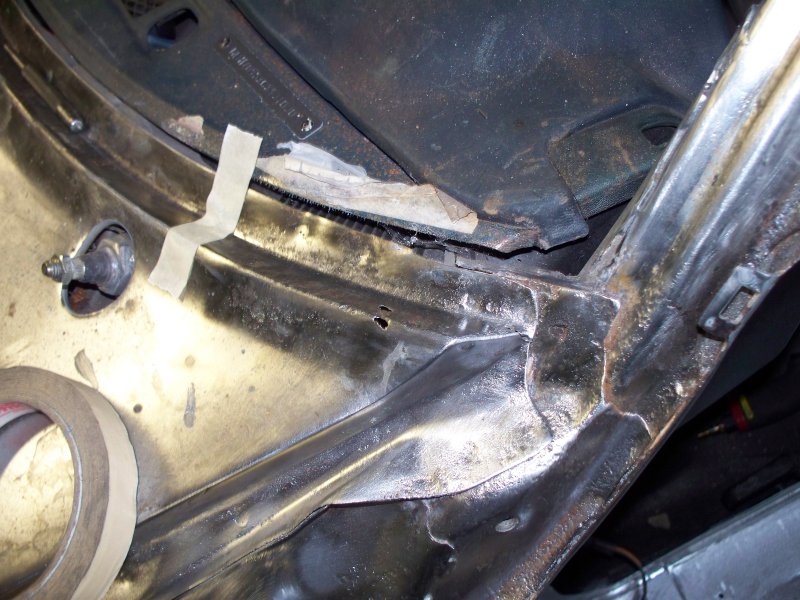
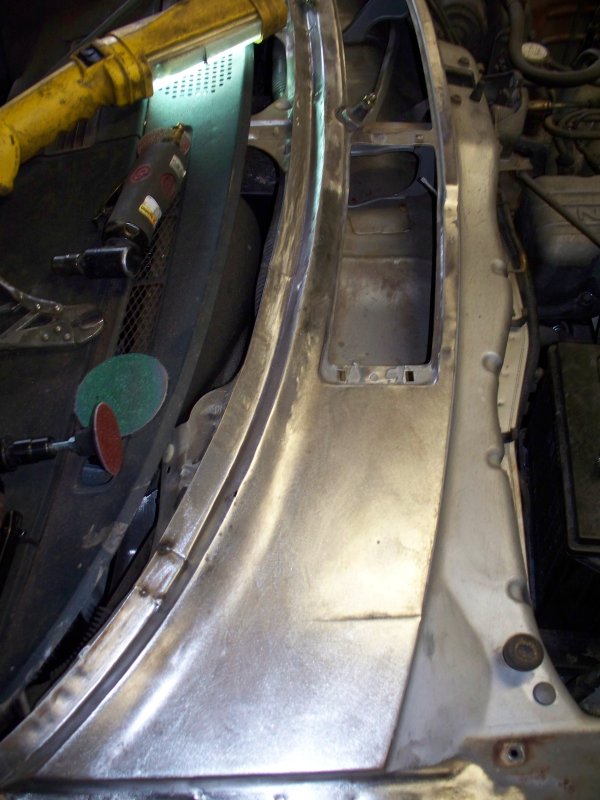
Started cleaning windshield frame today. Removed all interior trim and the head liner in preparation for welding.
At least the side frame is in good condition.
After using wire wheels, grinder, mini DA , and others tools, this is what I have.
The sides cleaned up very good.
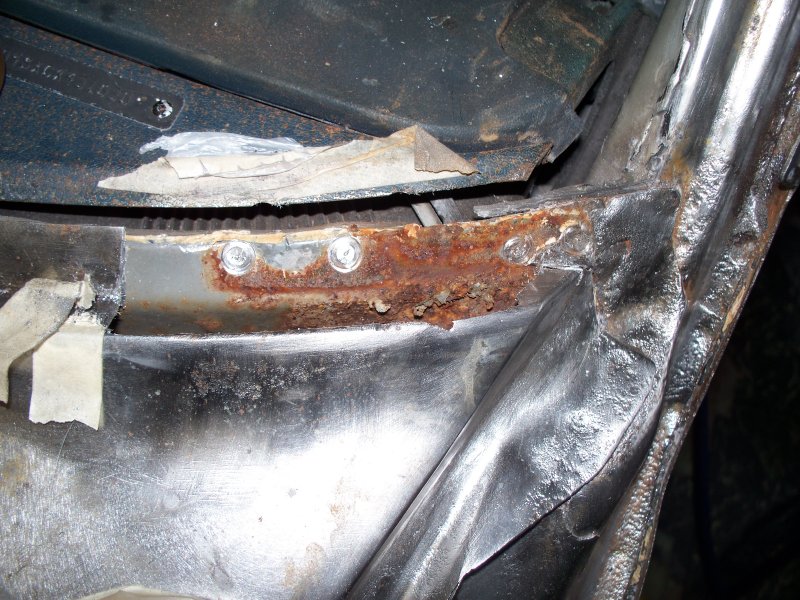
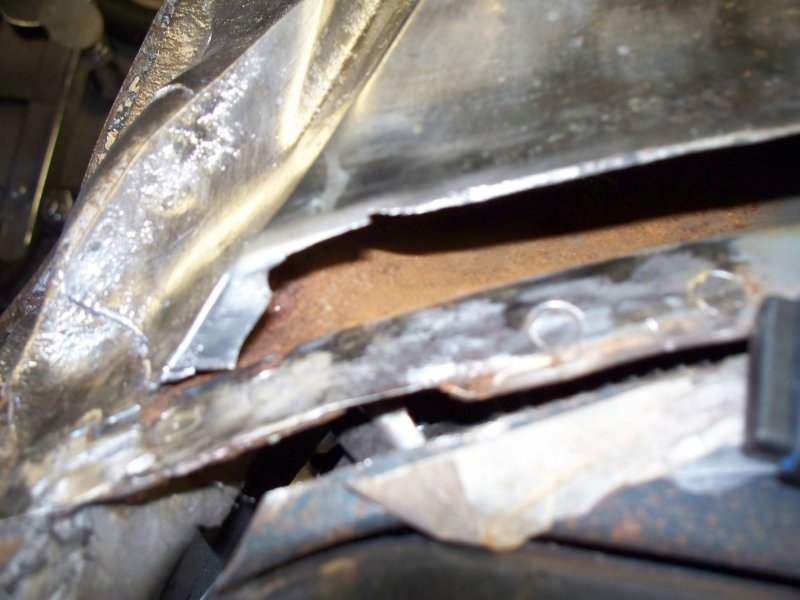
The top of the frame has deep pitting and several pin holes. It's hard to tell in the photo, but there is deep pitting in most of the frame. The photo looks better than the metal does.
No surprise, but the bottom looks bad.
I have to pick up some metal and start making new channels. Probably 70% of the top and bottom frame will be replaced.
The side of the cowl panel is not too bad, some pitting but not deep enough to warrant making patches. The solution is to remove as much rust from the pits as possible by sanding and or wire brushing and then using rust remover (Naval Jelly). It will probably take three or four treatments to get all of the rust out of the pits.
I put Naval Jelly on all of the dark areas, let it set for about 10 minutes, scrub with a wire brush, (a welding brush, tooth brush size) and then spread a little fresh Naval jelly and cover with plastic.
Naval jelly's instruction say to let set for 5 to 10 minutes and remove but it's hard to get the rust out of the pits with only 10 minutes, so I cover with plastic, keeps the Naval Jelly from drying out and then rinse off the next morning. Followed by going over the area with a wire brush (drill type) and then repeat until the bottom of the pits are completely rust free.
Media blasting is a quicker option, however it's messy when done inside and usually does not get all of the rust out of the pits. Although it's probably good enough.
At least the side frame is in good condition.
After using wire wheels, grinder, mini DA , and others tools, this is what I have.
The sides cleaned up very good.
The top of the frame has deep pitting and several pin holes. It's hard to tell in the photo, but there is deep pitting in most of the frame. The photo looks better than the metal does.
No surprise, but the bottom looks bad.
I have to pick up some metal and start making new channels. Probably 70% of the top and bottom frame will be replaced.
The side of the cowl panel is not too bad, some pitting but not deep enough to warrant making patches. The solution is to remove as much rust from the pits as possible by sanding and or wire brushing and then using rust remover (Naval Jelly). It will probably take three or four treatments to get all of the rust out of the pits.
I put Naval Jelly on all of the dark areas, let it set for about 10 minutes, scrub with a wire brush, (a welding brush, tooth brush size) and then spread a little fresh Naval jelly and cover with plastic.
Naval jelly's instruction say to let set for 5 to 10 minutes and remove but it's hard to get the rust out of the pits with only 10 minutes, so I cover with plastic, keeps the Naval Jelly from drying out and then rinse off the next morning. Followed by going over the area with a wire brush (drill type) and then repeat until the bottom of the pits are completely rust free.
Media blasting is a quicker option, however it's messy when done inside and usually does not get all of the rust out of the pits. Although it's probably good enough.
08-09-2015, 08:03 PM
#15
Registered User
Thread Starter
Join Date: Jul 2014
Location: Marietta GA
Posts: 22
I have the car somewhat disassembled now. My girl friend was freaked out weeks ago by her car being apart. She doesn't want to see it till it's back together. She doesn't even want to hear what I'm doing to it.
The sad thing is the transmission in my GTO failed with only 55 miles on it. Of course right after I pulled her car apart so I have no room in my shop for my car. I will have to pull my transmission in the garage. I will have to wait till mid September, I can't work in 90+ heat anymore.
Back to topic.
This is the result of using a phosphoric based acid cleaner on pitted metal. It takes a bit of work to achieve this result, but the effort is worth the result. There is no remaining rust in the pits and when primed with an epoxy primer, this area will not rust again. After applying primer, you can use filler to make the surface look smooth, if you wish. In some cases I didn't bother on my GTO, since after installing the rear window filler panel the rough metal could never be seen. However since this is the GF's car, it will get the full treatment.
There are many parts of the car that will require patches. This is the first patch I elected to make, mainly since I had a scrap of metal on hand that was about the right size and thickness.
I started cutting the rusty metal out.
Not enough, you need to get to rust free metal. In the end, I cut off the entire bottom of the quarter panel.
Cleaned up somewhat. This entire area will shot with epoxy primer, prior to welding the patch in.
Started forming the patch.
A little more bending
Test fit. Not too bad. I did make minor adjustments after this photo.
Ready for primer. The textured surface was produced by 120 grit DA. You need to give the primer something to stick to. Unfortunately you will have to wait to see the welding. My back got sore from taking the car apart and I need a few days to recover.
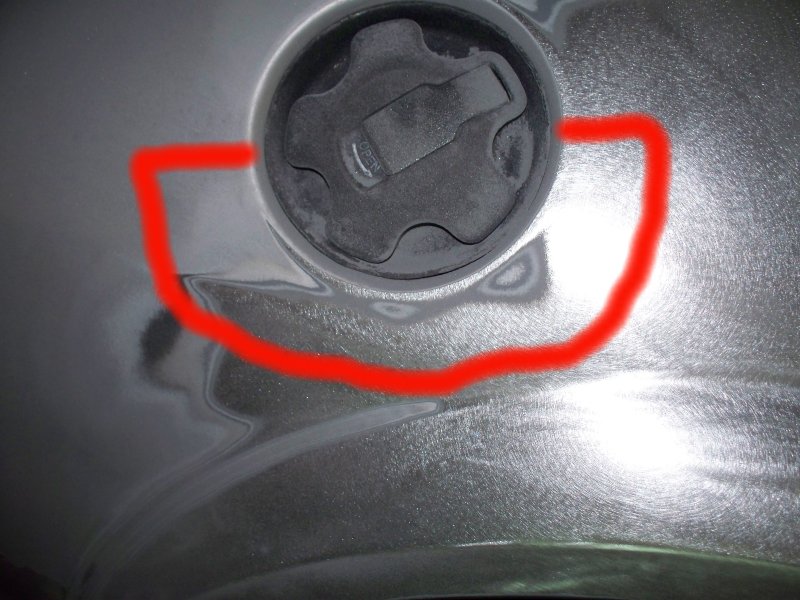
A rust spot under the gas filler. I hit it with a wire brush and a hole appeared. Not good. This is rust from the back side.
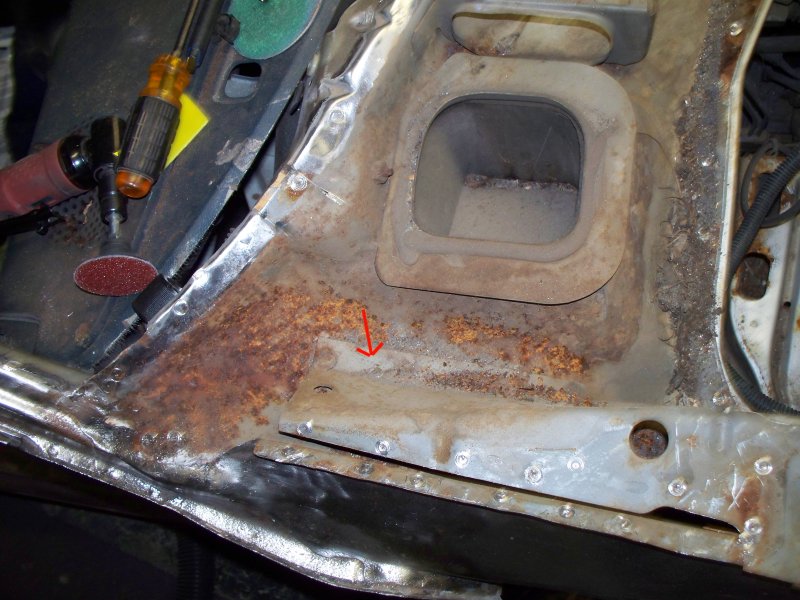
With my inspection camera I determined that I need to cut out an area marked by red.
Floor rust.
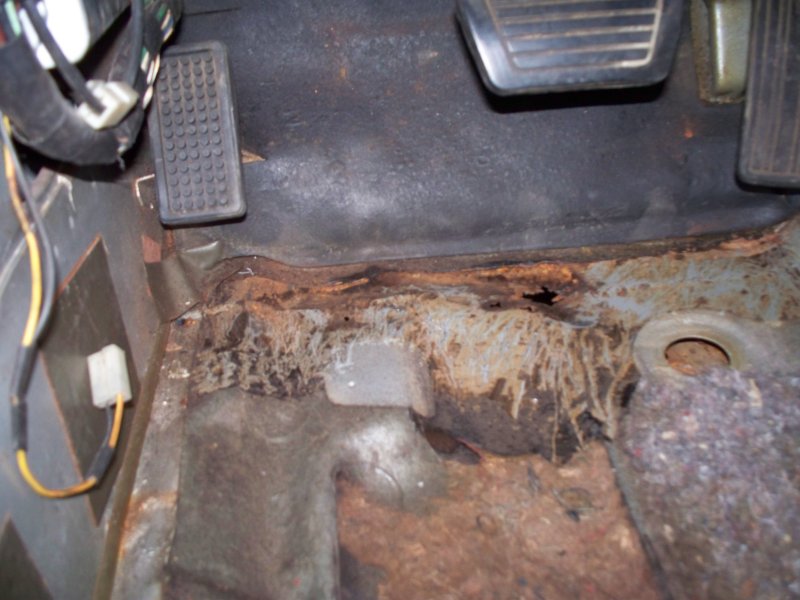
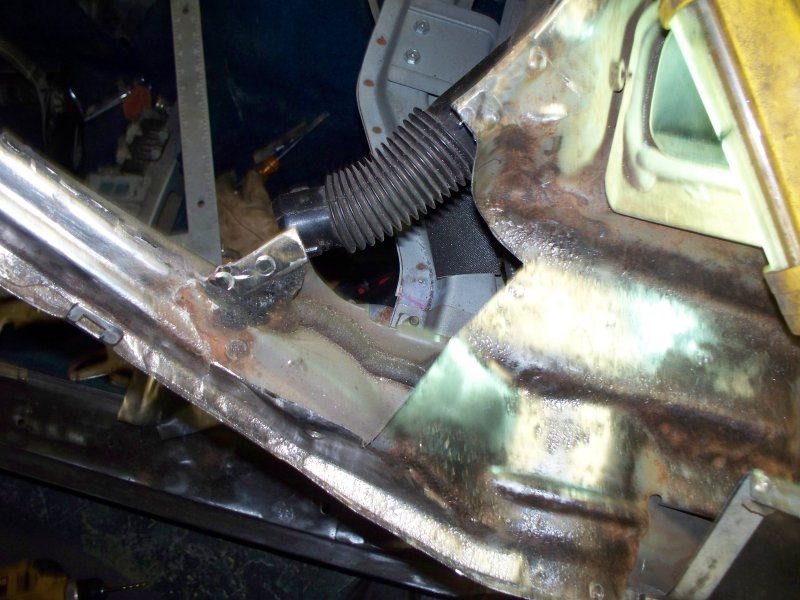
A view from below. The frame rail appears to have surface rust along the area where it was bent by a floor jack. I may cut that section out and weld in a patch.
That's it for tonight. I'll try to upload some more of my pictures tomorrow.
The sad thing is the transmission in my GTO failed with only 55 miles on it. Of course right after I pulled her car apart so I have no room in my shop for my car. I will have to pull my transmission in the garage. I will have to wait till mid September, I can't work in 90+ heat anymore.
Back to topic.
This is the result of using a phosphoric based acid cleaner on pitted metal. It takes a bit of work to achieve this result, but the effort is worth the result. There is no remaining rust in the pits and when primed with an epoxy primer, this area will not rust again. After applying primer, you can use filler to make the surface look smooth, if you wish. In some cases I didn't bother on my GTO, since after installing the rear window filler panel the rough metal could never be seen. However since this is the GF's car, it will get the full treatment.
There are many parts of the car that will require patches. This is the first patch I elected to make, mainly since I had a scrap of metal on hand that was about the right size and thickness.
I started cutting the rusty metal out.
Not enough, you need to get to rust free metal. In the end, I cut off the entire bottom of the quarter panel.
Cleaned up somewhat. This entire area will shot with epoxy primer, prior to welding the patch in.
Started forming the patch.
A little more bending
Test fit. Not too bad. I did make minor adjustments after this photo.
Ready for primer. The textured surface was produced by 120 grit DA. You need to give the primer something to stick to. Unfortunately you will have to wait to see the welding. My back got sore from taking the car apart and I need a few days to recover.
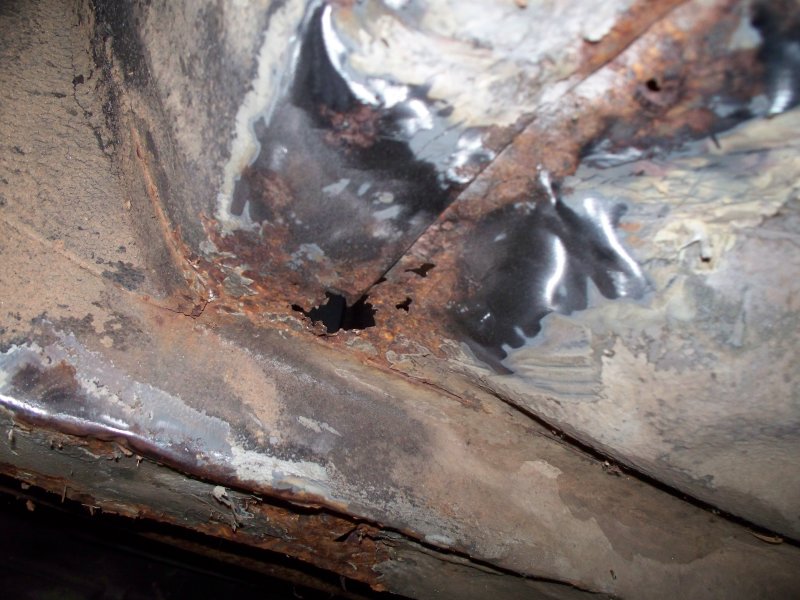
A rust spot under the gas filler. I hit it with a wire brush and a hole appeared. Not good. This is rust from the back side.
With my inspection camera I determined that I need to cut out an area marked by red.
Floor rust.
A view from below. The frame rail appears to have surface rust along the area where it was bent by a floor jack. I may cut that section out and weld in a patch.
That's it for tonight. I'll try to upload some more of my pictures tomorrow.
08-13-2015, 09:22 PM
#16
Registered User
Thread Starter
Join Date: Jul 2014
Location: Marietta GA
Posts: 22
I'm still sore from taking the car apart so I'm picking stuff to do that won't bother my back.
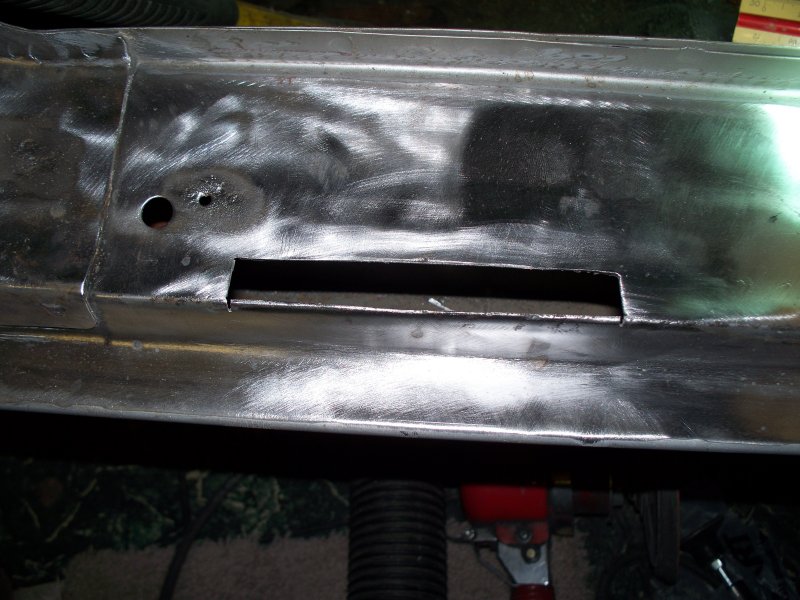
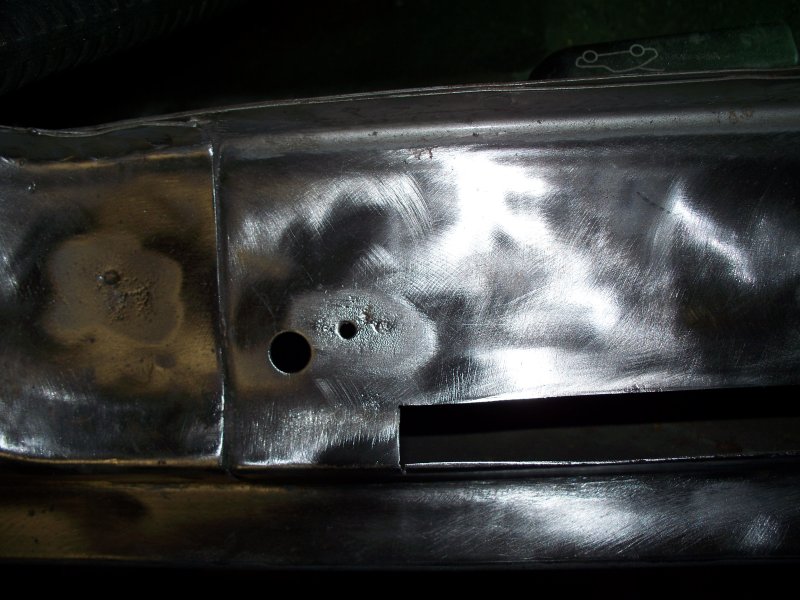
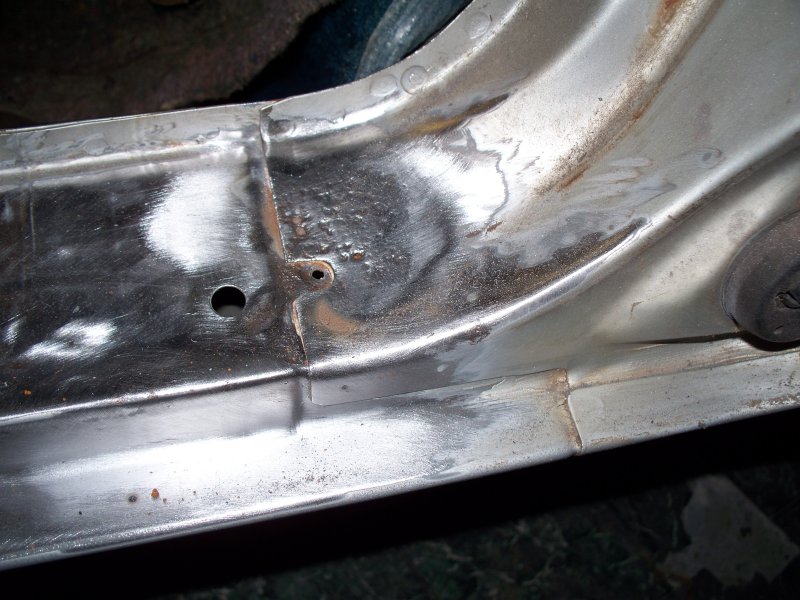
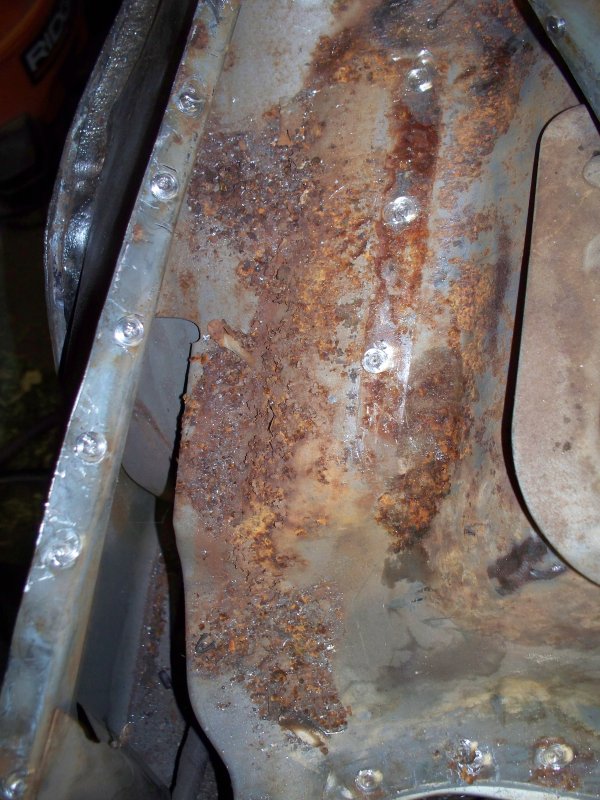
After some consideration I decided to patch this section of the driver door sill. Although hard to see in the photo, some of the rust pits are around 80% of the thickness of the metal. There are a couple of lone pits that I will attempt to fill with a short burst of the MIG welder.

I used a cutoff wheel and a High Speed Air Reciprocating Body Saw to cut the metal out. It helps to make the cuts as straight a possible, to ease making the patch. I dress the edges using a sanding disk in a right angle grinder.
The depth of the pits are obvious in this photo.
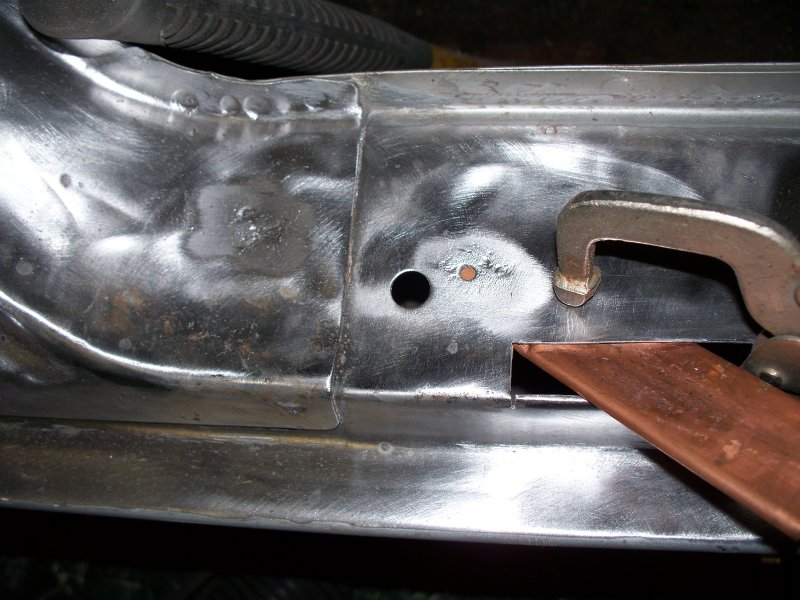
I'm backing the repair area with copper to keep from blowing a hole in the pit. Weld will not stick to copper. The copper is just scrap plumbing line that I flatten and bent into shape. Cheap and can made into any shape needed.
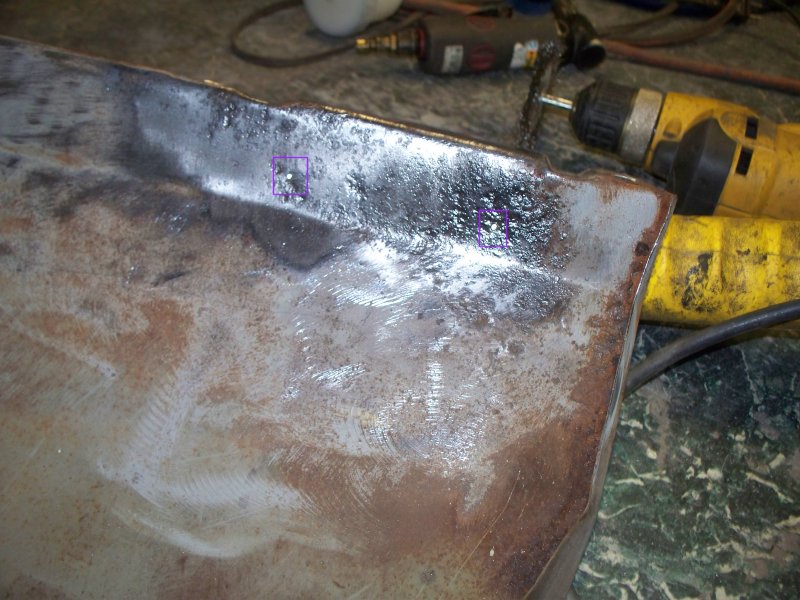
Here is the completed weld. When welding around rusty metal you will get more splatter.
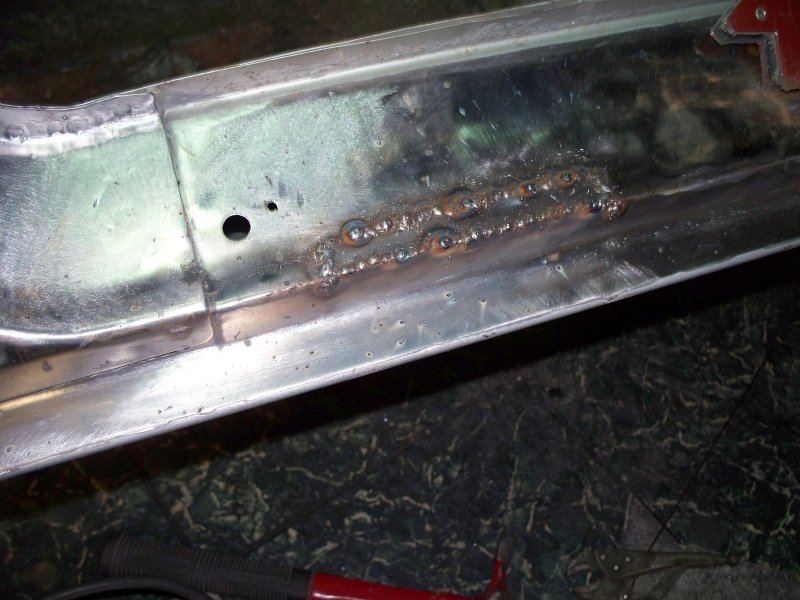
And the dressed weld. You can also see that my attempts to fix those other two deep pits were successful. Not too bad considering I'm out of practice, its been nearly five years since I last butt welded metal. Although not perfect no filler will be needed here, since the sill plate will cover the inner weld and the outer weld, the portion that will be visible did turn out perfect
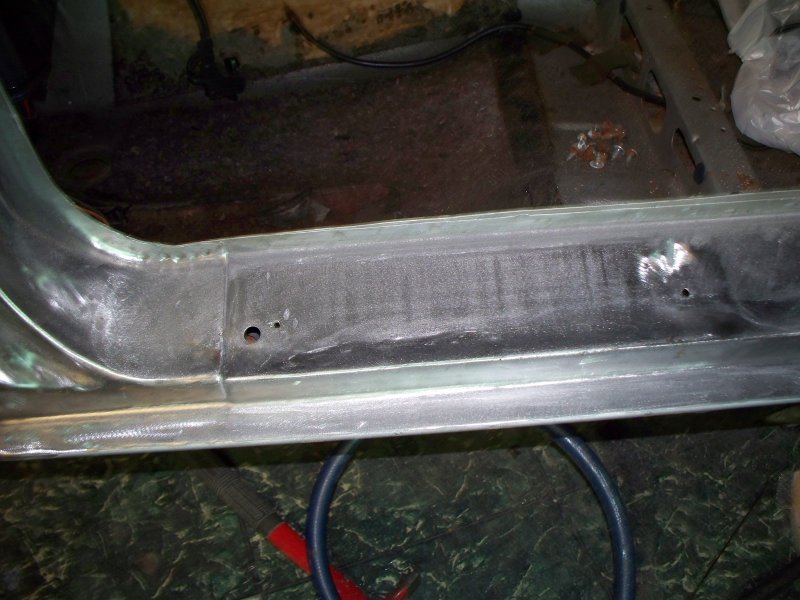
Along the driver side one more patch will be needed in the door sill area. I'll save this for another day.
After some consideration I decided to patch this section of the driver door sill. Although hard to see in the photo, some of the rust pits are around 80% of the thickness of the metal. There are a couple of lone pits that I will attempt to fill with a short burst of the MIG welder.
I used a cutoff wheel and a High Speed Air Reciprocating Body Saw to cut the metal out. It helps to make the cuts as straight a possible, to ease making the patch. I dress the edges using a sanding disk in a right angle grinder.
The depth of the pits are obvious in this photo.
I'm backing the repair area with copper to keep from blowing a hole in the pit. Weld will not stick to copper. The copper is just scrap plumbing line that I flatten and bent into shape. Cheap and can made into any shape needed.
Here is the completed weld. When welding around rusty metal you will get more splatter.
And the dressed weld. You can also see that my attempts to fix those other two deep pits were successful. Not too bad considering I'm out of practice, its been nearly five years since I last butt welded metal. Although not perfect no filler will be needed here, since the sill plate will cover the inner weld and the outer weld, the portion that will be visible did turn out perfect
Along the driver side one more patch will be needed in the door sill area. I'll save this for another day.
08-16-2015, 09:37 PM
#17
Registered User
Thread Starter
Join Date: Jul 2014
Location: Marietta GA
Posts: 22
I started on the upper windshield frame today.
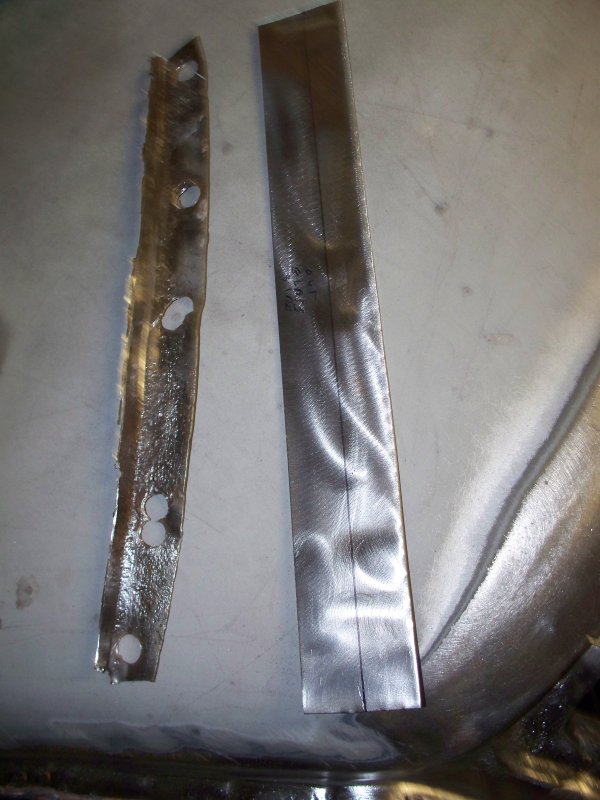
While the channel has not totally rusted through, there is very little of the original metal left. There are some rust holes around 14" from the left.
Cut of the rusted piece. Under side is not too bad.
The under part cleaned up very well. I applied weld through primer to this area before welding in the replacement channel.
The cut out piece and the piece of metal I am forming a new channel with.
This is what I use to bend metal with. In a bind you and use 2 pieces of angle iron clamped to the metal to make a bend. Just takes more time.
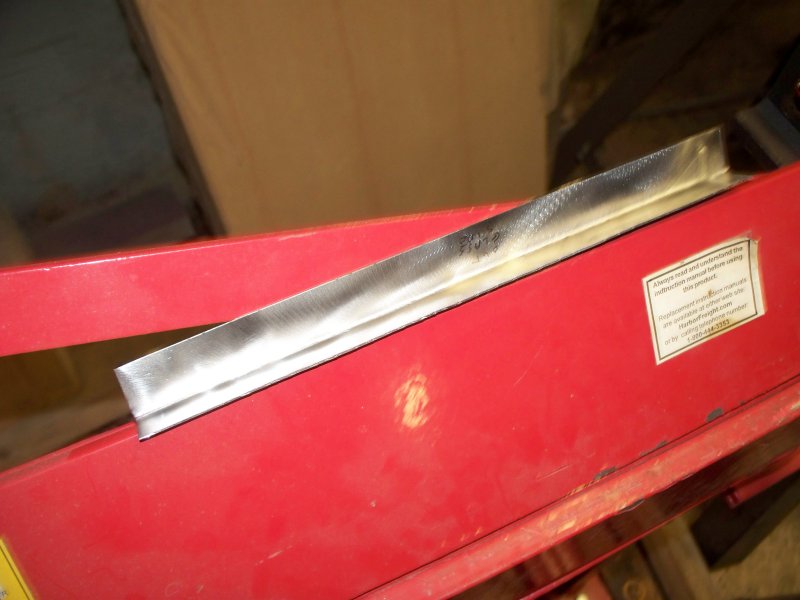
And the future channel after coming out of the brake.
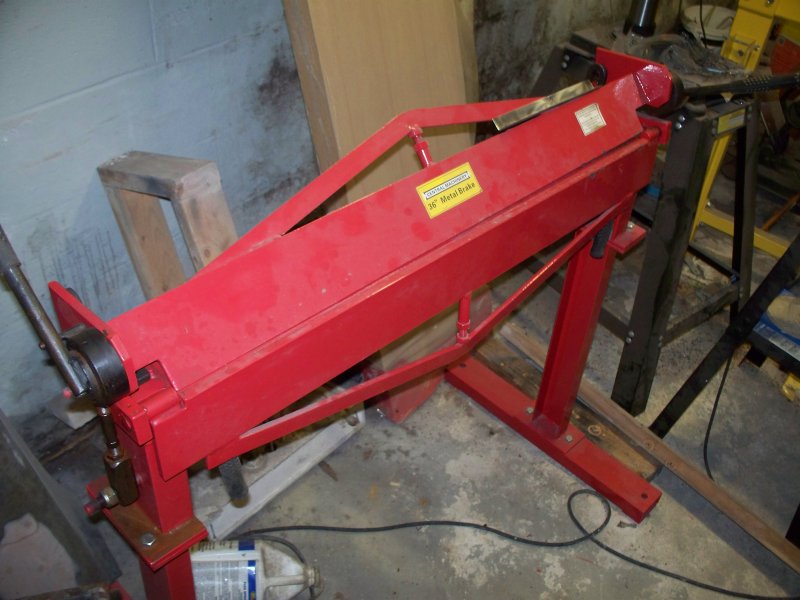
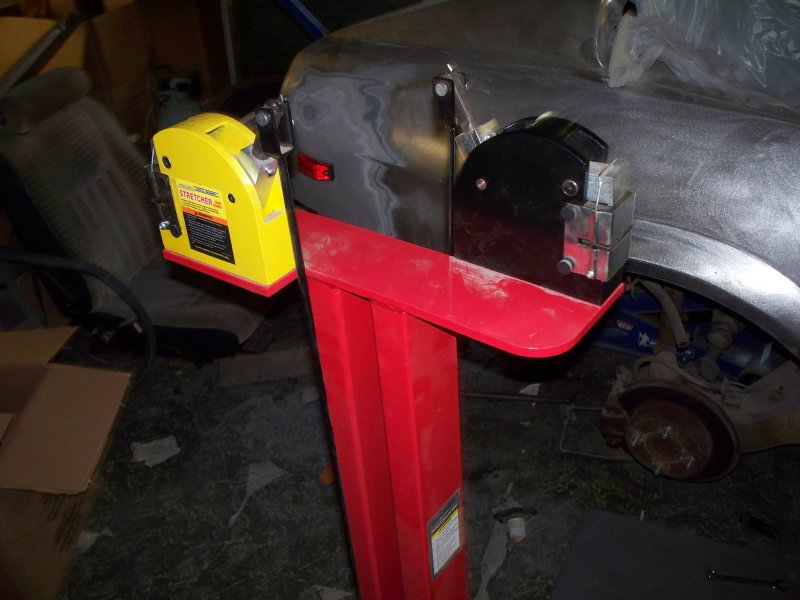
The next step requires a shrinker/stretcher. While some try to make bends by cutting slits in the angle, it doesn't work to well, in this case the channel bends both out and upward. Very difficult to do without a shrinker/stretcher. This HF unit can be had very cheap when on sale and works well. The one thing you must get is the floor stand. It's very easy to work with a foot operated petal, very hard with the arm operated lever.
It's getting close
The final test fit. It took less than five minutes of time with the shrinker/stretcher to shape the angle. It did however take much longer to weld.

It would have been nice if much scrap metal had been a few inches longer as I had to make another piece to replace all of the rust damage.
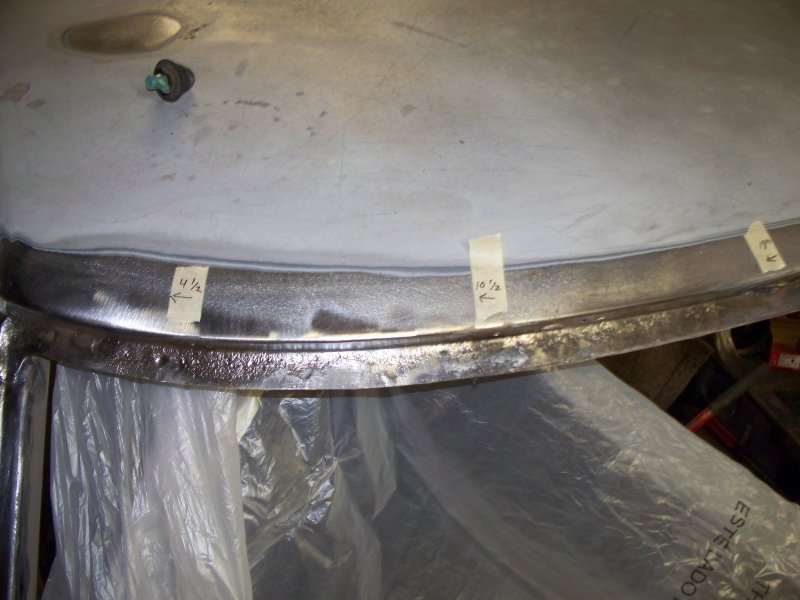
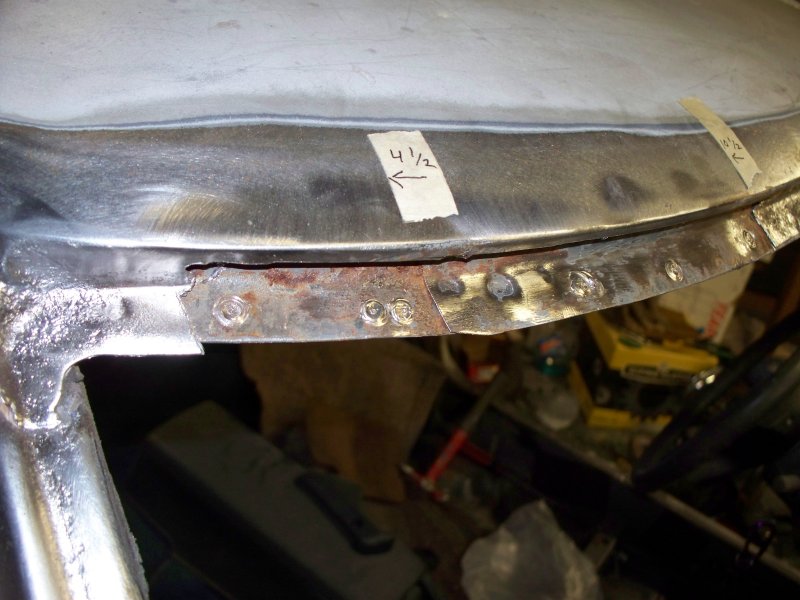
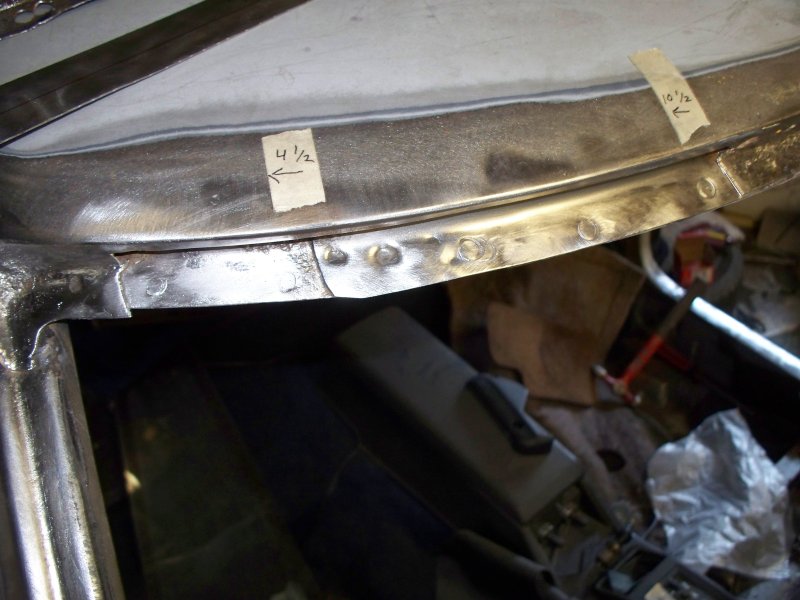
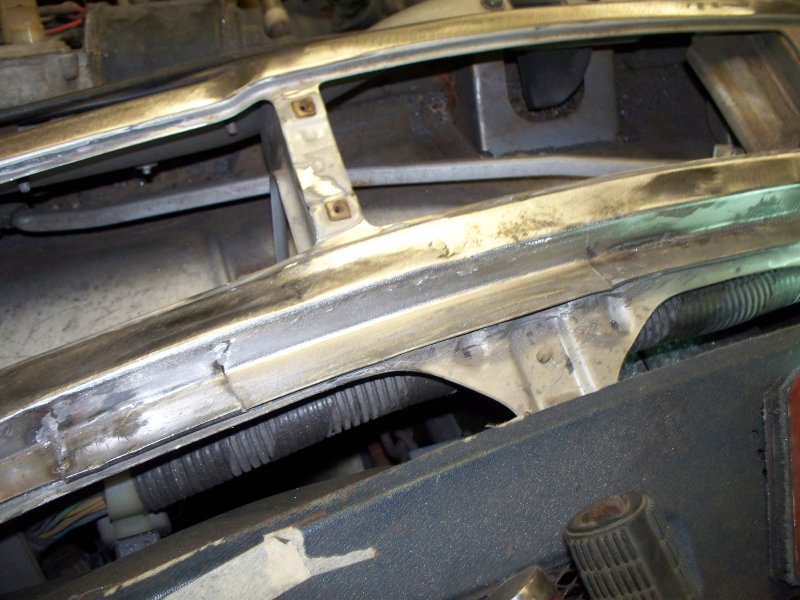
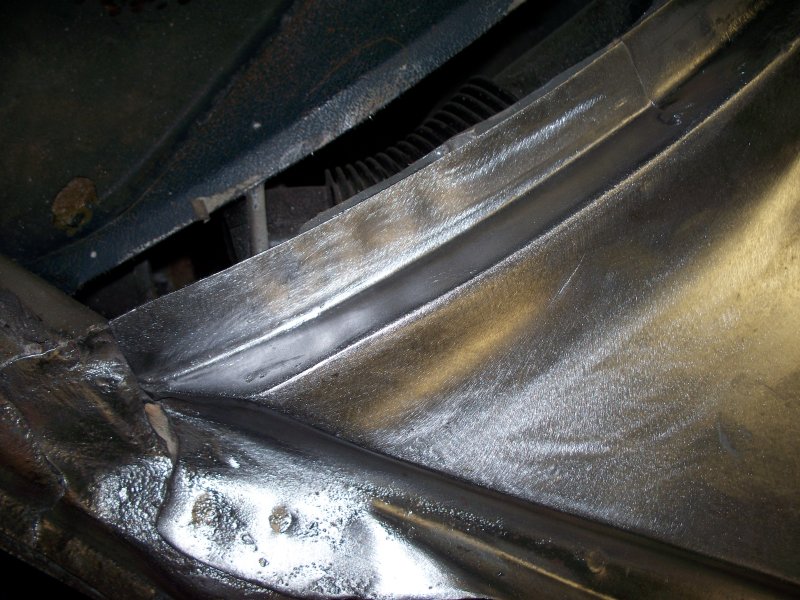
My installed channel. The area between the red marks is the original channel. The channel has been cleaned and is in good enough shape to keep.
The driver side of the upper channel is in somewhat better shape and will probably have around 6" of it replaced. I expect the rest of the channel to clean up with treatments with naval jelly.
Any questions, just ask.
While the channel has not totally rusted through, there is very little of the original metal left. There are some rust holes around 14" from the left.
Cut of the rusted piece. Under side is not too bad.
The under part cleaned up very well. I applied weld through primer to this area before welding in the replacement channel.
The cut out piece and the piece of metal I am forming a new channel with.
This is what I use to bend metal with. In a bind you and use 2 pieces of angle iron clamped to the metal to make a bend. Just takes more time.
And the future channel after coming out of the brake.
The next step requires a shrinker/stretcher. While some try to make bends by cutting slits in the angle, it doesn't work to well, in this case the channel bends both out and upward. Very difficult to do without a shrinker/stretcher. This HF unit can be had very cheap when on sale and works well. The one thing you must get is the floor stand. It's very easy to work with a foot operated petal, very hard with the arm operated lever.
It's getting close
The final test fit. It took less than five minutes of time with the shrinker/stretcher to shape the angle. It did however take much longer to weld.
It would have been nice if much scrap metal had been a few inches longer as I had to make another piece to replace all of the rust damage.
My installed channel. The area between the red marks is the original channel. The channel has been cleaned and is in good enough shape to keep.
The driver side of the upper channel is in somewhat better shape and will probably have around 6" of it replaced. I expect the rest of the channel to clean up with treatments with naval jelly.
Any questions, just ask.
08-18-2015, 09:59 PM
#18
Registered User
Thread Starter
Join Date: Jul 2014
Location: Marietta GA
Posts: 22
Started on the driver side of the upper windshield frame tonight.
Started cutting this piece out.
After cutting this piece out. A tiny pin hole appeared in the corner piece and I could see rust was forming around the spot weld. I was hoping that I would not need to cut this piece out, since making a new one would require some effort. I also slipped with the cuter and cut a small slit on the roof. No problem to fix. Just back it with some copper and weld it shut before installing the replacement channel.
After staring at the piece for a while, I decided I might as well cut the corner piece out, since the signs were it was rusting from behind. I save my worn out cut-off discs for just these uses.
You can get into small places with the worn out cut-off disc.
This is what I found under the corner.

The back side of the piece I removed. The large hole is from a spot weld cutter. You can see rust had started forming on the back side. If I had not cut this piece out, it might have rusted out with the passage of time.
The two pieces that I cut out. I try to preserve the pieces to serve as a pattern in making the replacement piece. I especially need the corner since I will need to make a hammer form/mold to duplicate the bends on this piece.
A tip for getting up under the edge is to wrap some adhesive backed sand paper around a mixing stick
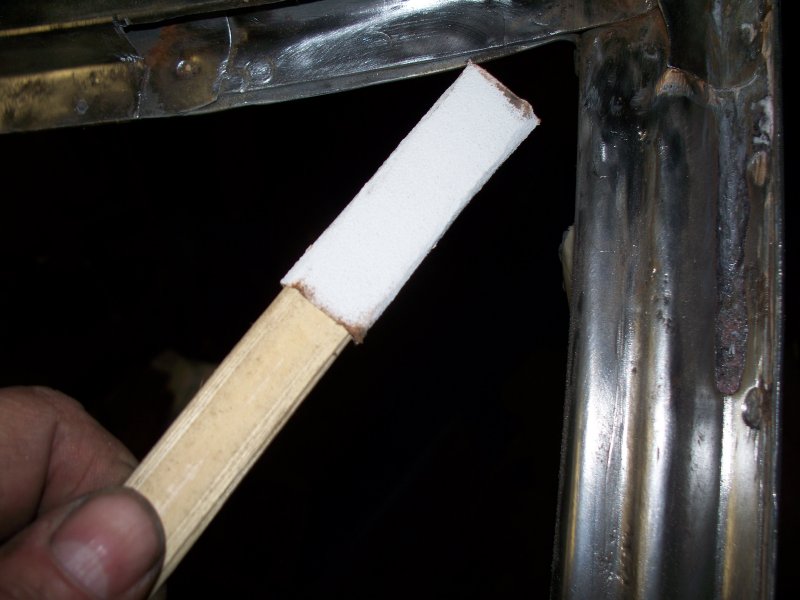
You can now sand under the edge.
Still needs more rust removal, but is much better. This is one place you can't use rust converters since they require you to finish your welding before you use them. I really never been a fan of rust converters anyway. Under best case conditions they may slow down rust, but they don't totally stop it. I don't want rust coming back in another 10 years. By then I may be too old to repair it.
Started cutting this piece out.
After cutting this piece out. A tiny pin hole appeared in the corner piece and I could see rust was forming around the spot weld. I was hoping that I would not need to cut this piece out, since making a new one would require some effort. I also slipped with the cuter and cut a small slit on the roof. No problem to fix. Just back it with some copper and weld it shut before installing the replacement channel.
After staring at the piece for a while, I decided I might as well cut the corner piece out, since the signs were it was rusting from behind. I save my worn out cut-off discs for just these uses.
You can get into small places with the worn out cut-off disc.
This is what I found under the corner.
The back side of the piece I removed. The large hole is from a spot weld cutter. You can see rust had started forming on the back side. If I had not cut this piece out, it might have rusted out with the passage of time.
The two pieces that I cut out. I try to preserve the pieces to serve as a pattern in making the replacement piece. I especially need the corner since I will need to make a hammer form/mold to duplicate the bends on this piece.
A tip for getting up under the edge is to wrap some adhesive backed sand paper around a mixing stick
You can now sand under the edge.
Still needs more rust removal, but is much better. This is one place you can't use rust converters since they require you to finish your welding before you use them. I really never been a fan of rust converters anyway. Under best case conditions they may slow down rust, but they don't totally stop it. I don't want rust coming back in another 10 years. By then I may be too old to repair it.
08-19-2015, 08:34 PM
#19
Registered User
Thread Starter
Join Date: Jul 2014
Location: Marietta GA
Posts: 22
Got a late start tonight but still managed to make the corner piece.
While staring a the block of wood I was going to make a form from, I thought, that is a lot of work for such a small part. I'lll try and bend a piece of metal into shape with basic hand tools.
Sometimes when making parts the first attempt doesn't go so well and you try again. OK so I will screw up attempt number one and get it right on attempt two. I'll plan on taking photos of attempt two. Well, I got the part right on attempt one, so I don't have many photo's to show.
Some of the scrap trimmed out, but shaping is showing some promise.
Trim to fit the opening.
Final trimming. Ready for welding now.
Well I don't have any photos of how I formed the metal, but these were the only tools required to make this piece.
I hope to finish the upper windshield frame tomorrow.
08-23-2015, 09:49 PM
#20
Registered User
Thread Starter
Join Date: Jul 2014
Location: Marietta GA
Posts: 22
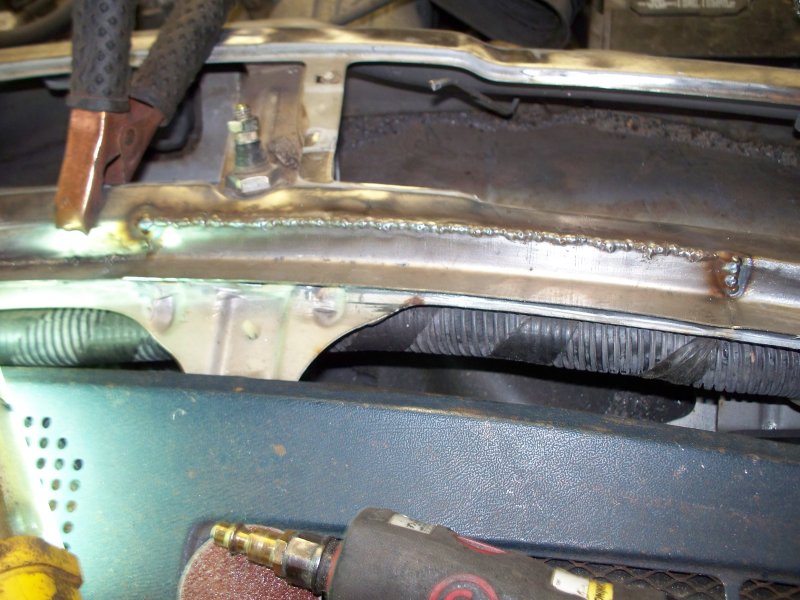
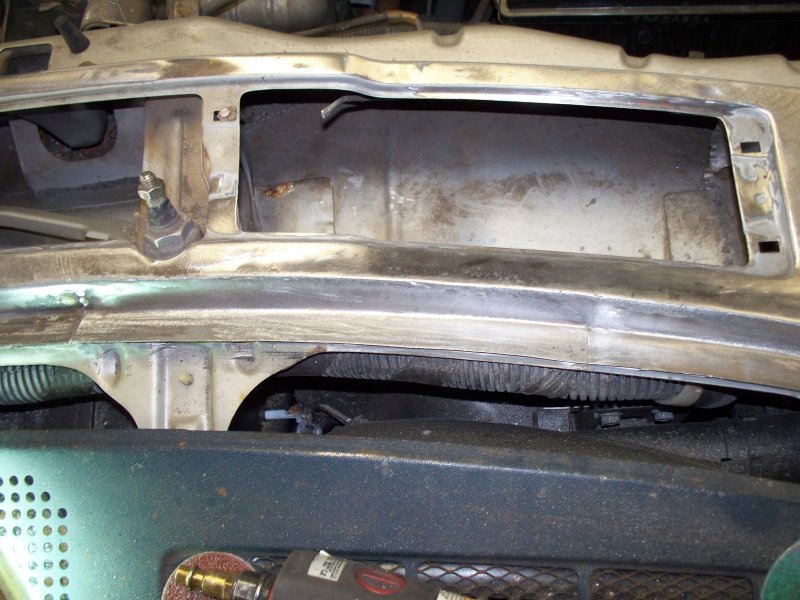
I finished the upper windshield frame repair earlier in the week.
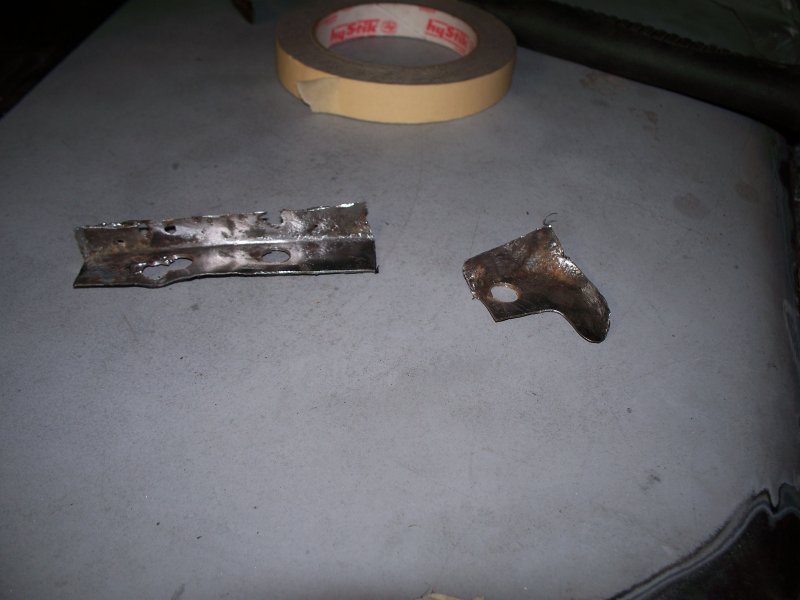
I had one more section in the upper channel to replace,
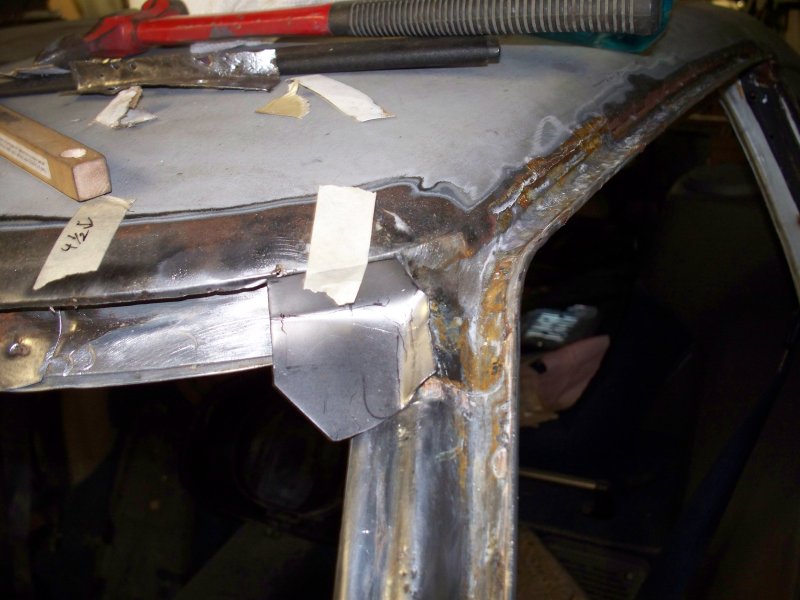
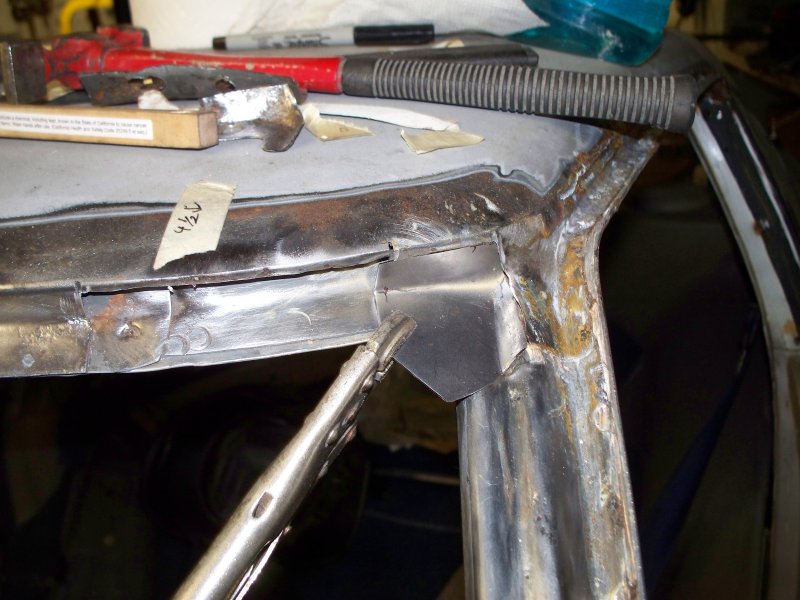
Picture of the corner repair complete.
A nasty piece of metal
The patch.
The installed piece. This completed the repair of the upper channel.
Moved on to the lower channel this weekend.
Marked the first piece to cut out.
 .
.
Now for the bad news. It's really rusty under here. No way to get to it.
For now I just moved on and cut out another piece of metal. The metal on the top of the cowl was also bad. I marked it to cut out also. I don't have the tools to make the replacement as one piece, so I will have to make it in two pieces.
Even installing this patch was difficult. The metal is 22 gauge and after the surface rust was removed, the metal was 23-24 gauge. Very difficult to weld.
Turned out OK. Now I need to make the channel piece.
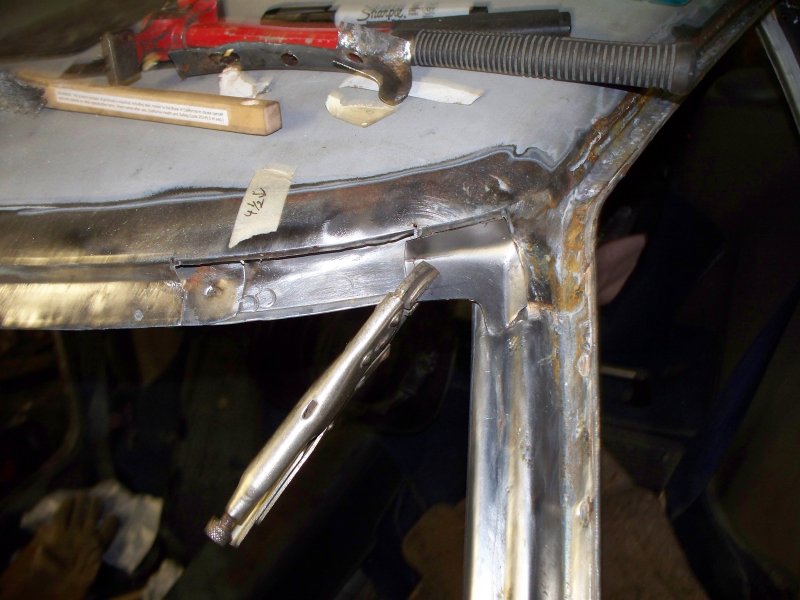
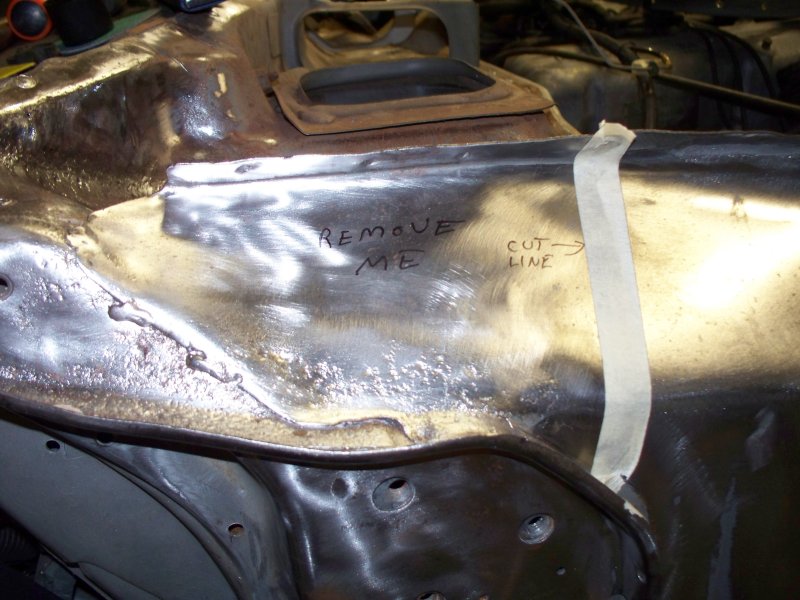
After some consideration, I decided the only way to stop the rust under the cowl is to remove the cowl. It's held in place by around 100 spot welds. With a quality spot weld cutter it could probably be removed in a couple of hours. However I will complete the repair of the windshield channel before removing the cowl. It would be better to compete the channel repair first, since things will move around and be flimsy if I start replacing channel after removing the cowl.
So I resumed the repair of the corner. Tacked but not completed.
I'm switching to the GTO later in the week, so there may not be any updates for a while. Hopefully it won't take too long to change the transmission.
I had one more section in the upper channel to replace,
Picture of the corner repair complete.
A nasty piece of metal
The patch.
The installed piece. This completed the repair of the upper channel.
Moved on to the lower channel this weekend.
Marked the first piece to cut out.
.Now for the bad news. It's really rusty under here. No way to get to it.
For now I just moved on and cut out another piece of metal. The metal on the top of the cowl was also bad. I marked it to cut out also. I don't have the tools to make the replacement as one piece, so I will have to make it in two pieces.
Even installing this patch was difficult. The metal is 22 gauge and after the surface rust was removed, the metal was 23-24 gauge. Very difficult to weld.
Turned out OK. Now I need to make the channel piece.
After some consideration, I decided the only way to stop the rust under the cowl is to remove the cowl. It's held in place by around 100 spot welds. With a quality spot weld cutter it could probably be removed in a couple of hours. However I will complete the repair of the windshield channel before removing the cowl. It would be better to compete the channel repair first, since things will move around and be flimsy if I start replacing channel after removing the cowl.
So I resumed the repair of the corner. Tacked but not completed.
I'm switching to the GTO later in the week, so there may not be any updates for a while. Hopefully it won't take too long to change the transmission.
08-31-2015, 09:30 PM
#21
Registered User
Thread Starter
Join Date: Jul 2014
Location: Marietta GA
Posts: 22
Well, I removed transmission from GTO only to find out the cooler lines were larger in the new transmission. Had to order new fittings for the transmission case, so I switch backed to working on the ZX.
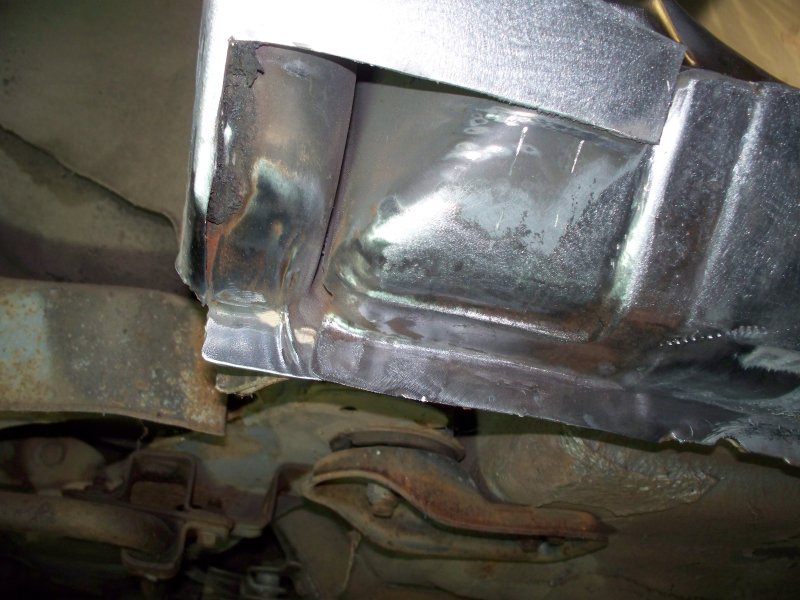
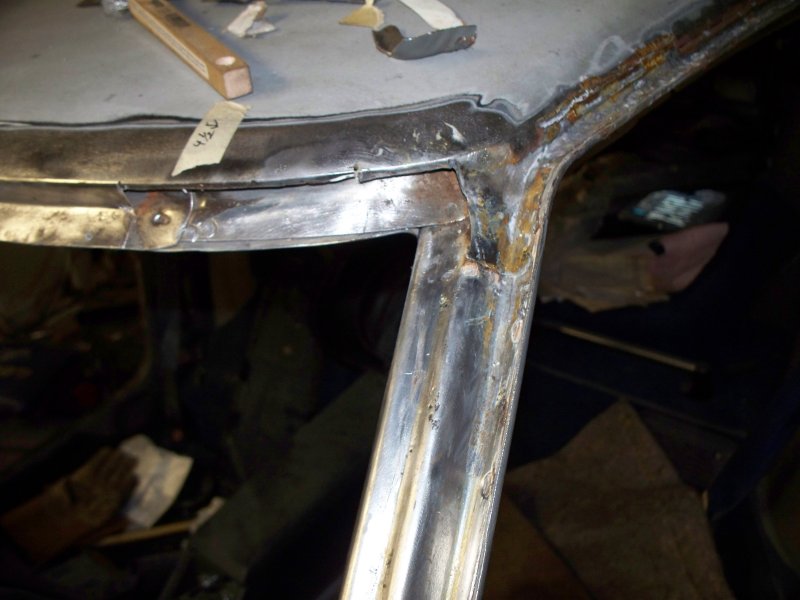
Continuing where I left off last. Here is a shot of the finished welding.
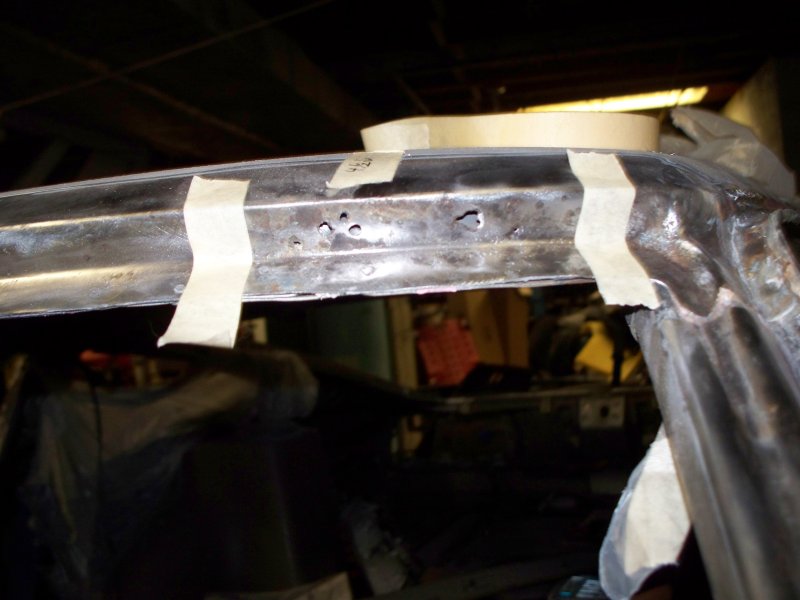
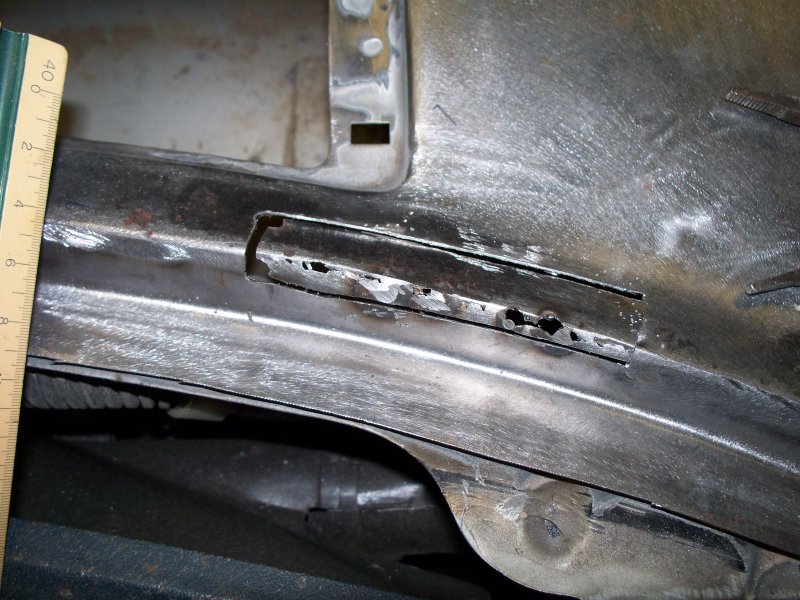
Moving on the next section. There are many pin holes in this section

New piece fits well.
Had to cut another small piece out. Edge was rusted too bad.
Finished weld. Will finish welding the pieces together where windshield mounts after removing the cowl.
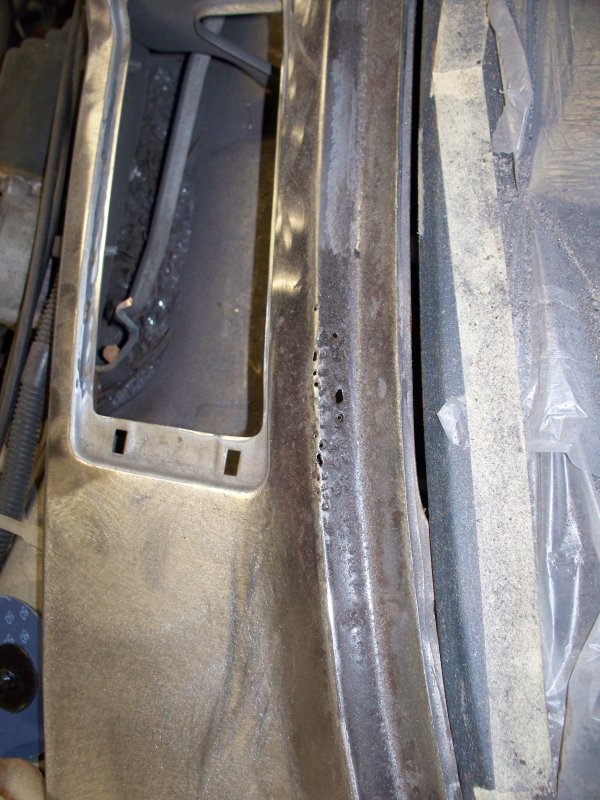
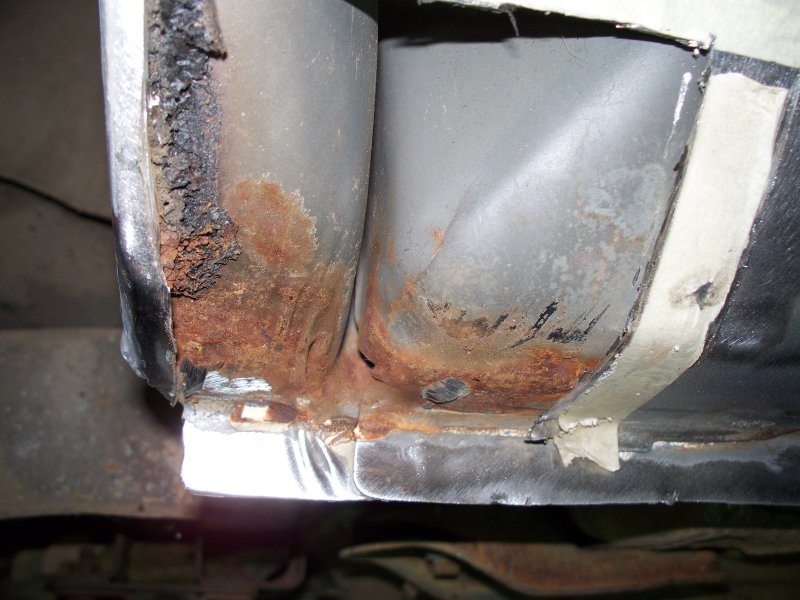
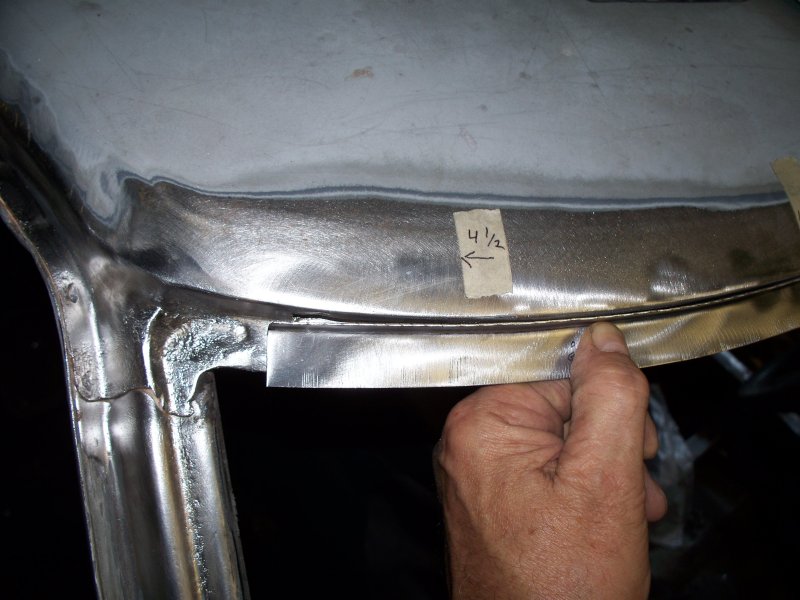
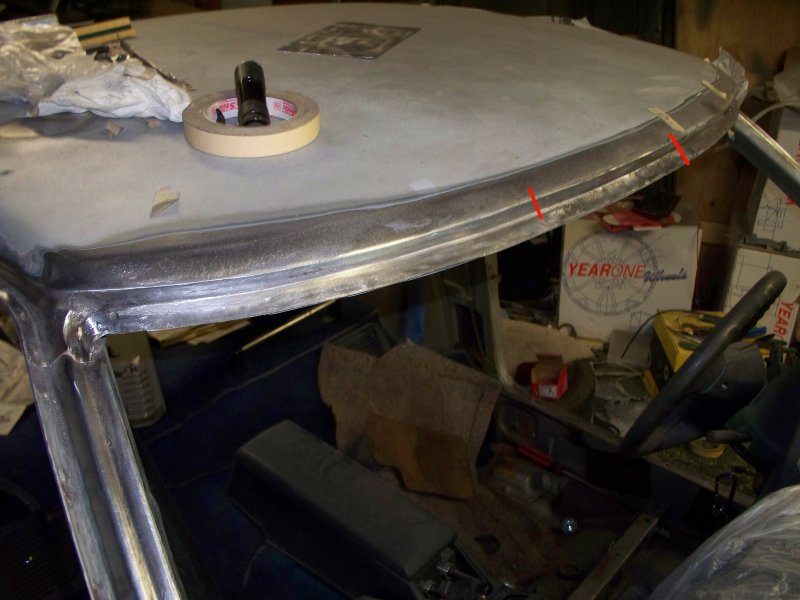
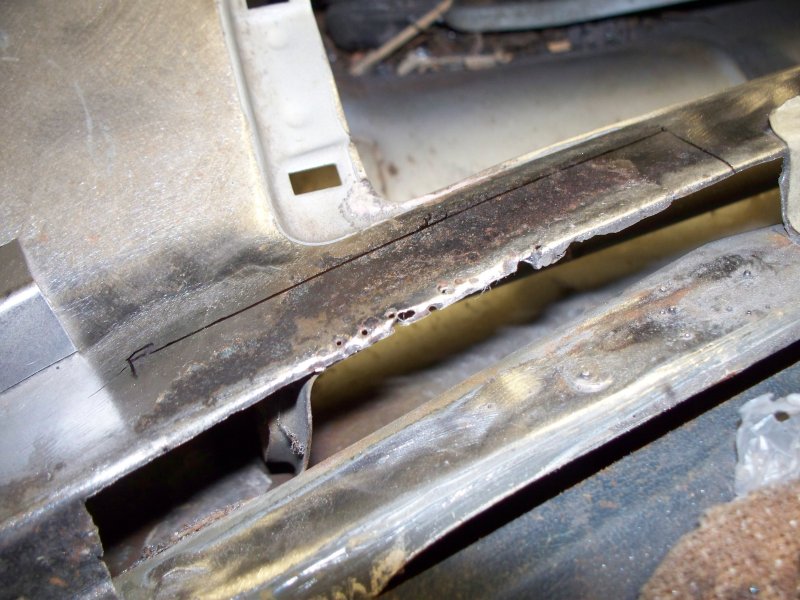
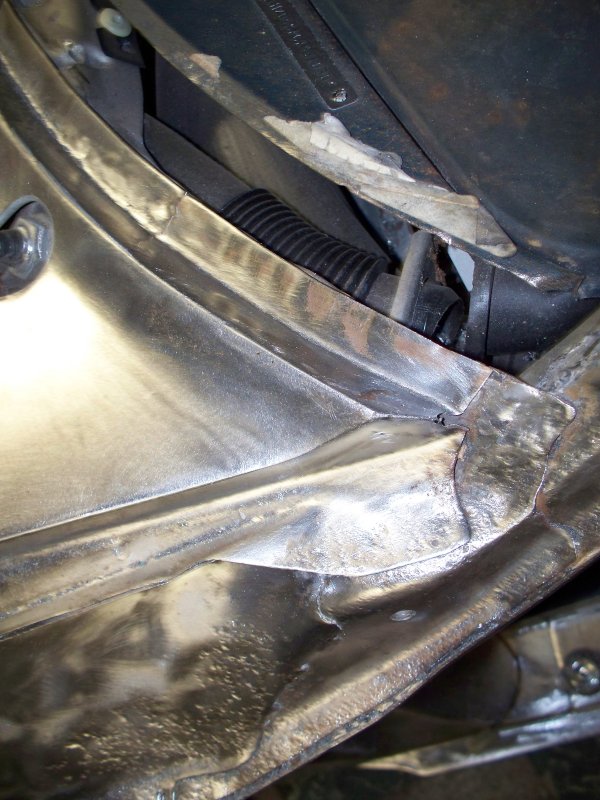
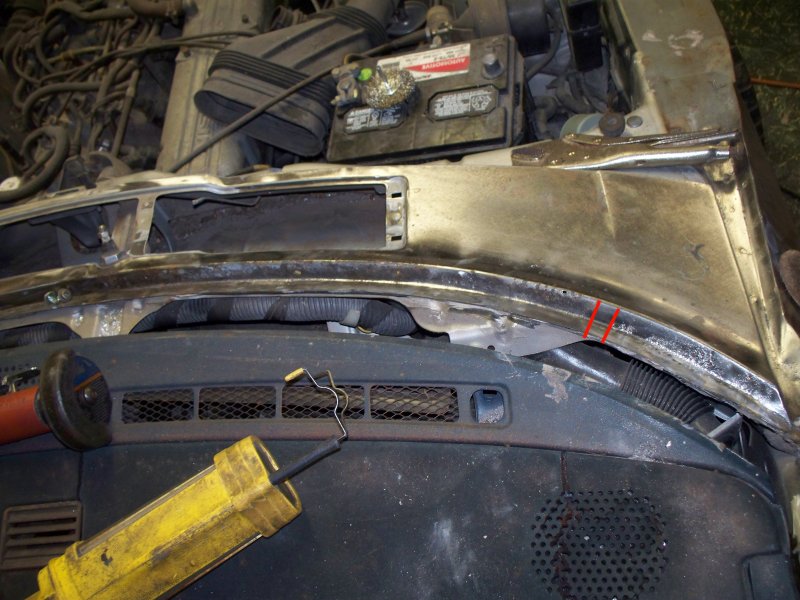
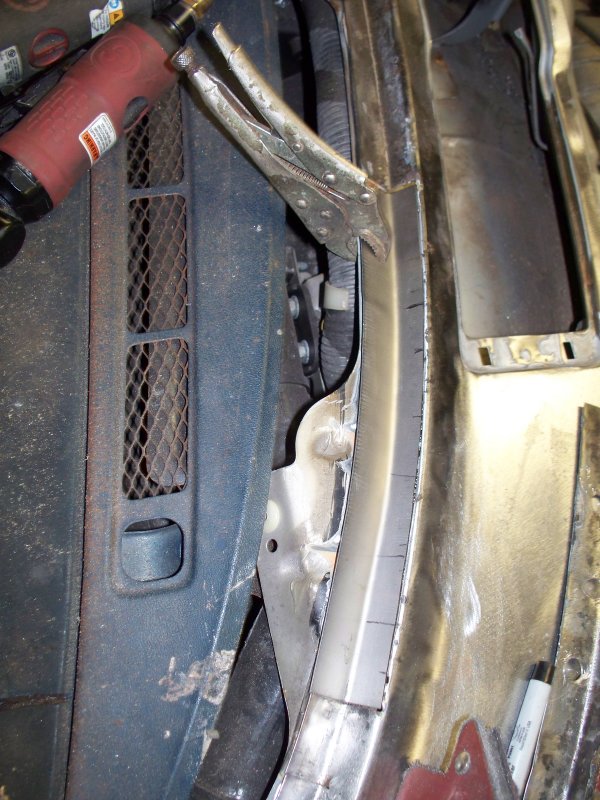
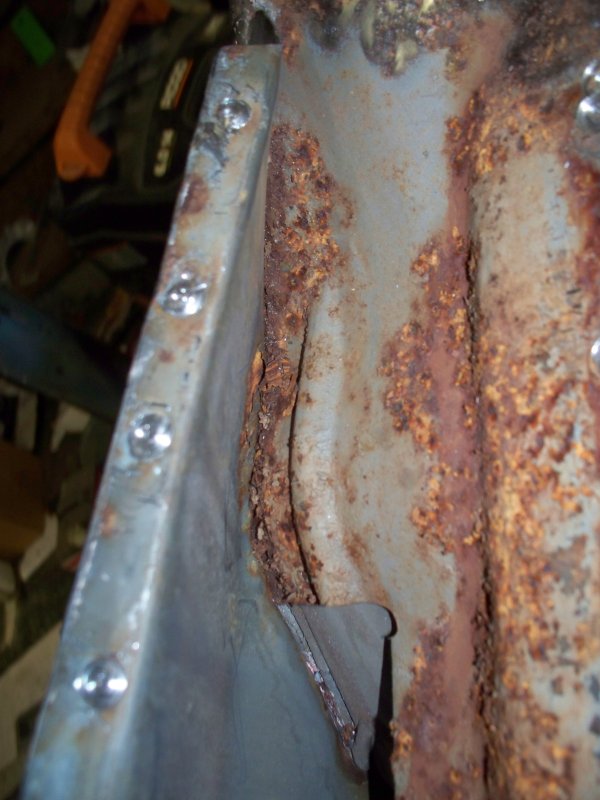
The passenger side is really bad. Most of the channel will have to be replaced. There are seven really big holes and more than a dozen tiny pin holes. The whole channel will need to be replaced from the two screws laying in the channel to the end. Only the tiny area marked between the red lines is good enough to keep.
It looks really bad in there. It wouldn't surprise me if I had to patch the metal under the cowl. Although I had removed all of the rust from the piece I cut out, the pits are very deep and the metal is not structurally sound. The pits are very close to being as deep as the metal is thick. There is also rusting from the bottom side, so in a few years it would be swiss cheese.

Continuing where I left off last. Here is a shot of the finished welding.
Moving on the next section. There are many pin holes in this section
New piece fits well.
Had to cut another small piece out. Edge was rusted too bad.
Finished weld. Will finish welding the pieces together where windshield mounts after removing the cowl.
The passenger side is really bad. Most of the channel will have to be replaced. There are seven really big holes and more than a dozen tiny pin holes. The whole channel will need to be replaced from the two screws laying in the channel to the end. Only the tiny area marked between the red lines is good enough to keep.
It looks really bad in there. It wouldn't surprise me if I had to patch the metal under the cowl. Although I had removed all of the rust from the piece I cut out, the pits are very deep and the metal is not structurally sound. The pits are very close to being as deep as the metal is thick. There is also rusting from the bottom side, so in a few years it would be swiss cheese.
 09-13-2015, 09:28 PM
#23
Registered User
Thread Starter
Join Date: Jul 2014
Location: Marietta GA
Posts: 22
Nice work. I really enjoy looking at your posts.
I'm really amazed that there are no questions, in my GTO build there was always questions like, why couldn't you do it this way, is there a cheaper way of getting the same thing done, and so on. It is possible to do repairs like I'm doing with fewer and cheaper tools. It will take longer of course.
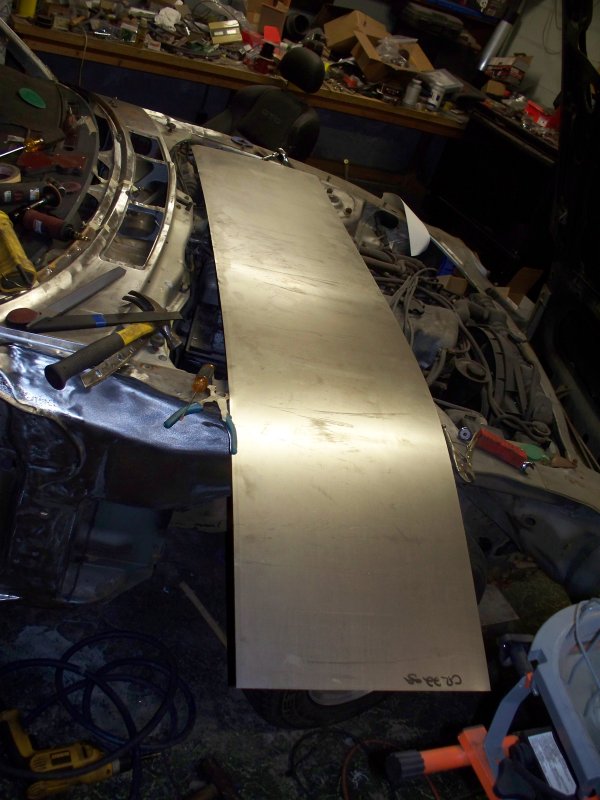
When doing this type of work you will need sheet metal to make the patches. While most people think of going to HD or Lowes, the selection is not great and the prices are very high. I bought this giant piece of 22 gauge metal at "Metal Supermarkets". Metal Supermarkets sells their scrap, pieces left over when they cut custom sizes for customers. This piece of metal set me back by $14. On another day I purchased a 8"x50" piece of 20 gauge metal for only $3.
Continuing from the previous post, metal fabricated.
Welded and welds dressed.
Moving on to next piece.
Welding wasn't too good. Remaining metal was too thin and I got massive blow thru. So I cut out the bad piece.
New patch formed.
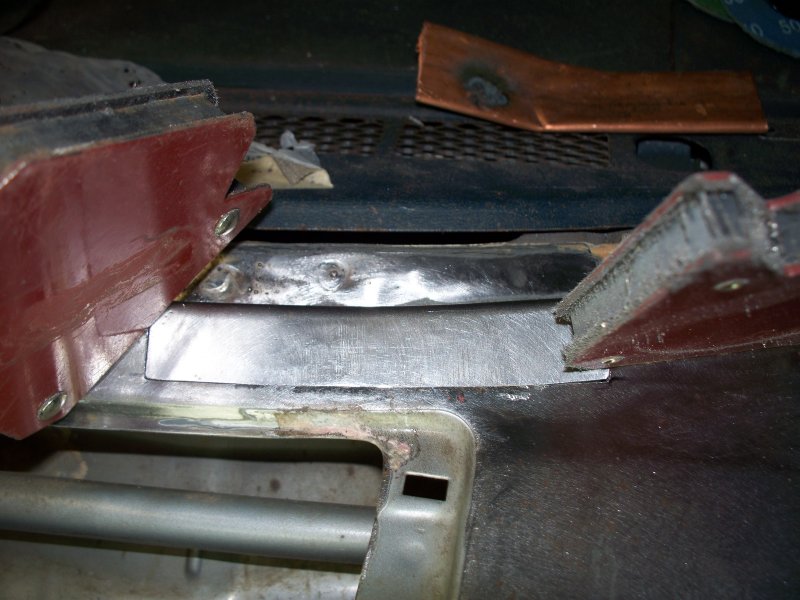
I use a filler spreader to check for fit. If the edges aren't level, the metal will be very thin after you grind the joint smooth.
The finished result. Much better.
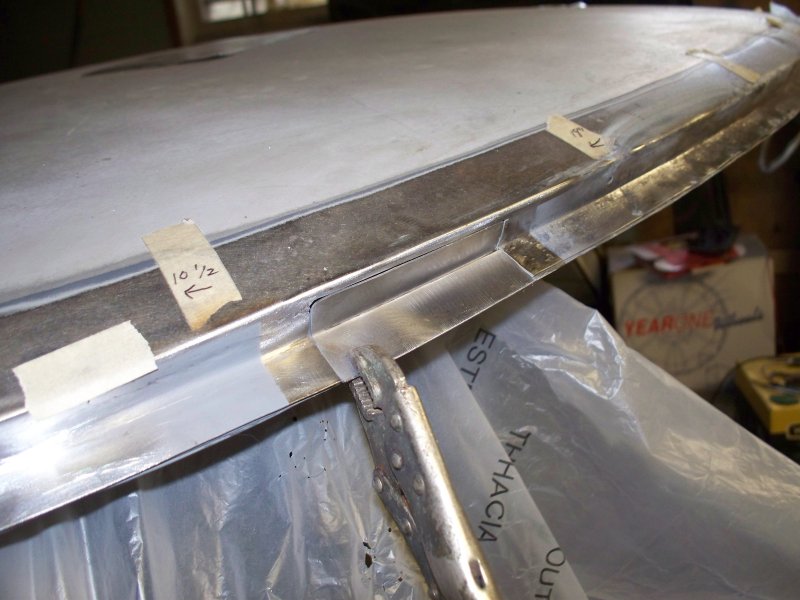
Now for the final piece of channel.
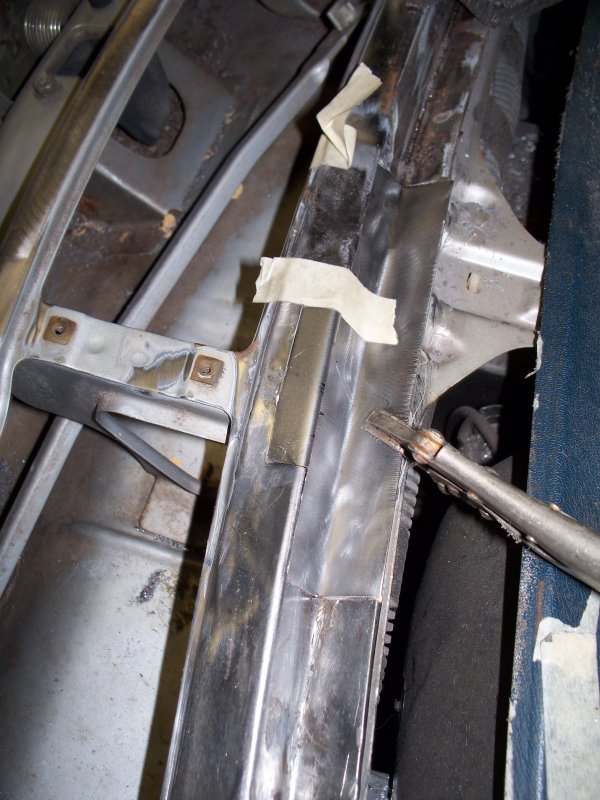
The fabricated piece should lay in place and not need to be forced. I do use clamps at both ends when welding.
Here I have tacked the patch in place. This took about 15 minutes, since I stop and adjust, (tap lightly with body hammer, pry with small screw driver, etc) until the metal is perfectly lined up. I tacked from the right to the left. The tacks are closer together on the left because the metal wanted to shift as a result of being welded. I had to tap the metal quite a bit to get it to line up. Ideally you would work both sides with a dolly and hammer, but the back side in not really accessible for use with a dolly,
The completed tacks. I don't run a bead since there is a bigger change of blow thru and it helps to minimize warping.
The dressed welds
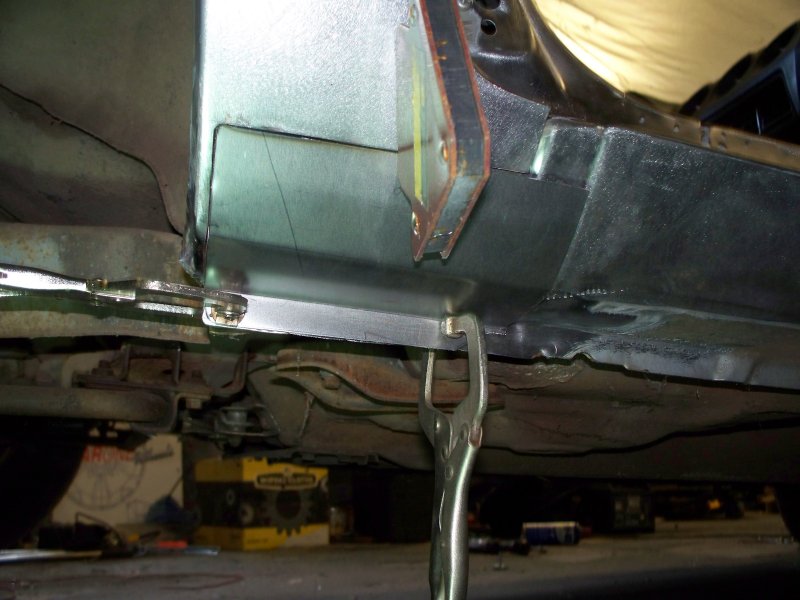
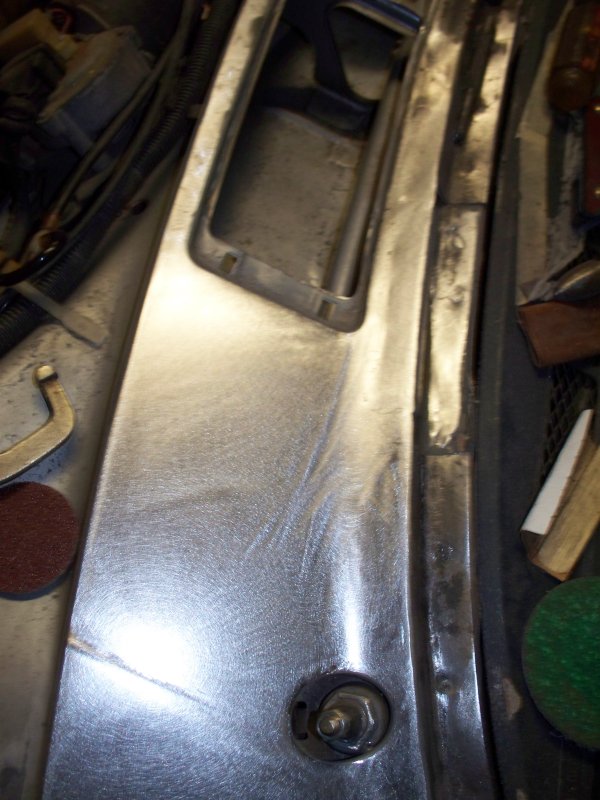
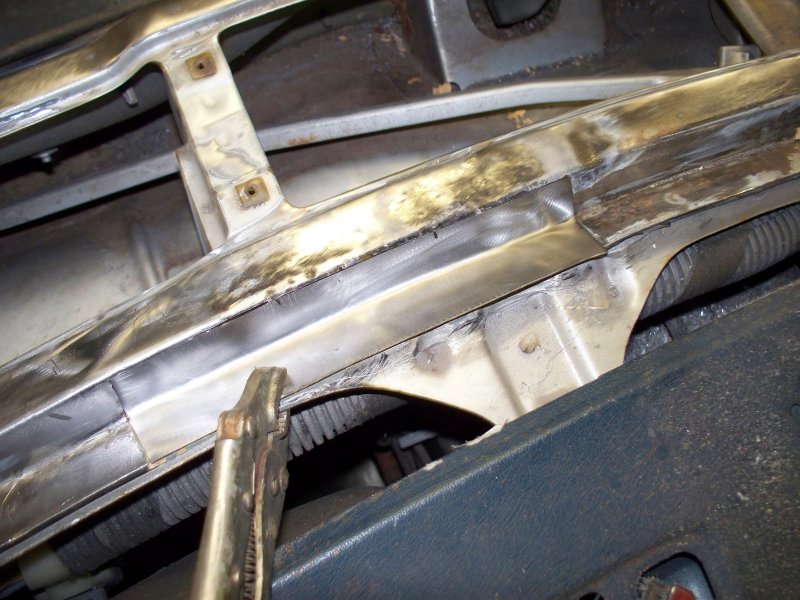
A overview of the passenger side. All of the rusty metal has been replaced.
Now to remove the cowl panel.
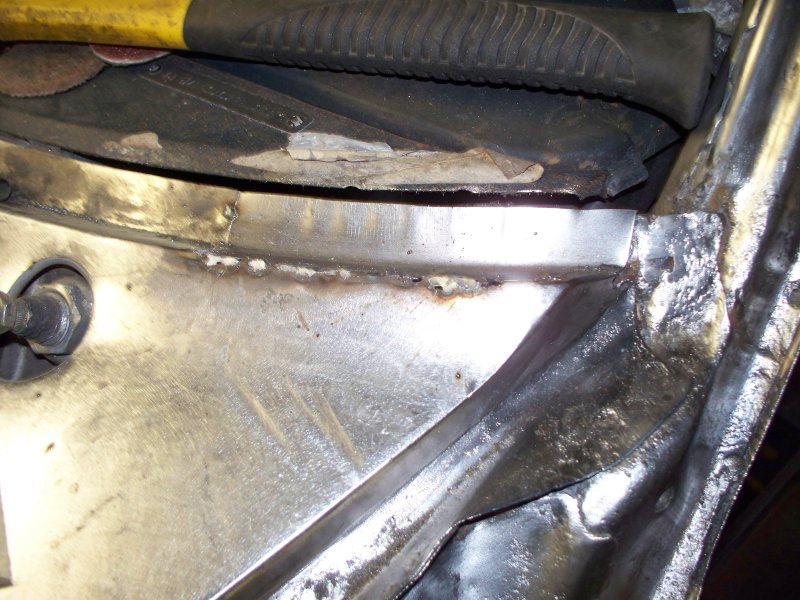
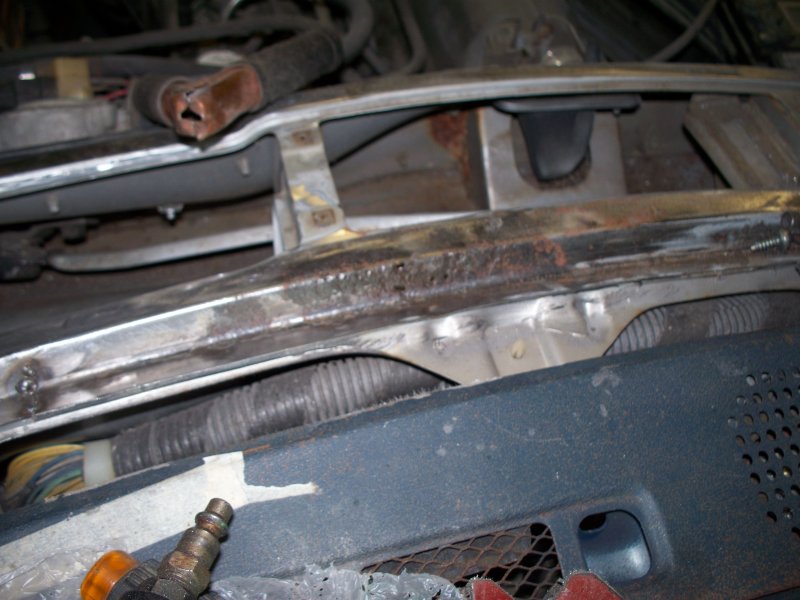
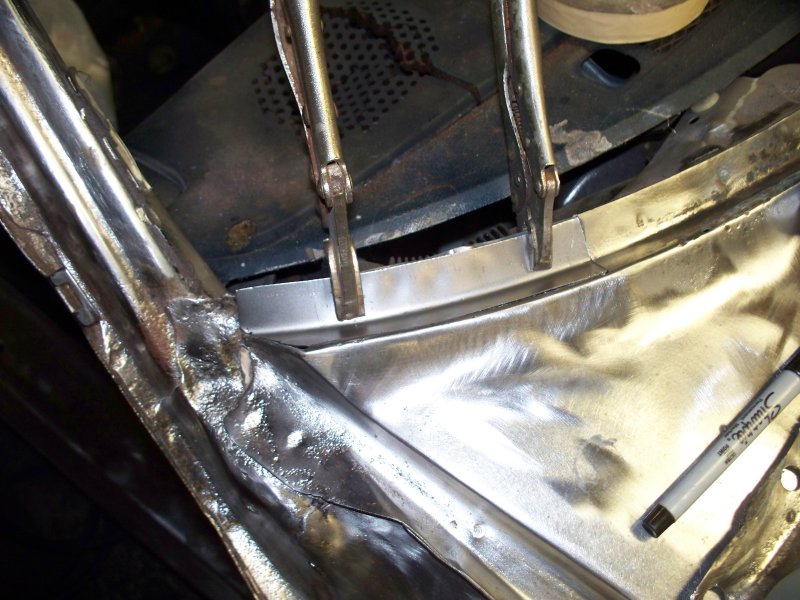
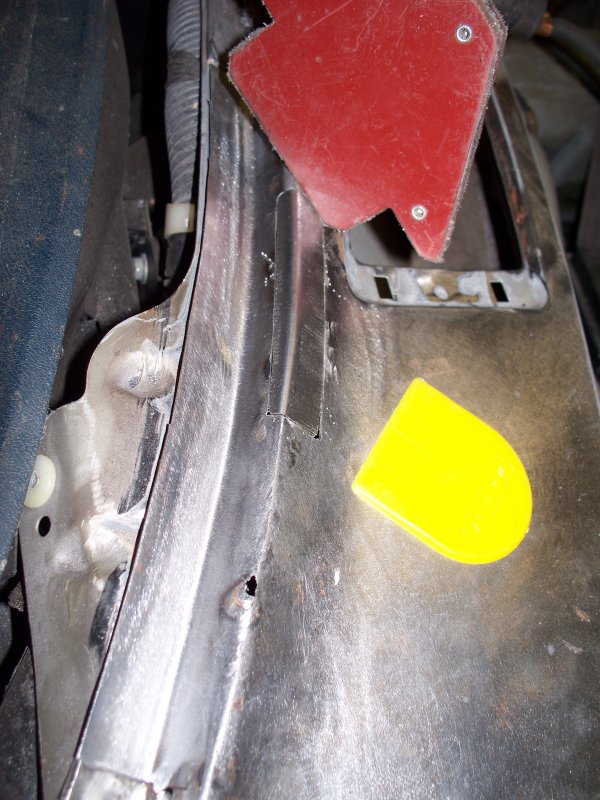
The extension piece marked with the arrow will have to come out on both sides.
Windshield wiper support doesn't look too good. May have to make a new one.
I need to further disassemble the car before I can determine what can be saved and what needs replacement. For the most part, I think the rust can be removed without having to replace the panels.
09-14-2015, 08:50 PM
#24
Registered User
Thread Starter
Join Date: Jul 2014
Location: Marietta GA
Posts: 22
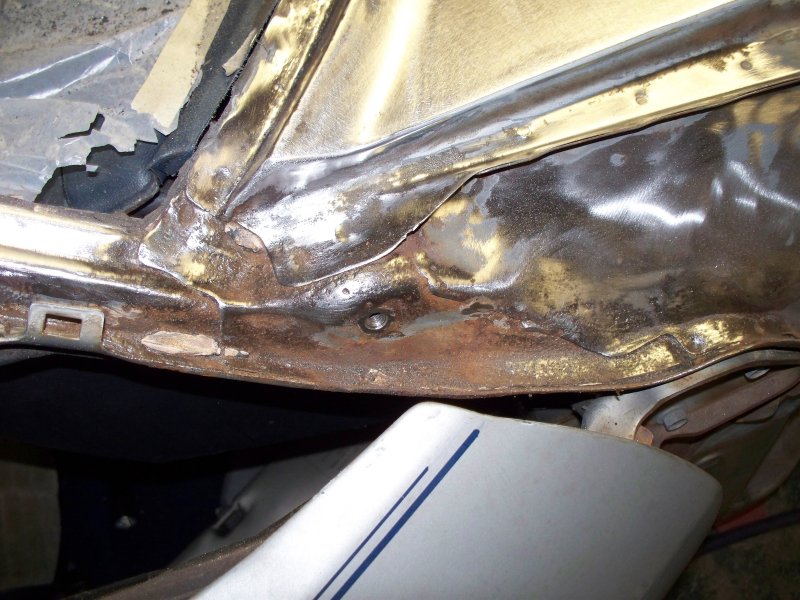
I removed the passenger side extension piece tonight. Harder than it should have been because I worn the spot weld cutter out.
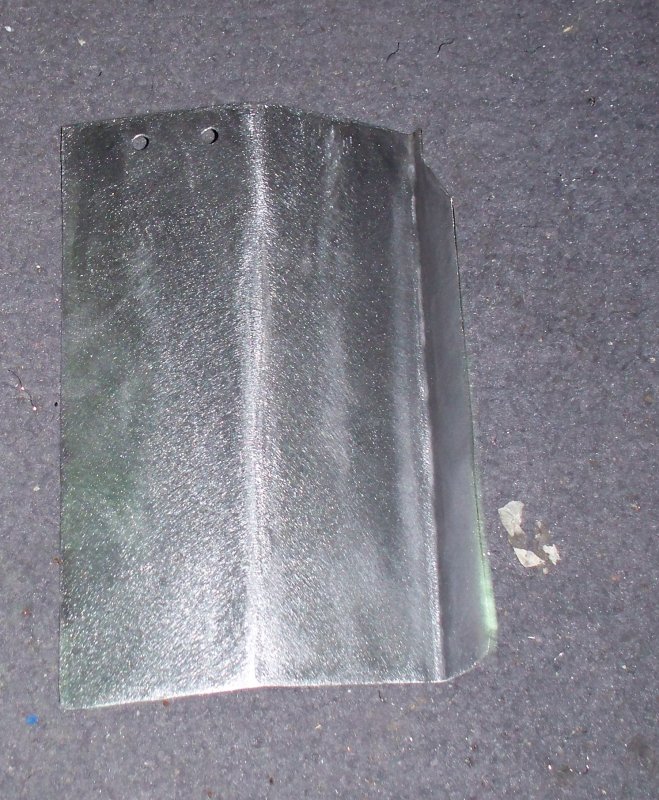
The extension can be cleaned up and reused.
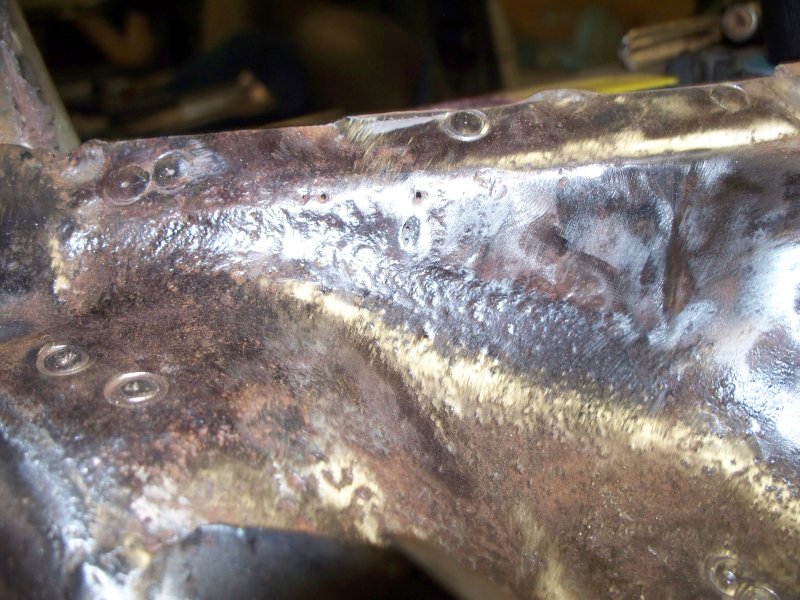
This is what was under the extension
This repair will repair will require more of the car to be cut up.
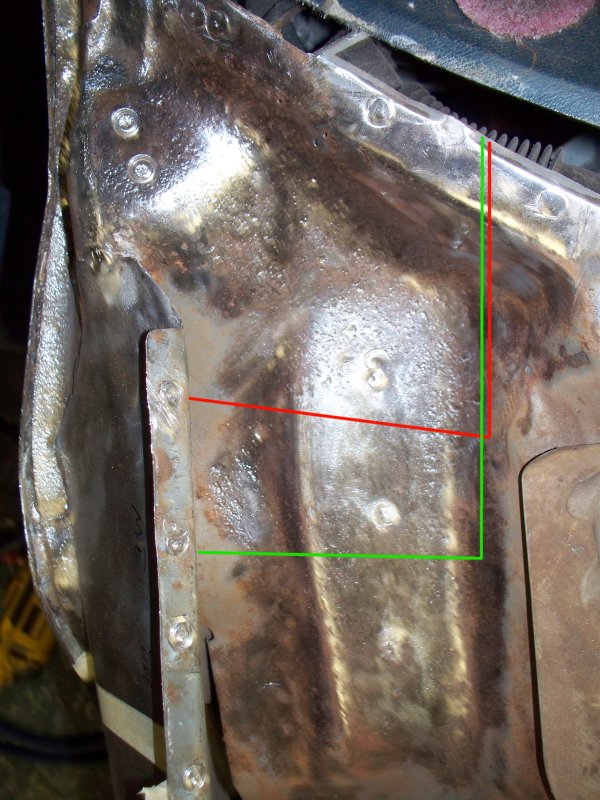
This is the piece I think I will remove for the above repair.
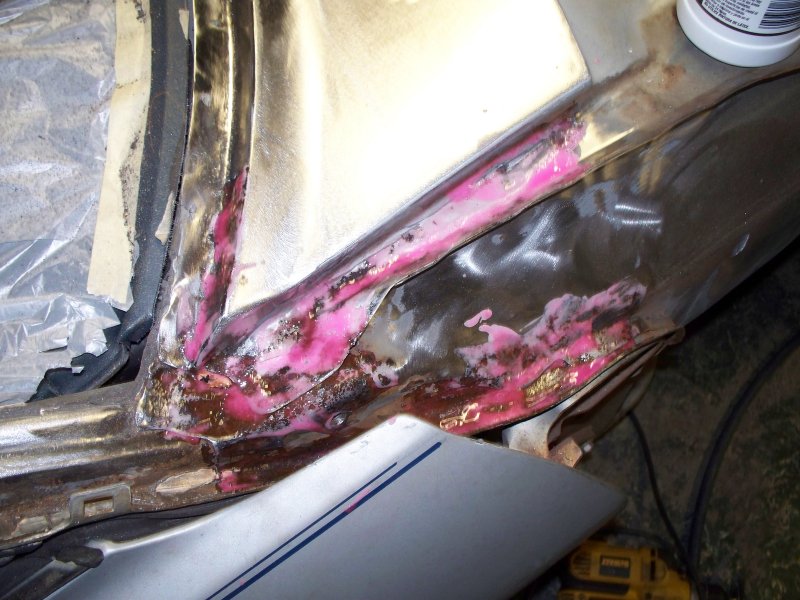
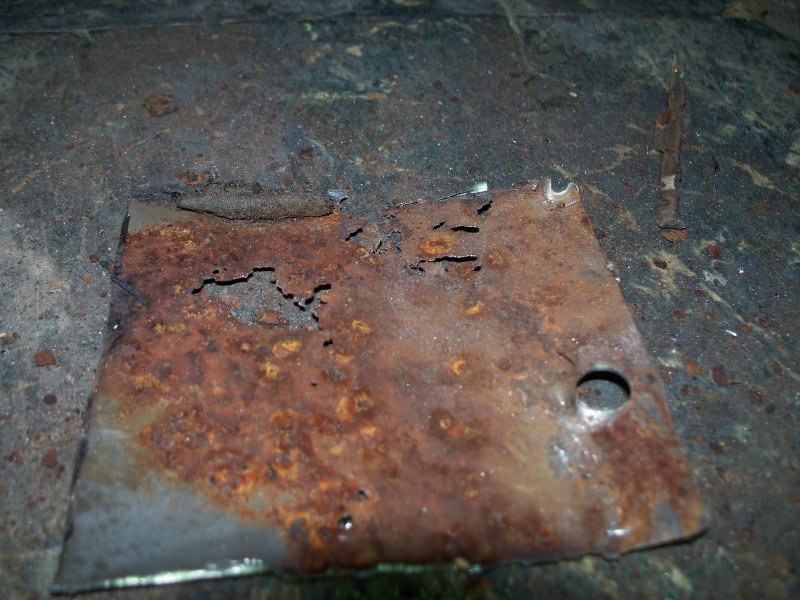
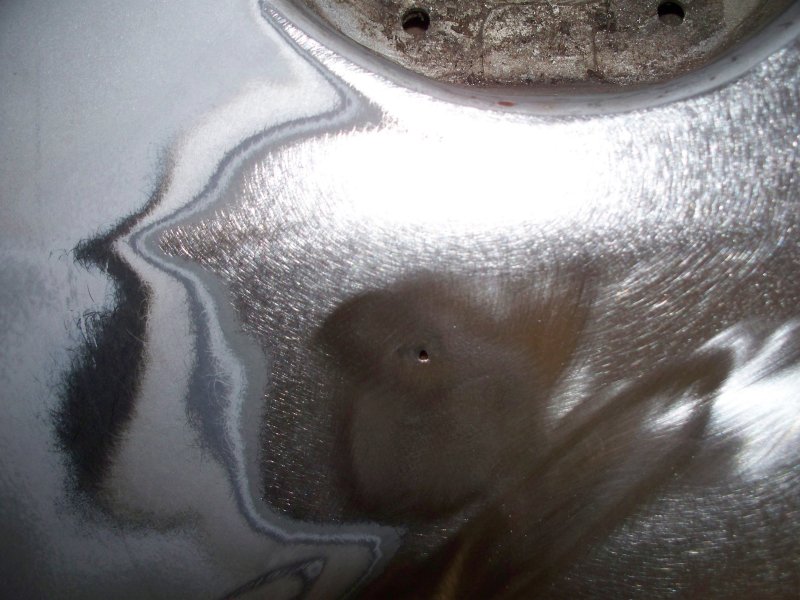
Of course when I wire brushed the rust, almost a dozen pin holes appeared. It's clear if I treat this with phosphoric acid and more wire brushing, more of these pits will have holes.
Although some pitting is OK, (if the rust is removed) welding to pitted metal is not generally possible. I will have to make a patch that replaces most of the pitted metal. These are the areas I am considering for the patch. The red line would be the smallest patch. I could make the patch a little bigger and get rid of most of the pits. (The green line)
Since my replacement spot weld cutter should come in tomorrow, I will think about this over night before I cut up more of the car.
Of course if rust treatments like POR or others worked for the long term, it would be easier to just treat this area with a rust treatment. My experience is rust treatments slows rusting, but does not stop it. The area in green was wire brushed very aggressively and treated with a rust treatment about 15 years ago, the rust reappeared maybe 10 years later. The only long term cure for rust is to totally remove it. Had I used phosphoric acid on this spot and totally removed the rust, the spot might not have rusted again. I suspect filler was applied over the spot and moisture was absorbed by the filler before the car was painted. Notice how the paint is lifting from the area. I think Maaco had the car about 3 days. They probably applied filler on day one and primed on day 2 or 3.
The extension can be cleaned up and reused.
This is what was under the extension
This repair will repair will require more of the car to be cut up.
This is the piece I think I will remove for the above repair.
Of course when I wire brushed the rust, almost a dozen pin holes appeared. It's clear if I treat this with phosphoric acid and more wire brushing, more of these pits will have holes.
Although some pitting is OK, (if the rust is removed) welding to pitted metal is not generally possible. I will have to make a patch that replaces most of the pitted metal. These are the areas I am considering for the patch. The red line would be the smallest patch. I could make the patch a little bigger and get rid of most of the pits. (The green line)
Since my replacement spot weld cutter should come in tomorrow, I will think about this over night before I cut up more of the car.
Of course if rust treatments like POR or others worked for the long term, it would be easier to just treat this area with a rust treatment. My experience is rust treatments slows rusting, but does not stop it. The area in green was wire brushed very aggressively and treated with a rust treatment about 15 years ago, the rust reappeared maybe 10 years later. The only long term cure for rust is to totally remove it. Had I used phosphoric acid on this spot and totally removed the rust, the spot might not have rusted again. I suspect filler was applied over the spot and moisture was absorbed by the filler before the car was painted. Notice how the paint is lifting from the area. I think Maaco had the car about 3 days. They probably applied filler on day one and primed on day 2 or 3.
09-16-2015, 09:34 PM
#25
Registered User
Thread Starter
Join Date: Jul 2014
Location: Marietta GA
Posts: 22
Continuing with cutting the cat apart.
Some nasty rust hiding here.
I looked at the pin holes and in a moment of insanity tried to plug the ping holes with short blasts from the MIG welder. After all I was able to back the holes up with copper plate. I later took a small screw driver and was able to punch holes in the metal with very little effort.
Well, time to cut out the bad metal.
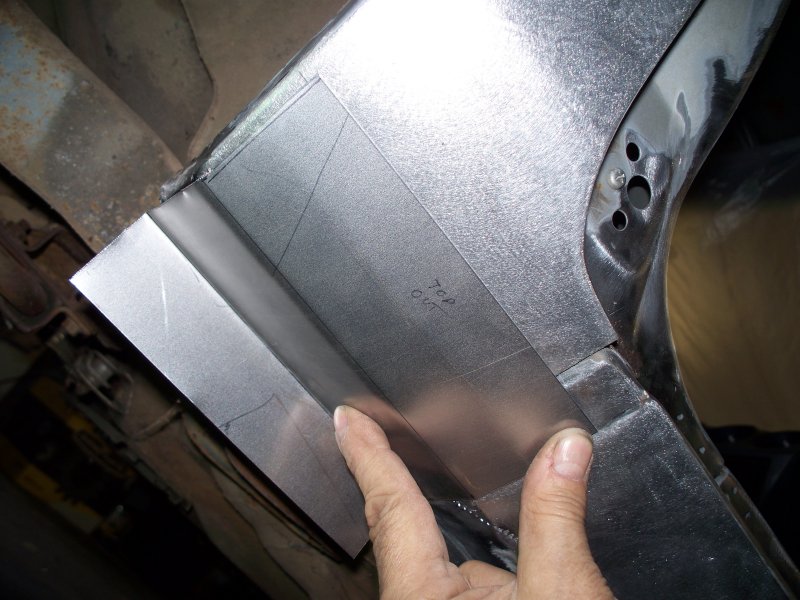
Made a patch, still needs a little tweaking, but very close. While it looks funny due to the flash, it matches the original contour perfectly. Only the edges need a little grinding for a perfect fit.
Two more problem areas. What looks like deep pits in the blue area are just spot welds, not deep rust pits. The remaining rust pits should clean up and not require metal replacement.
Some nasty rust hiding here.
I looked at the pin holes and in a moment of insanity tried to plug the ping holes with short blasts from the MIG welder. After all I was able to back the holes up with copper plate. I later took a small screw driver and was able to punch holes in the metal with very little effort.
Well, time to cut out the bad metal.
Made a patch, still needs a little tweaking, but very close. While it looks funny due to the flash, it matches the original contour perfectly. Only the edges need a little grinding for a perfect fit.
Two more problem areas. What looks like deep pits in the blue area are just spot welds, not deep rust pits. The remaining rust pits should clean up and not require metal replacement.

Thread
Thread Starter
Forum
Replies
Last Post
TylerSkidmore
280ZX Appearance Exterior, Interior
28
11-09-2015 01:14 PM
Philbert
280ZX Appearance Exterior, Interior
17
01-30-2012 04:57 PM
trp79Z
280ZX Appearance Exterior, Interior
4
06-02-2011 10:44 AM
Bookmarks


