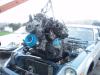
1969 Datsun 510 2Dr Z22 turbo EFI build
 12-05-2012, 07:57 PM
#26
Mr Z++ Wiki
Thread Starter

Join Date: Sep 2009
Location: Victoria, BC
Posts: 2,195
Ding Ding Ding! We have a winner!
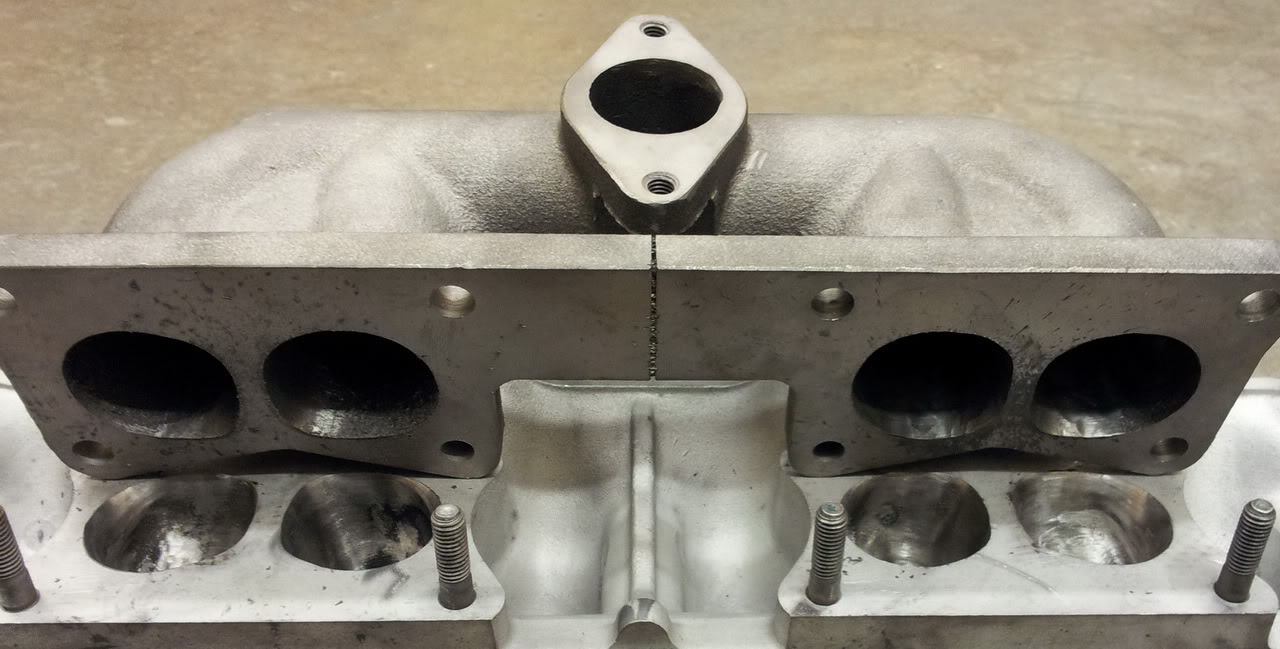
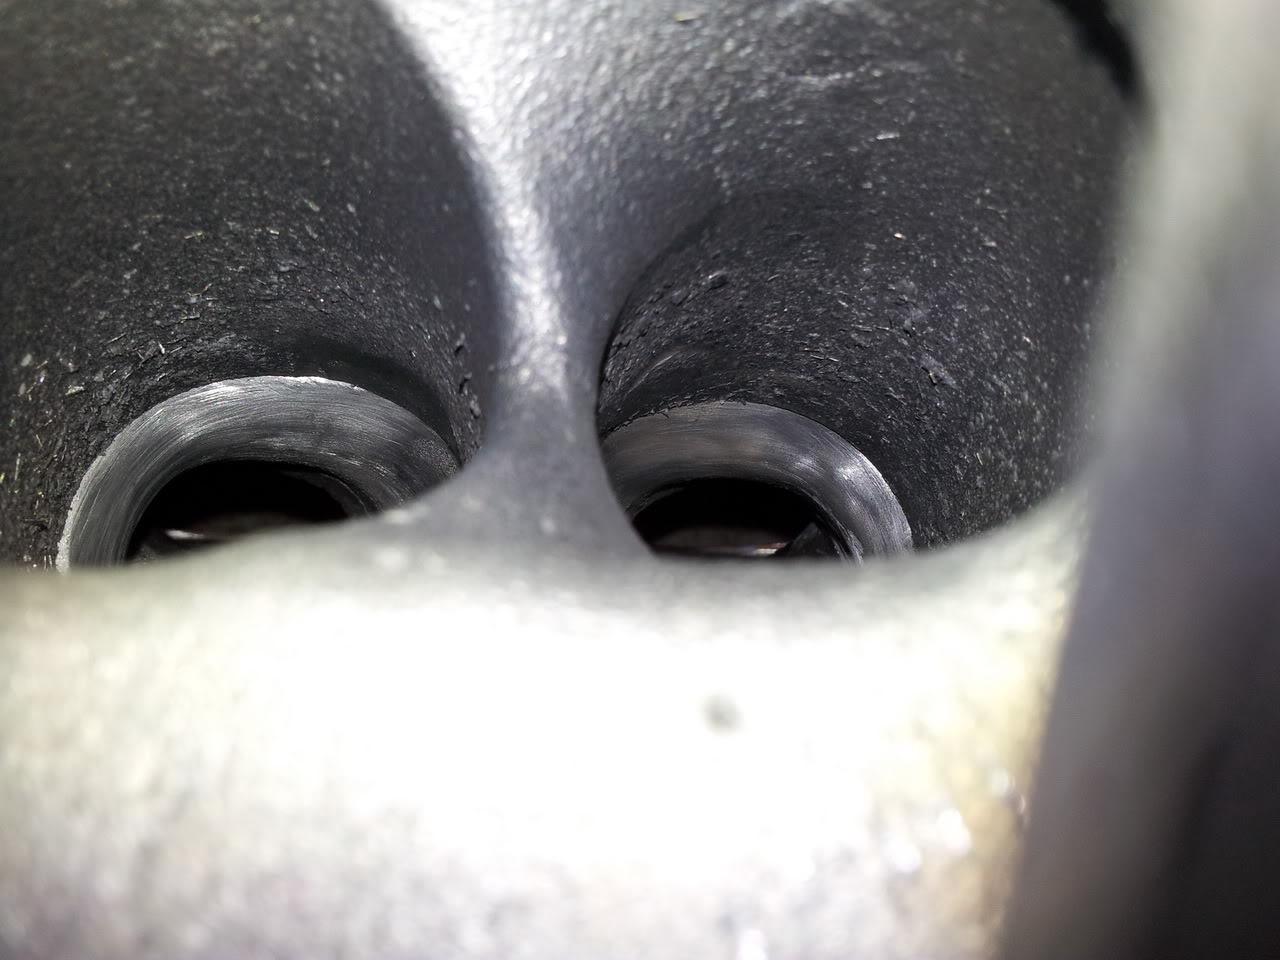
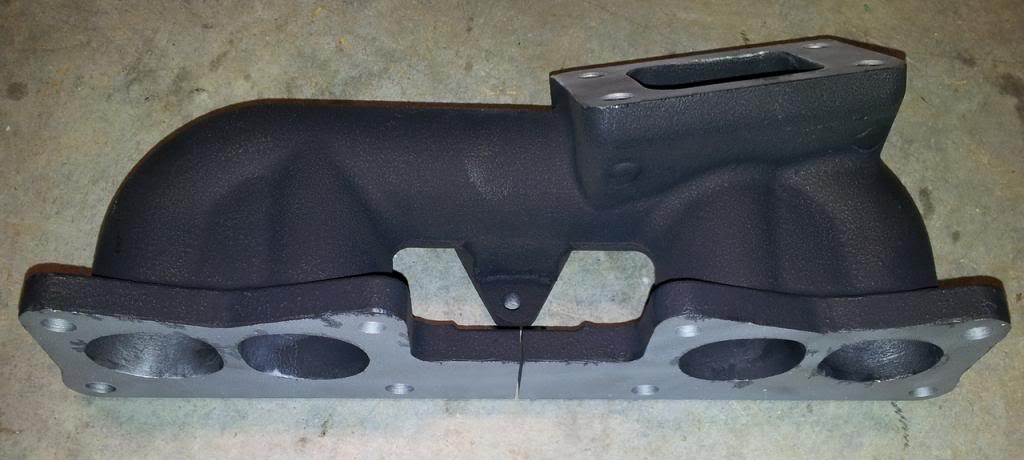
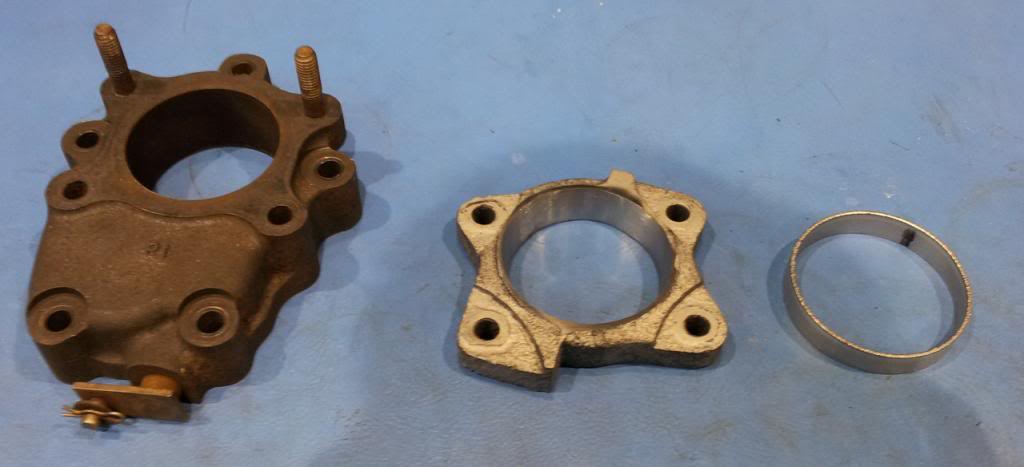
Well it looks like with some fairly aggressive but doable porting the KA24E manifold will work with the NAPS Z heads - woohoo! There is lots of material on the head on the sides of the port - just have to be careful on the bottom as it looks like that's where the water passages for the head reside. The log manifold is cast so there is lots of material to work with. I must say this manifold looks very nice and I suspect it will flow well. It's not optimal but with the large runners but smaller volume than a tubular manifold it should spool quickly (which means more power under the curve). The only place on the manifold that isn't smooth is the entry into the turbo flange which I'll clean up with the die grinder.
I made templates for both sides and marked off where the material needs to be removed to match everything up.
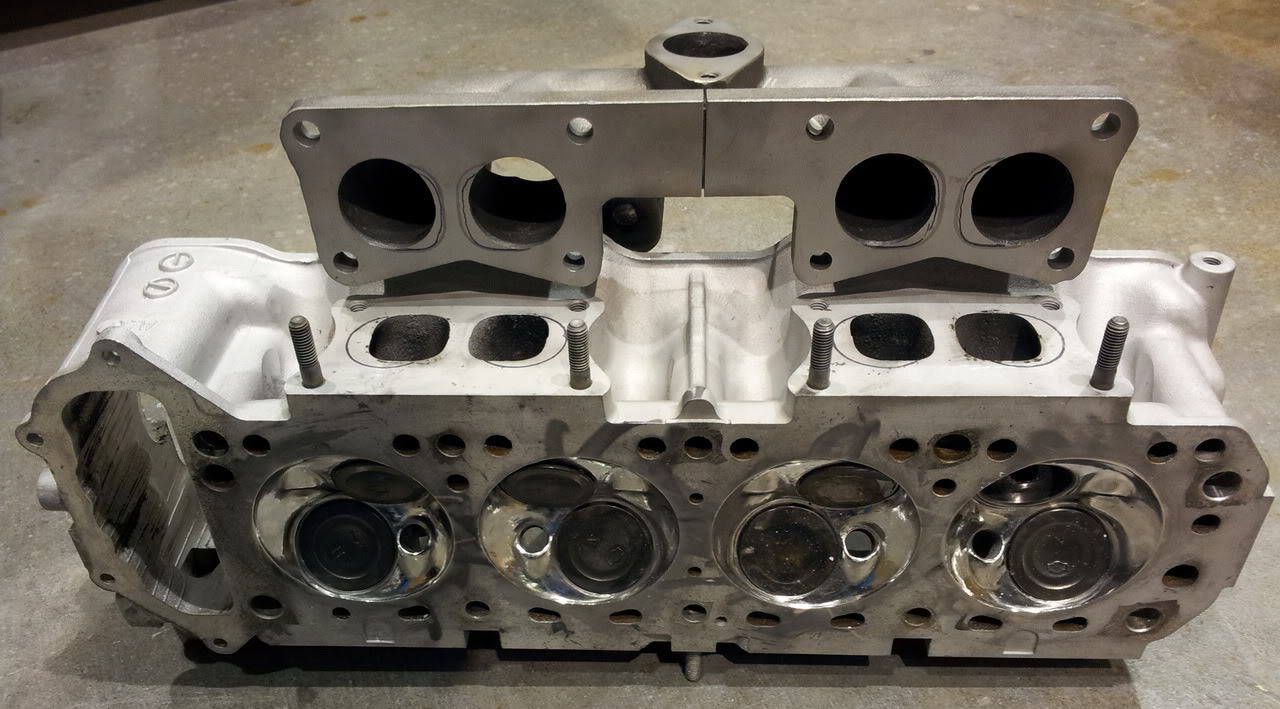
Looks like it was made for the Z22! I'm hoping the offset top mount will clear the strut towers. I looks like it should be fine but I won't know until we get there.
Well it looks like with some fairly aggressive but doable porting the KA24E manifold will work with the NAPS Z heads - woohoo! There is lots of material on the head on the sides of the port - just have to be careful on the bottom as it looks like that's where the water passages for the head reside. The log manifold is cast so there is lots of material to work with. I must say this manifold looks very nice and I suspect it will flow well. It's not optimal but with the large runners but smaller volume than a tubular manifold it should spool quickly (which means more power under the curve). The only place on the manifold that isn't smooth is the entry into the turbo flange which I'll clean up with the die grinder.
I made templates for both sides and marked off where the material needs to be removed to match everything up.
Looks like it was made for the Z22! I'm hoping the offset top mount will clear the strut towers. I looks like it should be fine but I won't know until we get there.

 12-07-2012, 10:45 PM
#28
Big Poppa

Join Date: Jan 2005
Location: Mission, British Columbia
Posts: 4,499
this is what i was going to do on my 620 truck but some idiot decided to give me too much money for it so i let it fly. lol was going to be my first turbo project but i guess ill wait till i blow the zx's motor and go rb.
12-08-2012, 09:30 PM
#29
Mr Z++ Wiki
Thread Starter
Join Date: Sep 2009
Location: Victoria, BC
Posts: 2,195
 It's not rocket science. I just read a LOT. I like figuring out how things work then based on that I can design and tweek to make it better. It appeals to the engineer in me!
 12-12-2012, 09:43 PM
#31
Mr Z++ Wiki
Thread Starter
Join Date: Sep 2009
Location: Victoria, BC
Posts: 2,195
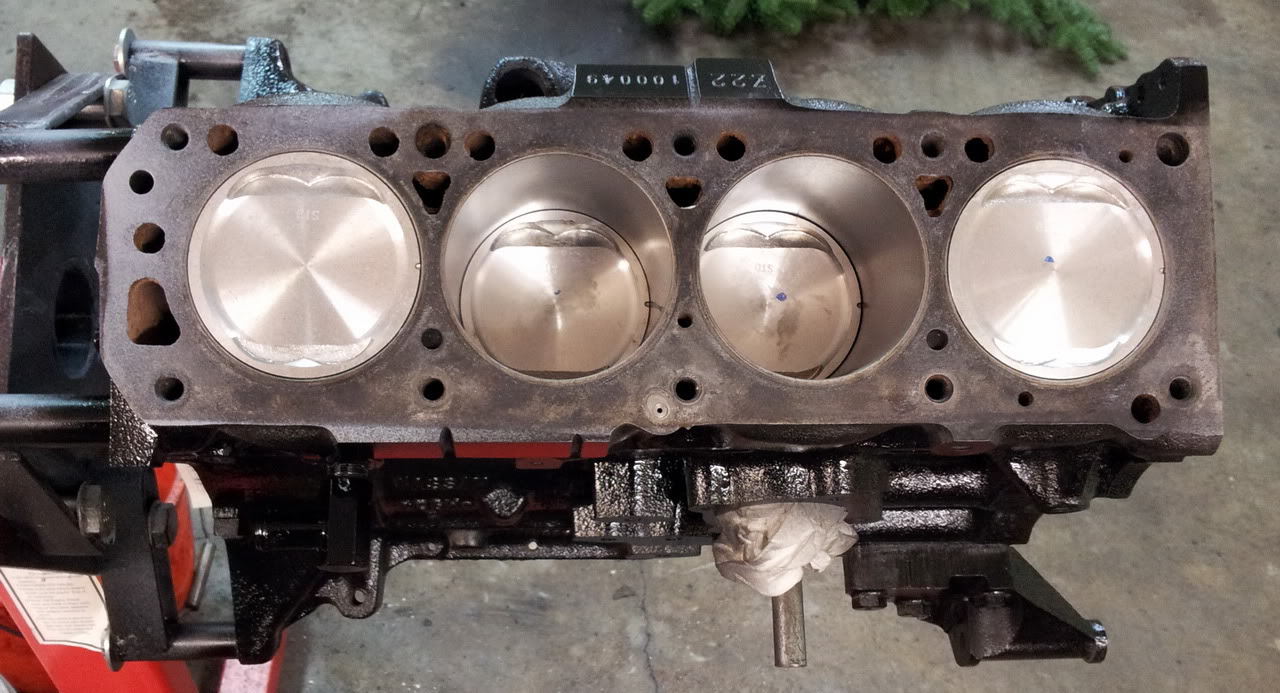
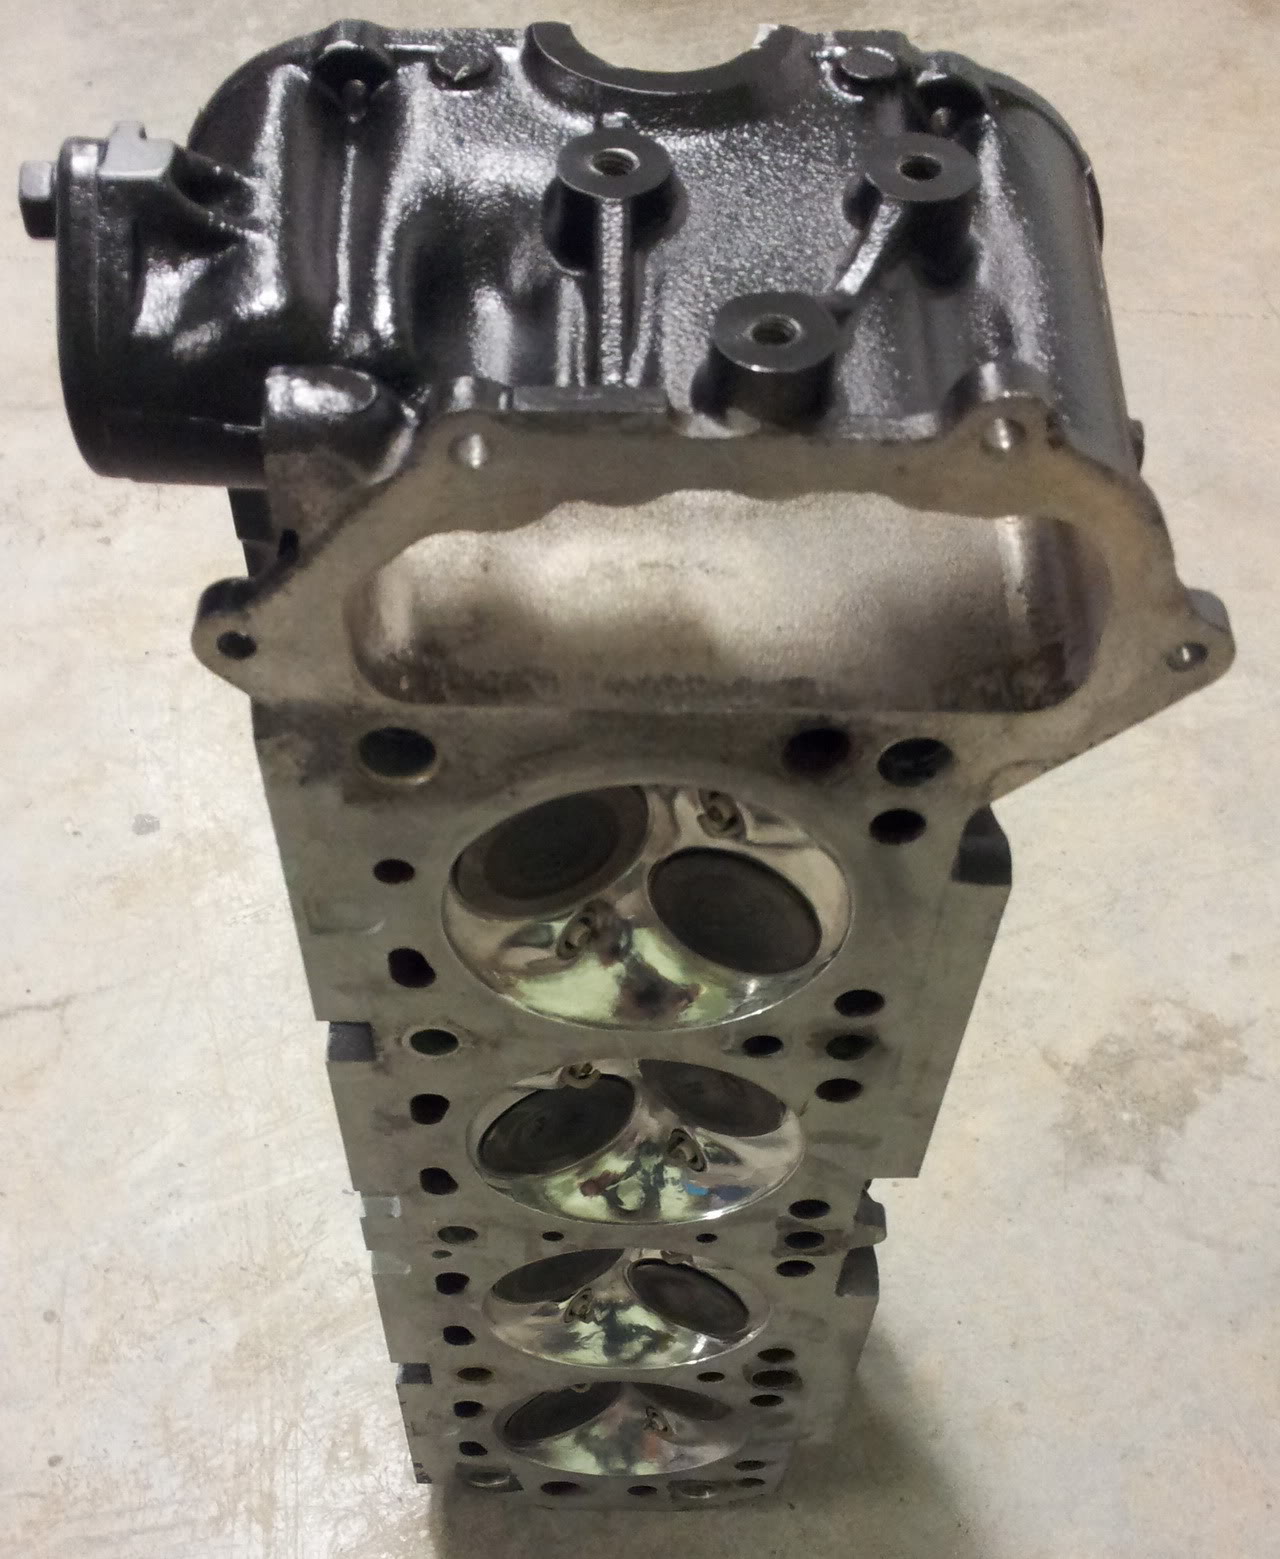
Pretty much done with the head now. Lapped the valves in and hot tanked the head. There's one seat that has a nick in it we'll try to polish out then a quick clean and install the valves and cam. Had the old piston wrist pins pressed out and the new pistons and wrist pins installed. Sent that to the machinist which is the only machine work so far for a total of $62. Pistons are installed and started painting the block. One coat of primer over the old paint and a coat of semi gloss black engine enamel.
12-13-2012, 07:35 AM
#32
Nope just always wanted to work on my own car. First car was a 1981 280ZX but it was my DD and I didn't want to wreak something and not be able to drive it. Anyhow fast forward to the present and after getting over the fear of breaking stuff just jump in with some thoughtful planing and it usually works out OK. This is my first engine rebuild so I have a friend helping out - so far so good It's not rocket science. I just read a LOT. I like figuring out how things work then based on that I can design and tweek to make it better. It appeals to the engineer in me!
It's not rocket science. I just read a LOT. I like figuring out how things work then based on that I can design and tweek to make it better. It appeals to the engineer in me! ). Reading is certainly helpful! Car's looking great, I want to do a 510 now.
12-13-2012, 10:41 PM
). Reading is certainly helpful! Car's looking great, I want to do a 510 now.
12-13-2012, 10:41 PM
#34
Yes sir I'm learning more and more about them! Pretty cool little cars, as a teenager my dad owned a 1600 so it makes me want one even more.
 12-21-2012, 01:51 PM
#35
Mr Z++ Wiki
Thread Starter
Join Date: Sep 2009
Location: Victoria, BC
Posts: 2,195
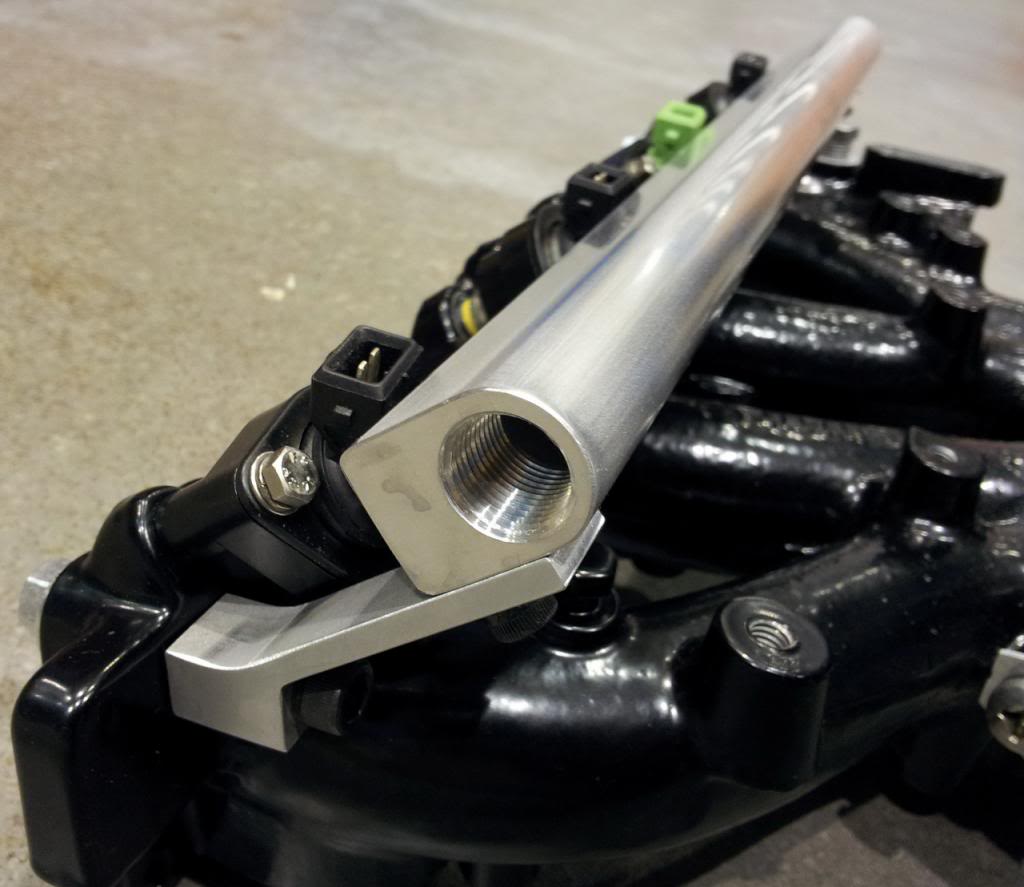
Fixed the last valve seat with the nick in it. All the valve springs and valves are re-installed. Spark plugs gaped and semi-indexed (picked the best of for the eight). Painted the head with high temp exhaust manifold paint to match the block. Ready for cam reinstall. The hot cam for the L28ET is the L28E NA cam. Hopefully the Z22 NA cam works well for a turbo application. Still undecided as to what turbo to run on this build. Probably will start with a T3 from an L28ET. I think a GT28 or GT30 would likely be a good final build turbo for this application. Big returns from a methanol injecton for the L series head and a boosted application - not so sure the hemi style head here will need the methanol as badly. Something to ponder for the future....
 01-02-2013, 01:20 PM
#37
Mr Z++ Wiki
Thread Starter
Join Date: Sep 2009
Location: Victoria, BC
Posts: 2,195
Getting there. Turns out the ARP head bolts I was told to get are the wrong ones. Waiting to hear back from ARP. Sigh.... it's always something but I'm not in a rush so that makes it more bearable
01-10-2013, 09:49 AM
#38
Mr Z++ Wiki
Thread Starter
Join Date: Sep 2009
Location: Victoria, BC
Posts: 2,195
So apparently when I was told to use the L20b ARP set on the Z22 the person was assuming I was building a LZ. The L20B studs are WAY too long for the Z22 with the stock head and they don't make a Z22 kit (or any NAPS Z kits for that matter). I think I've found a stud that will work. ARP sells these as a individual stud - M10 x1.25 x 1.50 x 109mm PN: AM 4.300-2LB so 10 of these, 10 washers and nuts should make a Z22 ARP head bolt kit Just talking with ARP to find out if they'll make a kit of these to buy direct from them or through their suppliers so I can get this thing together!
Just talking with ARP to find out if they'll make a kit of these to buy direct from them or through their suppliers so I can get this thing together!
01-10-2013, 10:05 PM
#39
Registered User

Join Date: Jan 2013
Posts: 3
Very Nice Build!!
I'm currently in the process of doing a very similar build on a Z24 engine for my '86 720 4x4 pickup. I'm still stockpiling parts but got all the major pieces like the turbo, intercooler, wastegate,BOV, piping, and a bunch of weld on flanges, bungs, fittings, etc,etc. Mine will be set up for a fast spool up and lots of midrange power to move this heavy truck with the aerodynamics of a brick better at highway speeds and to basically just make it more fun to drive. I got a 300zx for going fast but I can't take that one off road or into the mud...
Got the same manifold and have to do the same port matching but I'm going to be making mine a blow thru system using a Holley 350 2 barrel carb that'll be modded to run under boost. I see you're converting yours to EFI which will help considerably for tuning and I may end up doing the same later on if I can get the same 200sx efi intake.
Right now I'm in the pre assembly and modifying parts stage but should be ready to start the build in my free time in the next few weeks. If you don't mind I may have a few questions as I go thru with my buildup, but definitely keep up the good work and I can't wait to hear how yours runs once it's finished.
01-10-2013, 10:33 PM
#40

So apparently when I was told to use the L20b ARP set on the Z22 the person was assuming I was building a LZ. The L20B studs are WAY too long for the Z22 with the stock head and they don't make a Z22 kit (or any NAPS Z kits for that matter). I think I've found a stud that will work. ARP sells these as a individual stud - M10 x1.25 x 1.50 x 109mm PN: AM 4.300-2LB so 10 of these, 10 washers and nuts should make a Z22 ARP head bolt kit Just talking with ARP to find out if they'll make a kit of these to buy direct from them or through their suppliers so I can get this thing together!
Just talking with ARP to find out if they'll make a kit of these to buy direct from them or through their suppliers so I can get this thing together!
01-11-2013, 08:09 AM
#41
Registered User
Join Date: Jan 2013
Posts: 3
Do you have a Fastenal or similar near by? After doing research for a head bolt / stud replacement on my Geo G10 motor, I found that you can buy bolts and studs much stronger than ARP's, for a fraction of the price. I ended up getting ~180k psi tensile strength for less than $1/ea. While there I did check to see if they had studs long enough for the L-Series head... no go, but they could custom cut me studs for $5/ea... of whatever hardness I wish.
01-11-2013, 10:44 AM
#42
Do you have a Fastenal or similar near by? After doing research for a head bolt / stud replacement on my Geo G10 motor, I found that you can buy bolts and studs much stronger than ARP's, for a fraction of the price. I ended up getting ~180k psi tensile strength for less than $1/ea. While there I did check to see if they had studs long enough for the L-Series head... no go, but they could custom cut me studs for $5/ea... of whatever hardness I wish.
What are the stock L series head bolts rated for?
 01-12-2013, 03:04 PM
#45
Mr Z++ Wiki
Thread Starter
Join Date: Sep 2009
Location: Victoria, BC
Posts: 2,195
Do you have a Fastenal or similar near by? After doing research for a head bolt / stud replacement on my Geo G10 motor, I found that you can buy bolts and studs much stronger than ARP's, for a fraction of the price. I ended up getting ~180k psi tensile strength for less than $1/ea. While there I did check to see if they had studs long enough for the L-Series head... no go, but they could custom cut me studs for $5/ea... of whatever hardness I wish.
01-16-2013, 10:44 PM
#46
Mr Z++ Wiki
Thread Starter
Join Date: Sep 2009
Location: Victoria, BC
Posts: 2,195
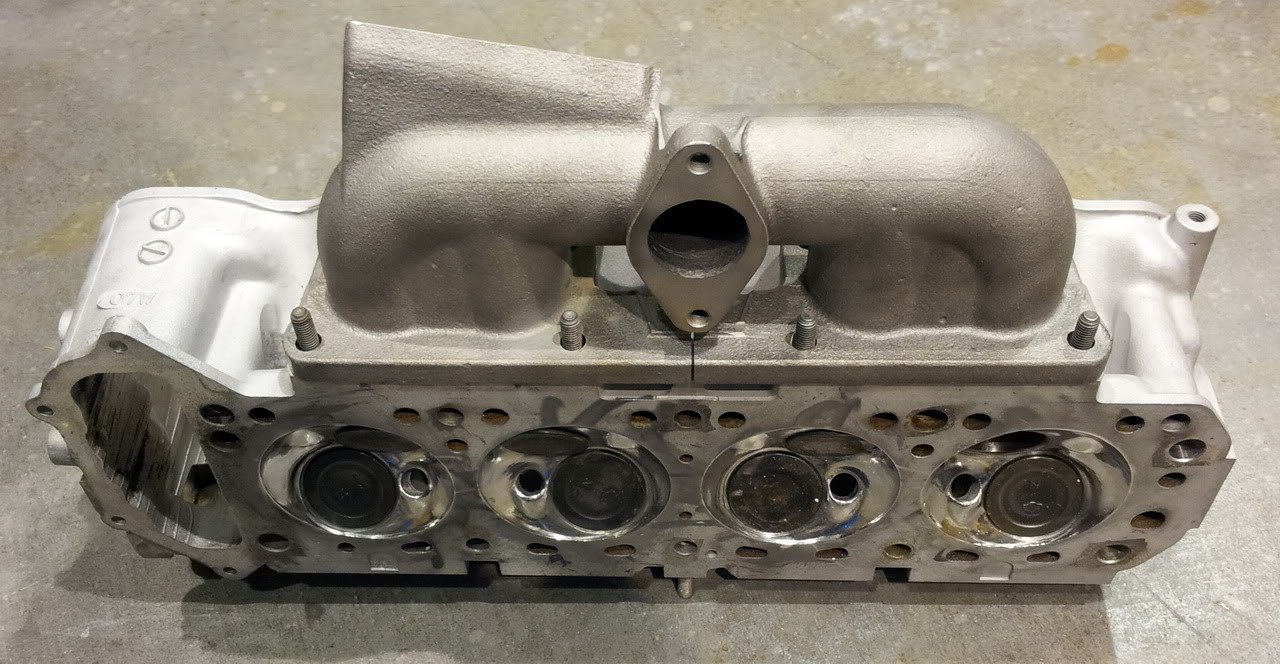
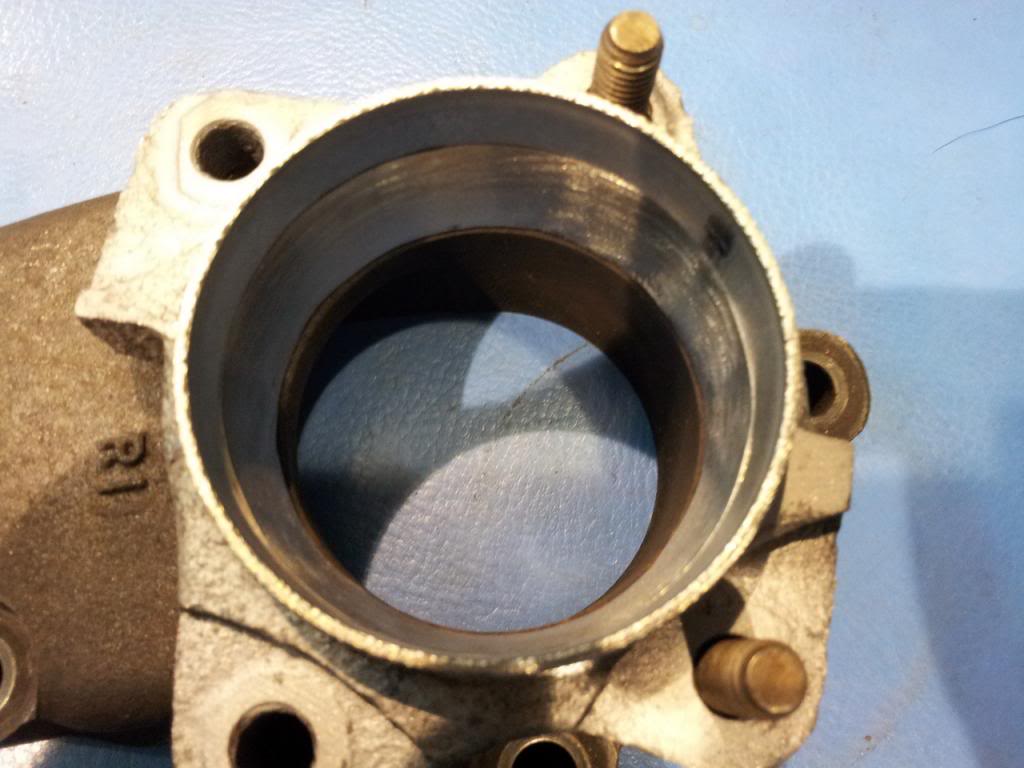
Picking away at the endless "little things" while I try to get the head studs squared away. Did some more porting and polishing on the exhaust manifold. I already matched the ports but I wanted to transistion and take some of the roughness of the casting out and round off any sharp edges going into the turbo flange. Cleaned it up and painted it satin black with some header paint to match the head.
01-30-2013, 10:39 PM
#48
Mr Z++ Wiki
Thread Starter
Join Date: Sep 2009
Location: Victoria, BC
Posts: 2,195
OK I've finally sourced the head bolts. My local parts place wanted 4x as much for the nuts, etc with a four to six week lead time. Ordered them from Regal at Northern Auto Parts for a fraction of what the local shop wanted and 7-10 days to get them in.
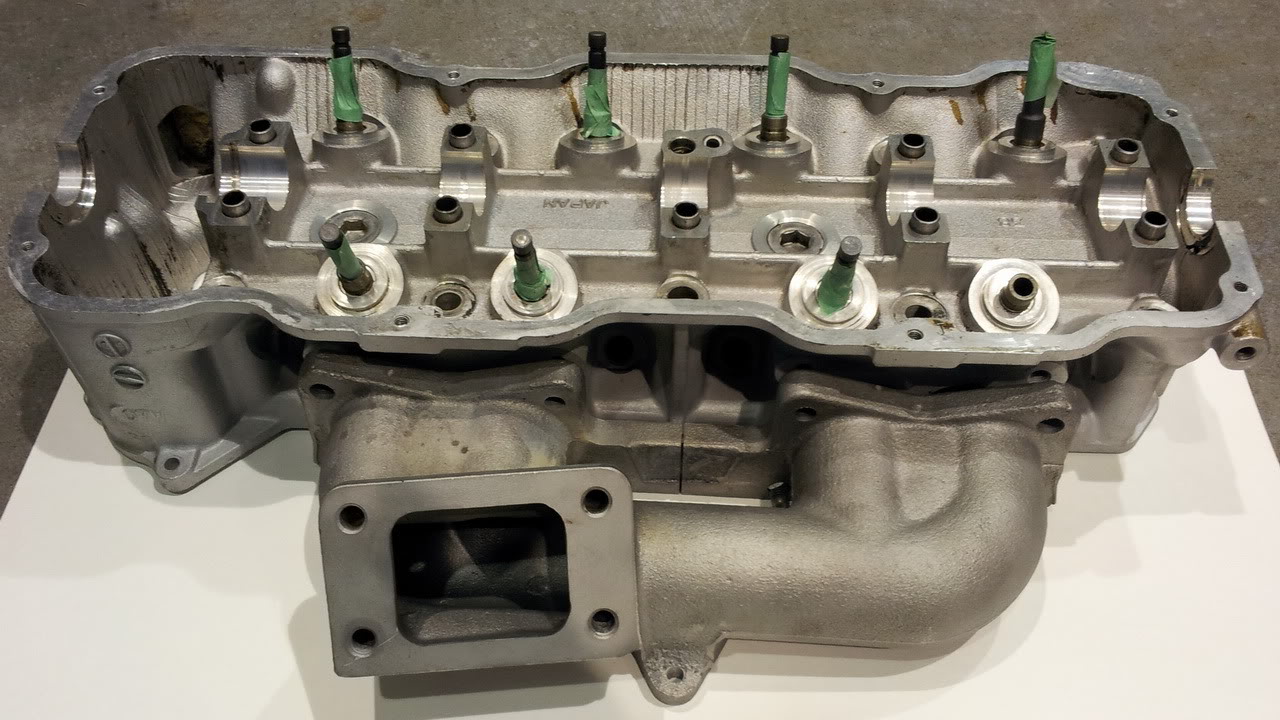
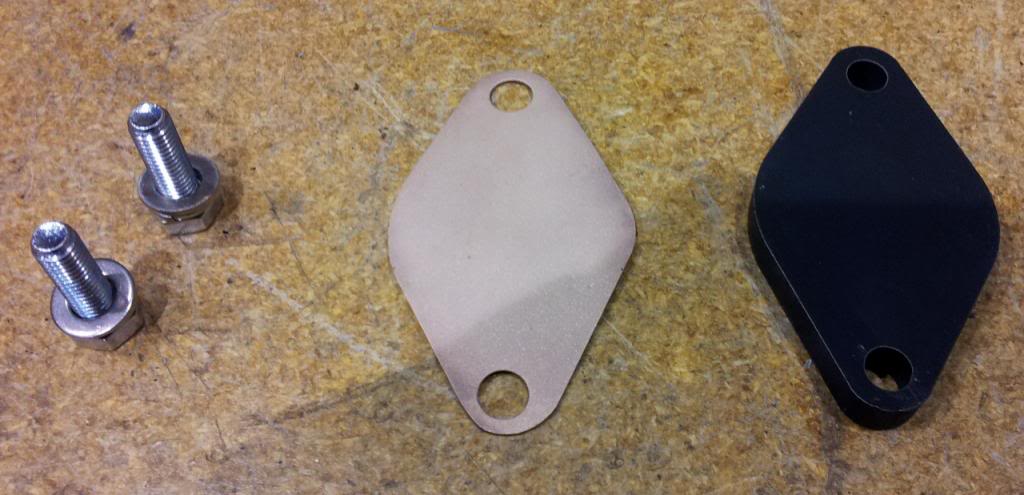
Working on the turbo manifold a bit. Got a heavy blanking plate cut and had made a copper gasket and had it annealed to make it soft. I'll use these to block off the wategate flange on the turbo as I'll be using a stock T3 from a 280ZX with an internal wastegate.
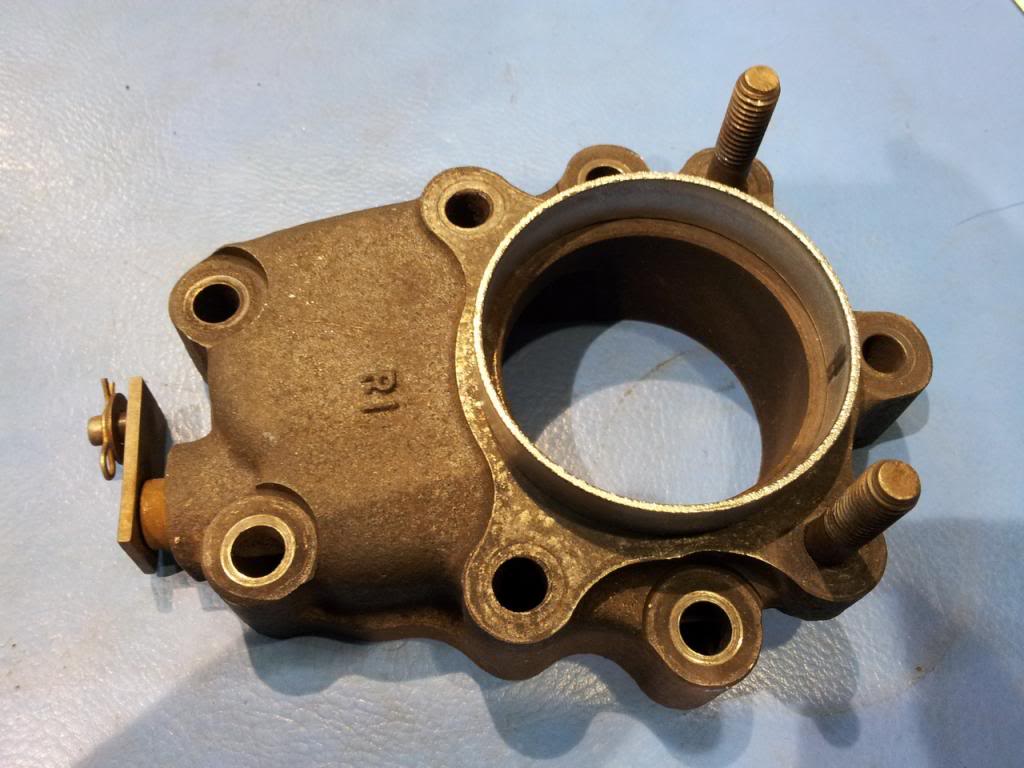
Got an old 280ZX turbo cast downpipe and hacked off the flange. Port matched it to the T3 outlet then tapered out for a mandrel bent 2 1/2" down pipe which I'll likely flare to 3". The turbo flange is a little rounded so it looks like there is a lip but it matches up perfectly.
Working on the turbo manifold a bit. Got a heavy blanking plate cut and had made a copper gasket and had it annealed to make it soft. I'll use these to block off the wategate flange on the turbo as I'll be using a stock T3 from a 280ZX with an internal wastegate.
Got an old 280ZX turbo cast downpipe and hacked off the flange. Port matched it to the T3 outlet then tapered out for a mandrel bent 2 1/2" down pipe which I'll likely flare to 3". The turbo flange is a little rounded so it looks like there is a lip but it matches up perfectly.