Painted my 240Z


Thread Starter
Encyclopedic Knowledge
Joined: Aug 2005
Posts: 3,316
From: Naperville, IL
senior members should be allowed to post as many pics as they want at once.


Reassembled:


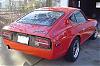
Hatch needs to be wetsanded a bit - there was some orange overspray that made its way under the newspaper, so I removed it, but didn't have time to do much more today. Blemish is visible in the following pic:


continued...
Reassembled:
Hatch needs to be wetsanded a bit - there was some orange overspray that made its way under the newspaper, so I removed it, but didn't have time to do much more today. Blemish is visible in the following pic:
continued...
Thread Starter
Encyclopedic Knowledge
Joined: Aug 2005
Posts: 3,316
From: Naperville, IL


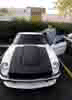
The inspiration:

The body's not perfect... it's from 1973 and was neglected for over 20 years, so as an amateur (this was my first paint job), I didn't expect it to be. Yes, it is orange peeled... I'll wetsand the next time I'm able to work on it. And the hood needs to be aligned before it can be closed.
For anyone wondering, I used Duplicolor's "Paint Shop" system.
All that's left to get it on the road is to finish the brakes and replace some sensors. Tried to bleed the system Thursday, found a massive leak from the front passenger's side hardline, so I fabricated a new one. Went to bleed the rears, but the master cylinder wasn't taking any fluid for the rear side... determined that the master cylinder was shot. Thanks (once again) to Eric, I obtained a 280ZX 15/16 master cylinder... got the rear hardline attached to the master cylinder, but the front hardline wasn't cooperating and I ran out of time.
Pr0n Addict
Joined: Sep 2007
Posts: 4,617
From: virginia
2nd that^^^ unless you plan on wider wheels at some point
and dude, i def would have come up there and helped you with it. no lie. if you decide to repaint it at any point, i'll seriously try to come up and help you spray it (not sure if you know this, but i'm a pro at painting. i'll show you some pics if you are in doubt!). good luck with sanding out the orange peel.
BUT! get that biotch to carlisle in May! it's going to be off the hizzy!
Last edited by KasbeKZ; Apr 19, 2010 at 07:30 PM.
Thread Starter
Encyclopedic Knowledge
Joined: Aug 2005
Posts: 3,316
From: Naperville, IL
As I said on ChicagoZ when you said that, Eric, the Z31 wheels are NOT staying. The ride height is also not finalized (do you not recall how low my Z32 was?). Sorry if I don't have your kind of money. lol The flares stay. Even if the holes weren't already in the fenders and quarters, and the surfaces underneath were in good condition (NEITHER of which are true), I'd still want the flares on the car.
Hell, if you had your way, I wouldn't have painted the car how I did. lol
You're also the only person who has had any negative opinion toward the flares.
Hell, if you had your way, I wouldn't have painted the car how I did. lol
You're also the only person who has had any negative opinion toward the flares.
Last edited by ZLover4Life; Apr 19, 2010 at 07:45 PM.
�ber User
Joined: Sep 2005
Posts: 9,532
From: lemont, Illinois
woaahhh, don't get me wrong, i freaking love the **** out of ZG flares, but done the way i described on chicagoz. i think no S30 lowered and with wider wheels should be without, i just meant for the current state it is in.
and yeah, i still think my idea for using those colors was better :P but it turned out a better then i expected. and i don't have money! if i did the S2K would be slammed on some enkei's right now and getting a turbo kit haha.
and yeah, i still think my idea for using those colors was better :P but it turned out a better then i expected. and i don't have money! if i did the S2K would be slammed on some enkei's right now and getting a turbo kit haha.

Thread Starter
Encyclopedic Knowledge
Joined: Aug 2005
Posts: 3,316
From: Naperville, IL
It's actually satin black (don't know if there's a difference).
As far as the camera, it's a 6.2MP Kodak... and the last several pics are in direct sunlight around 4-5pm. As far as flaws, there aren't any really in the paint - just orange peel. There is shitty metal underneath the flares, though... and if you look closely at the driver's side door in the rear driver's side pics, you can see the previous owners unimpressive bondo work (below the door handle).
I believe the lack of glossiness is either from the orange peel or I went too light on the clear coat... both of which aren't difficult to correct, but I'm going to consult my neighbor (who does body work for a living) about the best way to approach it.
�ber User
Joined: Sep 2005
Posts: 9,532
From: lemont, Illinois
hmmm... might also jsut be the size of the pics to... as for the orange peel, i would say it's very possible that the fluke of COLD air we had may have brought the temps down just below of what is desireable. i wouldn't paint anything while the ambient temp is below 60 degrees. especially cold metal stuff, it tends to really hold that cold temp in and screw with the drying/adhering process.
matte/satin/flat are all almost exaclty the same. matte and satin i think might be the same, just having a SLIGHT amount of gloss in them compared to flat.
matte/satin/flat are all almost exaclty the same. matte and satin i think might be the same, just having a SLIGHT amount of gloss in them compared to flat.

I have a present for you...
Joined: Mar 2003
Posts: 1,699
From: dayton, nevada usa
It's too late for all the shoudacudda but you can color sand the whole car to get the texture you want and then shoot it with a mat clear coat. If you shot it with the metal below 60 degrees I think you should wait about 2 weeks so it can dry under the skin.


Pr0n Addict
Joined: Sep 2007
Posts: 4,617
From: virginia
you can put down a good coat in some pretty low temperatures with the right reducer. the problem was probably entirely due to the gun not being set up properly. that's really the hardest part about painting, and the aspect that i still have the most trouble with. you can tell that a ton of care went into prep work and he was very patient when spraying it, but without a pro there to set the gun up, it's really hard to get that good texture.
Thread Starter
Encyclopedic Knowledge
Joined: Aug 2005
Posts: 3,316
From: Naperville, IL
I considered asking my neighbor to help with setting up the gun beforehand, but he's a busy guy and I always feel like I'm bugging him when I ask him stuff, nowadays.
And the engine bay is currently hideous. The bay is painted black, but the motor is all greasy and unpainted, there are AC components strewn all over the place (I have yet to mount the compressor and condenser), wires everywhere, etc. It runs fine... but I've never been one for an immaculate engine bay. lol
And the engine bay is currently hideous. The bay is painted black, but the motor is all greasy and unpainted, there are AC components strewn all over the place (I have yet to mount the compressor and condenser), wires everywhere, etc. It runs fine... but I've never been one for an immaculate engine bay. lol
Pr0n Addict
Joined: Sep 2007
Posts: 4,617
From: virginia
yeah, it looks like you were using a bit too much air pressure. the trick is to look at the fan from the side and get it to look strait and smooth for just about as far as it can (at least 8 inches from the nozzle). if it is breaking up into swirls before that, you just can't get a good coat down. that's about as far as i can get with it before i just start experimenting. i don't have much method past that point.
Thread Starter
Encyclopedic Knowledge
Joined: Aug 2005
Posts: 3,316
From: Naperville, IL
I went exactly by the directions on the can, which said ~30psi. It also said to increase the paint flow, which I did a little bit, but not too much.
Eric's point is valid as well... the temperature dropped pretty drastically that night (was in the 50's). But it was either spray it then or not at all... so I had to get it done. Either way, I'm happy with how it looks, I just have to figure out how to smooth it out a bit.
Eric's point is valid as well... the temperature dropped pretty drastically that night (was in the 50's). But it was either spray it then or not at all... so I had to get it done. Either way, I'm happy with how it looks, I just have to figure out how to smooth it out a bit.
Pr0n Addict
Joined: Sep 2007
Posts: 4,617
From: virginia
yeah, 30psi at the regulator, but there are still two other controls to play with once you get that set. also, adjusting the regulator pressure can sometimes help compensate for that temperature.
what i'm trying to say is that setting up the gun is something that can't just be done by default settings. your reducer, paint system, temperature, spraying style, surface area and numerous other factors are going to affect how the gun is best set up for any given day. like i said though, it's tough. i still can't always do it. my paint jobs always turn out well because i have my dad there (painter for... 20 years or so) to check the gun set up.
what i'm trying to say is that setting up the gun is something that can't just be done by default settings. your reducer, paint system, temperature, spraying style, surface area and numerous other factors are going to affect how the gun is best set up for any given day. like i said though, it's tough. i still can't always do it. my paint jobs always turn out well because i have my dad there (painter for... 20 years or so) to check the gun set up.

Registered User
Joined: Sep 2008
Posts: 283
From: Collingswood, NJ
I went exactly by the directions on the can, which said ~30psi. It also said to increase the paint flow, which I did a little bit, but not too much.
Eric's point is valid as well... the temperature dropped pretty drastically that night (was in the 50's). But it was either spray it then or not at all... so I had to get it done. Either way, I'm happy with how it looks, I just have to figure out how to smooth it out a bit.
Eric's point is valid as well... the temperature dropped pretty drastically that night (was in the 50's). But it was either spray it then or not at all... so I had to get it done. Either way, I'm happy with how it looks, I just have to figure out how to smooth it out a bit.
Like it says... DON'T CUT INTO THE PAINT!
�ber User
Joined: Sep 2005
Posts: 9,532
From: lemont, Illinois
my spray gun usually is good at about 80psi at the regulator (when spraying drops to 60) but it also has a secondary regulator at the base of the gun to, forget what it is set to, then set the fan span and the paint flow so it covers smooth and not to thick. i usually spray cardboard before hand to see how it is laying down.
Thread Starter
Encyclopedic Knowledge
Joined: Aug 2005
Posts: 3,316
From: Naperville, IL
The regulator at the gun is what I had set to 25 for paint (paint directions said 20-40 psi), 30 for clear (directions said 30-40). I blasted the spare door I have before moving to the car, but the color coat isn't what there was an issue with - the color is even and looks great, in my opinion. It's the clear that I don't think I went heavy enough on.
And no, I didn't do any sanding or buffing... I'm only able to work on the car when I make trips to Chicago (I currently live ~250 miles from the car itself, which is stored at my parents'). Thanks for the link.
And no, I didn't do any sanding or buffing... I'm only able to work on the car when I make trips to Chicago (I currently live ~250 miles from the car itself, which is stored at my parents'). Thanks for the link.