
260Z Restoration as a Retirement Project


Thread Starter
Registered User
Joined: Apr 2013
Posts: 578
From: Tucson, Arizona USA
I predict an easy win in Nov.
You haven't been watching the ebay or CL. You really need to get that independent appraisal! $25k is no longer ungodly. Add up your receipts and total your hours. I'm sure you will see you are working for the love of it and minimum wage lol.
You haven't been watching the ebay or CL. You really need to get that independent appraisal! $25k is no longer ungodly. Add up your receipts and total your hours. I'm sure you will see you are working for the love of it and minimum wage lol.
As far as receipts and so on, I keep everything in Quicken. It's easy and alarming to see how much I've spent on this thing. Much more than the $27K and I've got more to do. I will get an appraisal when I'm all done and it will go back to Hagerty. So much less than minimum wage that I'm probably paying for the pleasure of doing the work.
BTW, I have been watching eBay. Saw that nice 260Z in Bakersfield just go for $6600, what a steal. Even if it was an automatic, with 42000 miles, garaged all its life and pretty much untouched (changed the carbs, a good thing), it was very nice. I also saw your product there, I'm now a "watcher".
Thread Starter
Registered User
Joined: Apr 2013
Posts: 578
From: Tucson, Arizona USA
Quarter Windows
Well, after a go-around with the metal finishing shop, I ended up with very nice rebuilt quarter window frames. Seems the shop thought I wanted them chromed when all I told them to do was to polish them so they would be shiny. The chroming process and its subsequent "undo" caused all the spot welds holding connectors and the door frame plate to let go due to the acid bath. I was livid  when they delivered my polished frames without all the other parts.
At least they made it right, and maybe better. I had another set of frames and they were able to use the very corroded internal connectors as a model, fabricated up new ones and with the door frame plates we got a set of very nice frames with rebuilt internals. They match up at the joints very well.
For sure, someone without a lot of experience can make a big mess installing rubber with sealant. OMG, I was thinking about Skully's comment about taking Gojo showers.
Finished assembling the windows and frames, cleaned them up and installed them. Lots of pushing, prying and shoving involved with all the new rubber.
Wow, every addition to this car seems like a big improvement. Although the door windows are not yet installed, the frame sash is in so the doors can be aligned. This all makes the car look like all the glass is there. Finally, no holes!

While it's at the shop, I'm a regular over there. I'm installing as much of the new weatherstrip rubber as I can. Next up should be front air dam and the rear spoiler.
Found some new rubber window "squeegees" over at ZCarSource. They are on their way. It will probably be "difficult" to attach them to the stainless trim piece but hey, what else would I do? Get in trouble?
when they delivered my polished frames without all the other parts.At least they made it right, and maybe better. I had another set of frames and they were able to use the very corroded internal connectors as a model, fabricated up new ones and with the door frame plates we got a set of very nice frames with rebuilt internals. They match up at the joints very well.
For sure, someone without a lot of experience can make a big mess installing rubber with sealant. OMG, I was thinking about Skully's comment about taking Gojo showers.
Finished assembling the windows and frames, cleaned them up and installed them. Lots of pushing, prying and shoving involved with all the new rubber.
Wow, every addition to this car seems like a big improvement. Although the door windows are not yet installed, the frame sash is in so the doors can be aligned. This all makes the car look like all the glass is there. Finally, no holes!
While it's at the shop, I'm a regular over there. I'm installing as much of the new weatherstrip rubber as I can. Next up should be front air dam and the rear spoiler.
Found some new rubber window "squeegees" over at ZCarSource. They are on their way. It will probably be "difficult" to attach them to the stainless trim piece but hey, what else would I do? Get in trouble?
Last edited by beg3yrs; Jun 30, 2015 at 08:38 AM.

Registered User
Joined: Feb 2002
Posts: 2,906
From: Saskatoon, SK
Oh man that looks good. Are you using glue for weatherstripping? I found it better if you did a nice thin layer on both surfaces and let it sit for a few minutes, then applied, less mess than just trying a bead on one piece and trying to plop the weatherstripping onto it.
Thread Starter
Registered User
Joined: Apr 2013
Posts: 578
From: Tucson, Arizona USA
Oh man that looks good. Are you using glue for weatherstripping? I found it better if you did a nice thin layer on both surfaces and let it sit for a few minutes, then applied, less mess than just trying a bead on one piece and trying to plop the weatherstripping onto it.
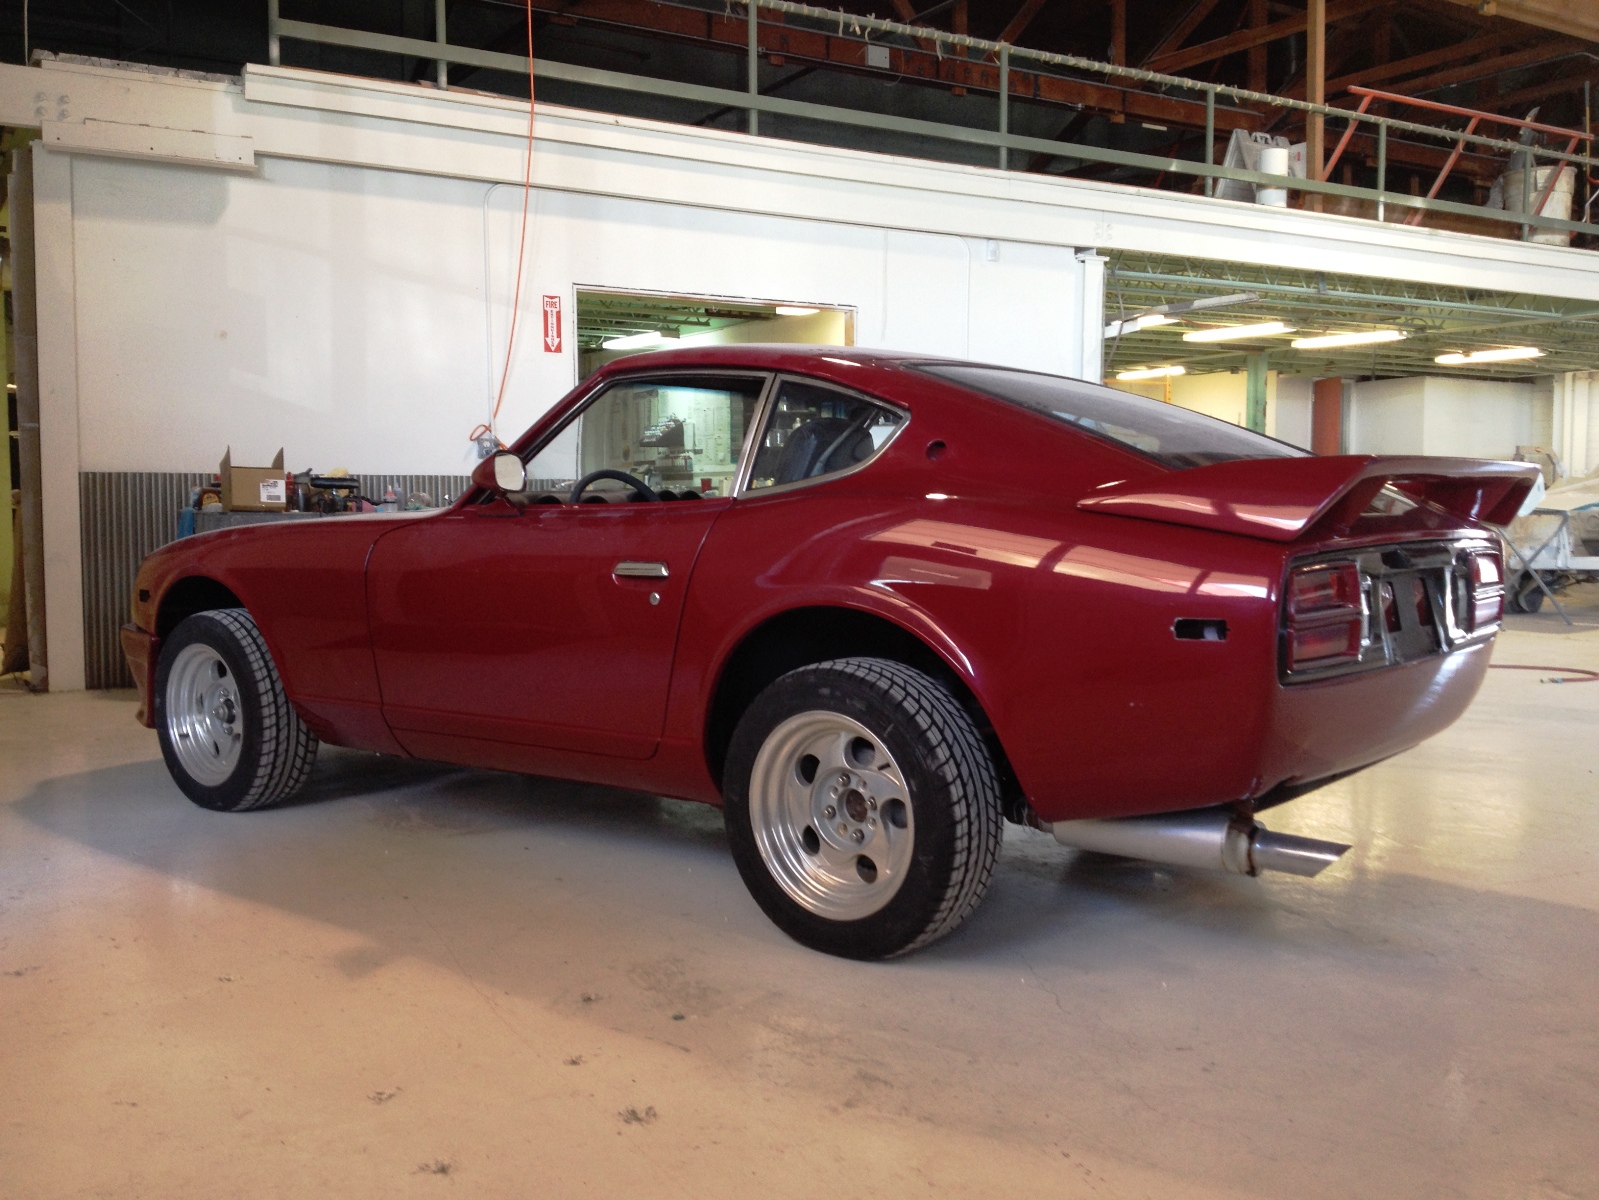
Wahoo! All the big bits are now on the car. Still have to do the final polish and apply the rest of the trim and badging.
Waddya all think???


Thread Starter
Registered User
Joined: Apr 2013
Posts: 578
From: Tucson, Arizona USA
Coming Home
Thanks for the nice words BGM. Much appreciated. Toward the end of my engineering career I was in management and did a lot of writing. Who knew all those high school teachers forty years ago were right?!
Well folks, a milestone has been reached. At least for now, we're done at the body shop, Cutting Edge Refinishing. I very much wanted to get the car back before this weekend as a key person at the shop was leaving for a well-earned holiday and wouldn't be back for another week. It was deliver now or deliver in another week. I spent four days there this week working on the car myself. So much so that when I showed up at 8:30AM on the fourth morning I was told that I was late and had missed the shop meeting. Go figure.
The work I was doing was not specialized refinishing work, rather it was assembling things that most hacks like myself can do without getting into too much trouble. Things like installing the roll-up windows, quarter windows, new weatherstripping, etc.. It was very handy to have extra hands in the area now and then as well as some experienced guidance too.
It was a real team project to figure out how to make a linkage between the hatch lock cylinder and the hatch latch release plate. This task had to be performed as relocating the rear wing to be even with the back of the body caused an interference with the hatch lock cylinder. An early decision to relocate the cylinder forward five inches had come to roost in the form of needing to invent a linkage. Turns out a metal rod welded to the flat plate on the latch release was a viable approach although not without its difficulties. The area in the hatch is quite small and not a straight shot. The rod required some interesting bends and some metal had to be cut away to get access.

No, that's not me doing the cutting. I used to have hair that color...
After installing the linkage we then found the metal rod had enough weight to it that it left the latch with a hair-trigger release. Any kind of tug on the hatch would tend to release the hatch and if you tried to close it with any force, the rod would release the hatch right away. Some genius at the shop (not me) suggested a spring to support the rod at the cylinder. We quickly found an appropriate one right on top of the orphan parts bin, mocked it up and it worked! Added a nib to the rod to keep that end of the spring in place and used a self tapping screw and washer to hold the other end against the inner hatch surface. Done.
Homeward bound! On my way home today, someone in a red Z was following real close.

Here she is folks, ready for more work back at the homestead.
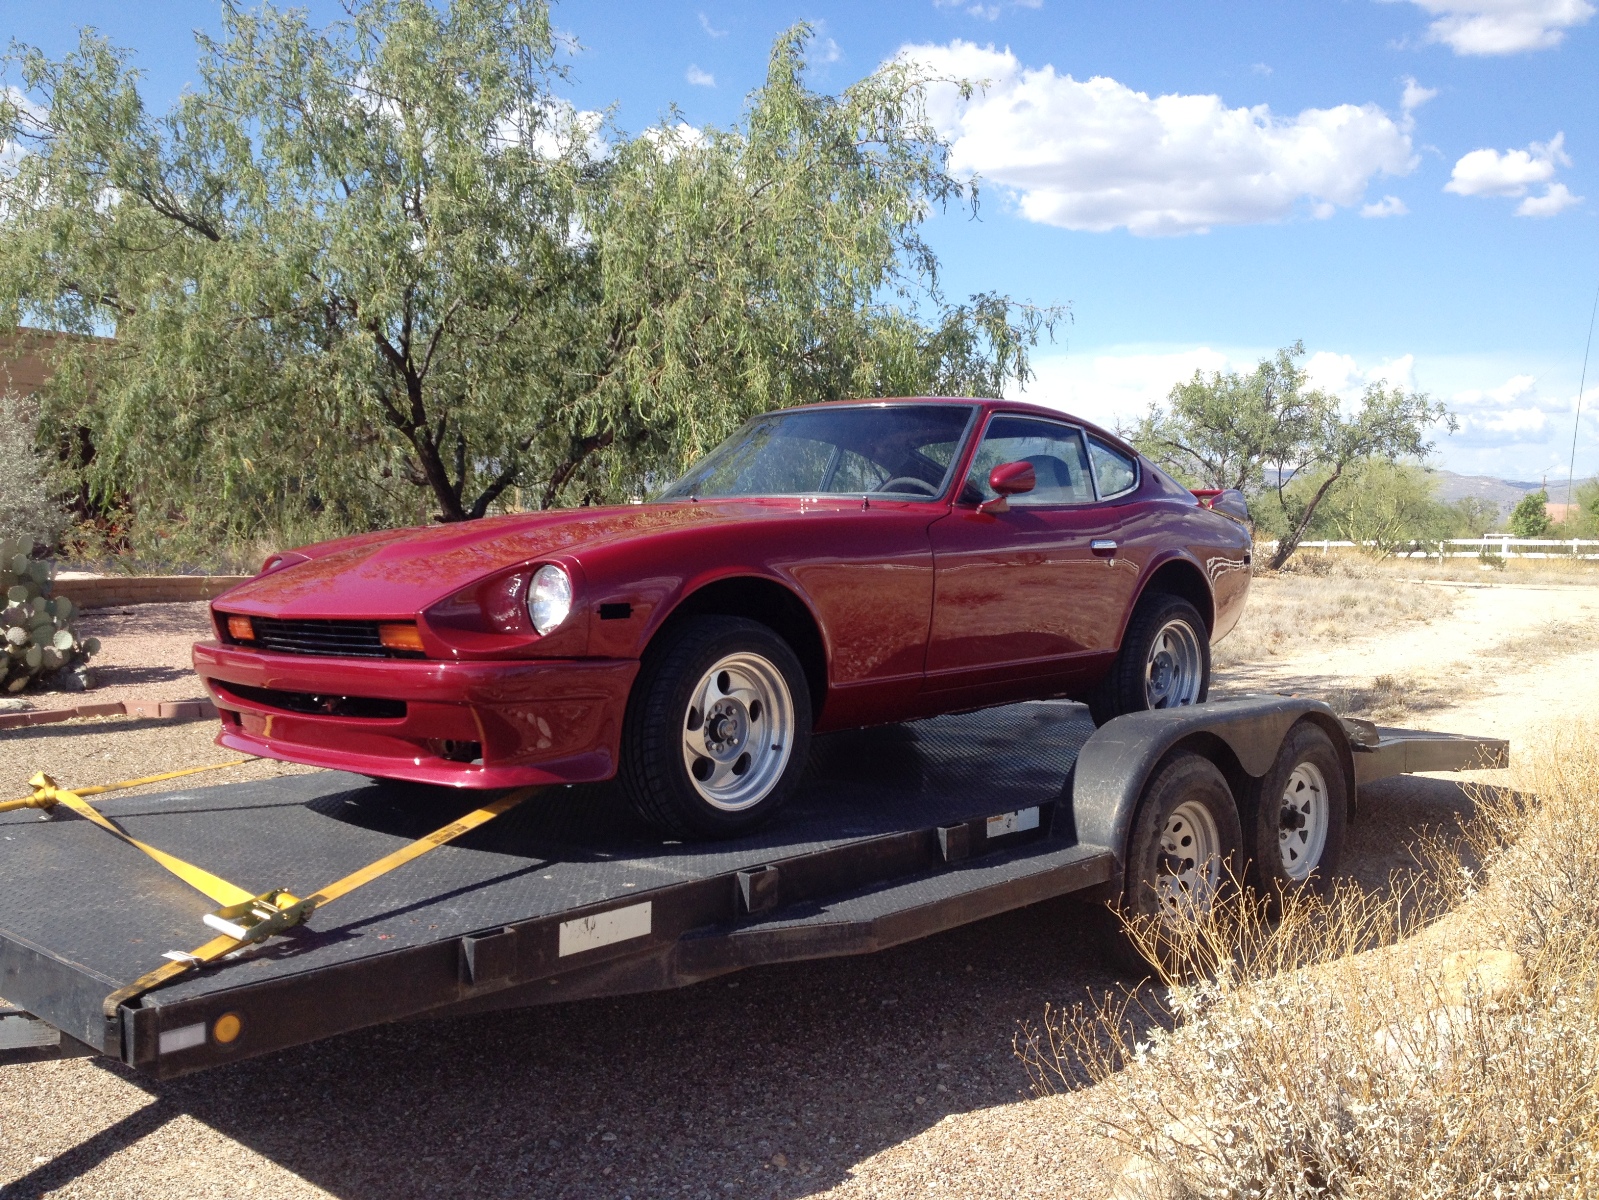
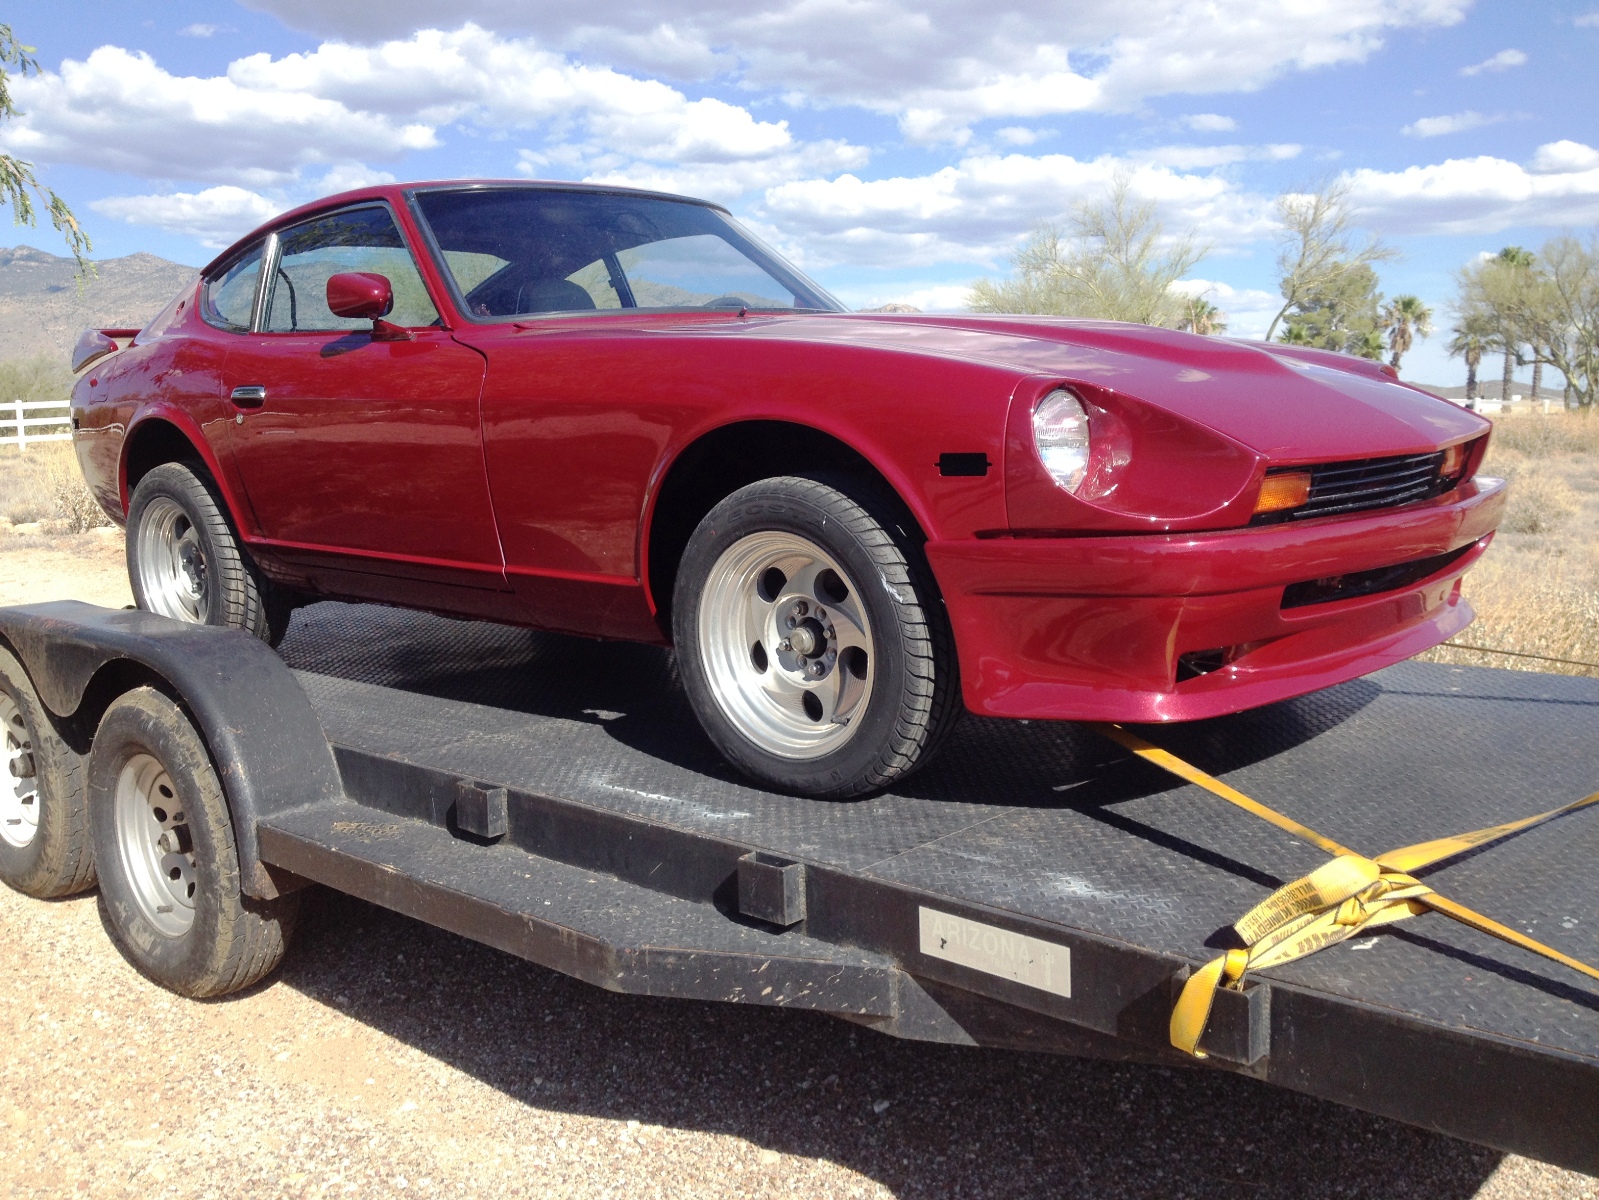
Tucked into the work bay, ready to be tucked in for the night with a custom car cover.

BTW, you can see with all new weatherstripping, I've got some fitment issues on the doors. They weren't there when we aligned for gaps without the rubber. I'm told it is mostly a time issue and we've got to wait for the rubber to compress a bit. Any advice from y'all would be appreciated.
And now time to recover from a very hot "Summer in Tucson" week.

Well folks, a milestone has been reached. At least for now, we're done at the body shop, Cutting Edge Refinishing. I very much wanted to get the car back before this weekend as a key person at the shop was leaving for a well-earned holiday and wouldn't be back for another week. It was deliver now or deliver in another week. I spent four days there this week working on the car myself. So much so that when I showed up at 8:30AM on the fourth morning I was told that I was late and had missed the shop meeting. Go figure.
The work I was doing was not specialized refinishing work, rather it was assembling things that most hacks like myself can do without getting into too much trouble. Things like installing the roll-up windows, quarter windows, new weatherstripping, etc.. It was very handy to have extra hands in the area now and then as well as some experienced guidance too.
It was a real team project to figure out how to make a linkage between the hatch lock cylinder and the hatch latch release plate. This task had to be performed as relocating the rear wing to be even with the back of the body caused an interference with the hatch lock cylinder. An early decision to relocate the cylinder forward five inches had come to roost in the form of needing to invent a linkage. Turns out a metal rod welded to the flat plate on the latch release was a viable approach although not without its difficulties. The area in the hatch is quite small and not a straight shot. The rod required some interesting bends and some metal had to be cut away to get access.
No, that's not me doing the cutting. I used to have hair that color...
After installing the linkage we then found the metal rod had enough weight to it that it left the latch with a hair-trigger release. Any kind of tug on the hatch would tend to release the hatch and if you tried to close it with any force, the rod would release the hatch right away. Some genius at the shop (not me) suggested a spring to support the rod at the cylinder. We quickly found an appropriate one right on top of the orphan parts bin, mocked it up and it worked!
Homeward bound! On my way home today, someone in a red Z was following real close.
Here she is folks, ready for more work back at the homestead.
Tucked into the work bay, ready to be tucked in for the night with a custom car cover.
BTW, you can see with all new weatherstripping, I've got some fitment issues on the doors. They weren't there when we aligned for gaps without the rubber. I'm told it is mostly a time issue and we've got to wait for the rubber to compress a bit. Any advice from y'all would be appreciated.
And now time to recover from a very hot "Summer in Tucson" week.
Registered User
Joined: Aug 2009
Posts: 1,223
From: Phoenix AZ + (Q8)
Looks really nice.......Are you planning any work on the suspension.....The Z looks up high.
About the door weatherstrip,the Precision brand will take a long time to adjust ...that's why some of the guys goes with Kia cars door weatherstrip or other brands...check this video......
https://www.youtube.com/watch?v=SXfLFNLq870
About the door weatherstrip,the Precision brand will take a long time to adjust ...that's why some of the guys goes with Kia cars door weatherstrip or other brands...check this video......
https://www.youtube.com/watch?v=SXfLFNLq870
Thread Starter
Registered User
Joined: Apr 2013
Posts: 578
From: Tucson, Arizona USA
Looks really nice.......Are you planning any work on the suspension.....The Z looks up high.
About the door weatherstrip,the Precision brand will take a long time to adjust ...that's why some of the guys goes with Kia cars door weatherstrip or other brands...check this video......
https://www.youtube.com/watch?v=SXfLFNLq870
About the door weatherstrip,the Precision brand will take a long time to adjust ...that's why some of the guys goes with Kia cars door weatherstrip or other brands...check this video......
https://www.youtube.com/watch?v=SXfLFNLq870
Current strategy is to first get everything else installed, interior, A/C, passenger seat and so on.
But, it never hurts to start planning early. I've been thinking about 16 or 17 inch retro-style rims with a low but not too low profile tire. Then we'll re-evaluate how much lower the body has to go.
Tom, your 3" estimate pretty much matches what we were discussing at the body shop last week. Good eye!
I'm very much open to recommendations as to wheel and tire sizes. Definitely have to get away from the 15" wheels that are on there right now.
Also, I'm a complete newbie at lowering techniques for this car. If someone could point me in a good direction, I'll start reading.
BTW, great music on that video.
Last edited by beg3yrs; Jul 4, 2015 at 02:06 PM.
Registered User
Joined: Aug 2009
Posts: 1,223
From: Phoenix AZ + (Q8)
Ckeck out Sakura Garage in Tempe AZ
Call Chuck or Greg......Best quality and price.
Datsun Suspension - Sakura Garage
My Z will be next very soon.
Call Chuck or Greg......Best quality and price.
Datsun Suspension - Sakura Garage
My Z will be next very soon.
Thread Starter
Registered User
Joined: Apr 2013
Posts: 578
From: Tucson, Arizona USA
Ckeck out Sakura Garage in Tempe AZ
Call Chuck or Greg......Best quality and price.
Datsun Suspension - Sakura Garage
My Z will be next very soon.
Call Chuck or Greg......Best quality and price.
Datsun Suspension - Sakura Garage
My Z will be next very soon.

I have a present for you...
Joined: Mar 2003
Posts: 1,699
From: dayton, nevada usa
Ckeck out Sakura Garage in Tempe AZ
Call Chuck or Greg......Best quality and price.
Datsun Suspension - Sakura Garage
My Z will be next very soon.
Call Chuck or Greg......Best quality and price.
Datsun Suspension - Sakura Garage
My Z will be next very soon.
Thread Starter
Registered User
Joined: Apr 2013
Posts: 578
From: Tucson, Arizona USA
Not Much Going On Right Now
Grandkids arrived for the annual 4-week visit and the wife is out-of-town helping her 83 year-old mother move. I'm busy riding horses, swimming and just having fun with the grandkids.
Current effort involves restoring the upper door moldings. Found new rubber at ZCarSource and had the moldings themselves polished at a local metal finishing shop.
Decided to wire wheel the metal strips that sandwich the rubber to the molding and will then rust-remediate them followed by paint.
My approach to reattaching the rubber and the metal strip took a while to decide. I have put off the original method of using staples as I have no idea where to get a machine that will staple like the originals. A real tight fit and pretty stiff staples. I'm going to test out using 1/8" pop rivets on an old set of moldings. Will let you know how it works out.

I have a present for you...
Joined: Mar 2003
Posts: 1,699
From: dayton, nevada usa
Grandkids arrived for the annual 4-week visit and the wife is out-of-town helping her 83 year-old mother move. I'm busy riding horses, swimming and just having fun with the grandkids.
Current effort involves restoring the upper door moldings. Found new rubber at ZCarSource and had the moldings themselves polished at a local metal finishing shop.
Decided to wire wheel the metal strips that sandwich the rubber to the molding and will then rust-remediate them followed by paint.
My approach to reattaching the rubber and the metal strip took a while to decide. I have put off the original method of using staples as I have no idea where to get a machine that will staple like the originals. A real tight fit and pretty stiff staples. I'm going to test out using 1/8" pop rivets on an old set of moldings. Will let you know how it works out.
Current effort involves restoring the upper door moldings. Found new rubber at ZCarSource and had the moldings themselves polished at a local metal finishing shop.
Decided to wire wheel the metal strips that sandwich the rubber to the molding and will then rust-remediate them followed by paint.
My approach to reattaching the rubber and the metal strip took a while to decide. I have put off the original method of using staples as I have no idea where to get a machine that will staple like the originals. A real tight fit and pretty stiff staples. I'm going to test out using 1/8" pop rivets on an old set of moldings. Will let you know how it works out.
Sometimes you can find them on eBay. I bought a set for $150 and I'm saving them for my '70.
Call Black Dragon to see if they have them. Part #59-800 and 59-801 ($100). It shows that they do. http://www.blackdragonauto.com/icata...l.aspx?Page=15
Thread Starter
Registered User
Joined: Apr 2013
Posts: 578
From: Tucson, Arizona USA
On my '77 I used window strips from a fox body mustang. Had to trim it quite a bite but then I glued them on with trim adhesive.
Sometimes you can find them on eBay. I bought a set for $150 and I'm saving them for my '70.
Call Black Dragon to see if they have them. Part #59-800 and 59-801 ($100). It shows that they do. Datsun 240Z, 260Z, 280Z, 280ZX & Mazda RX7 iCatalog - Black Dragon Auto
Sometimes you can find them on eBay. I bought a set for $150 and I'm saving them for my '70.
Call Black Dragon to see if they have them. Part #59-800 and 59-801 ($100). It shows that they do. Datsun 240Z, 260Z, 280Z, 280ZX & Mazda RX7 iCatalog - Black Dragon Auto
Slow going right now as time is being taken up with the grandkids. No complaining there except that the 12 year-old boy isn't interested in helping out gramps. His parents are gear-heads so I guess he's on overload.
What you did give me though was a source for the fuzzy inner glass trim. Thank you sir.
Thread Starter
Registered User
Joined: Apr 2013
Posts: 578
From: Tucson, Arizona USA
Well, I got the top door rubber molding installed. IMHO it looks great. It was a bit of effort but hey, if you want a new old car, you gotta do it.
I removed the metal strip that is stapled onto the stainless. It was pretty corroded but with a wire wheel it cleaned up OK. A little rust remediator and some satin black (not shown) and away we go.

New staples were out of the question as far as I was concerned, but ... I do have a pop rivet tool. That worked just fine. Photo is just a test, not the final painted part ...

Note: I did have to use a Dremel tool with a cutoff wheel to shorten the tail of the pop rivet a bit. It still holds very well.
Final product with the new squeegee rubber installed.
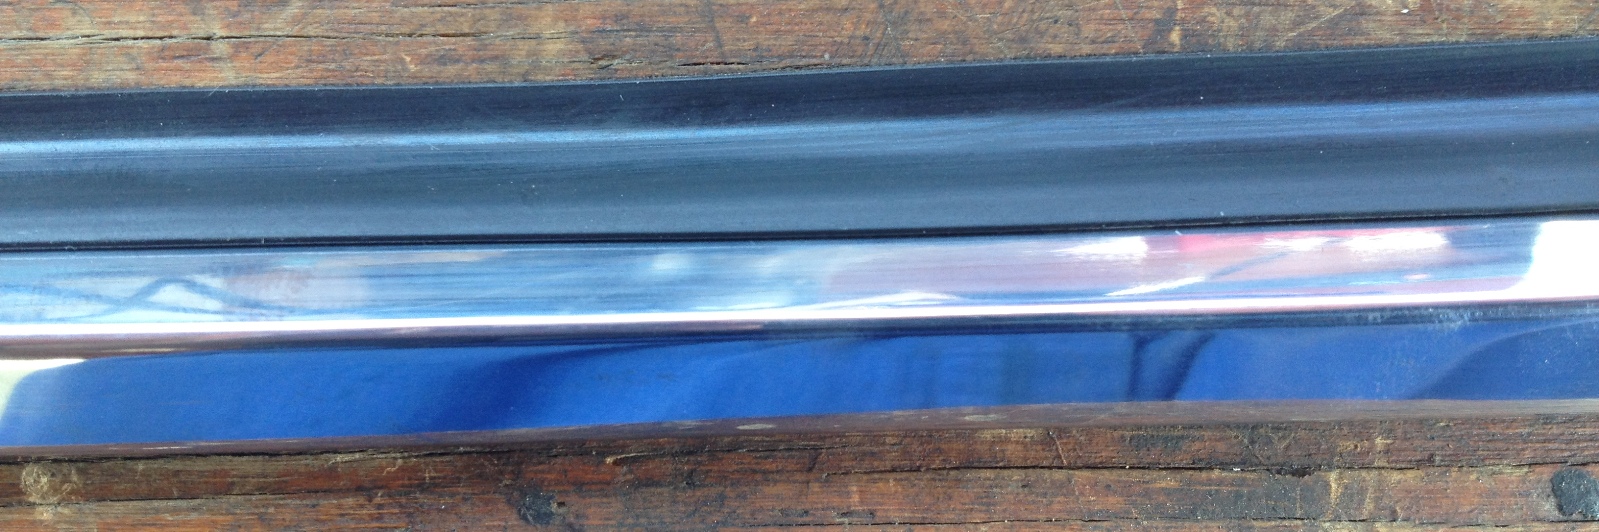
Installed the scuff plates the PO had bought. Very nice!

Now it was time to get the exhaust replaced. The old Flowmaster from the donor car just wasn't cutting it. Way too loud and lots of unnecessary bends in the pipe. Out with the old ...

Did I mention it gets hot in the Summer in Tucson?

And in with the new.

Nice new triple chrome exhaust tip too.

Have visited an A/C shop. They say I need a fan shroud. Imagine that ...
eBay has provided me with a shroud from a 280Z. Very nice except that my radiator is not original and somewhat bigger than OEM. Made some adaptor brackets and the shroud is in place. Still have to test drive it but we'll see soon enough.
Also visited an upholsterer. Wow, this guy does great custom work but ... his high estimate for all new stuff is on the order of $5K! He will work with me though. Turns out that if I supply things like seat covers, pre-cut foam, carpet kits and so on, the price goes way down.
I want to take the interior of the Z up a little. I never really liked the plastic covers in the rear nor did I like the diamond patterned vinyl on the tranny tunnel, the wheel arches and shock towers. The carpet kit I ordered should cover all that. As far as the plastic goes, I'm going to see if we can get a synthetic material that closely matches the seat leather and use it to cover the rear plastic panels. I'll also use it to redo the door cards.
I've ordered from MSA a carpet kit plus a seat foam kit.
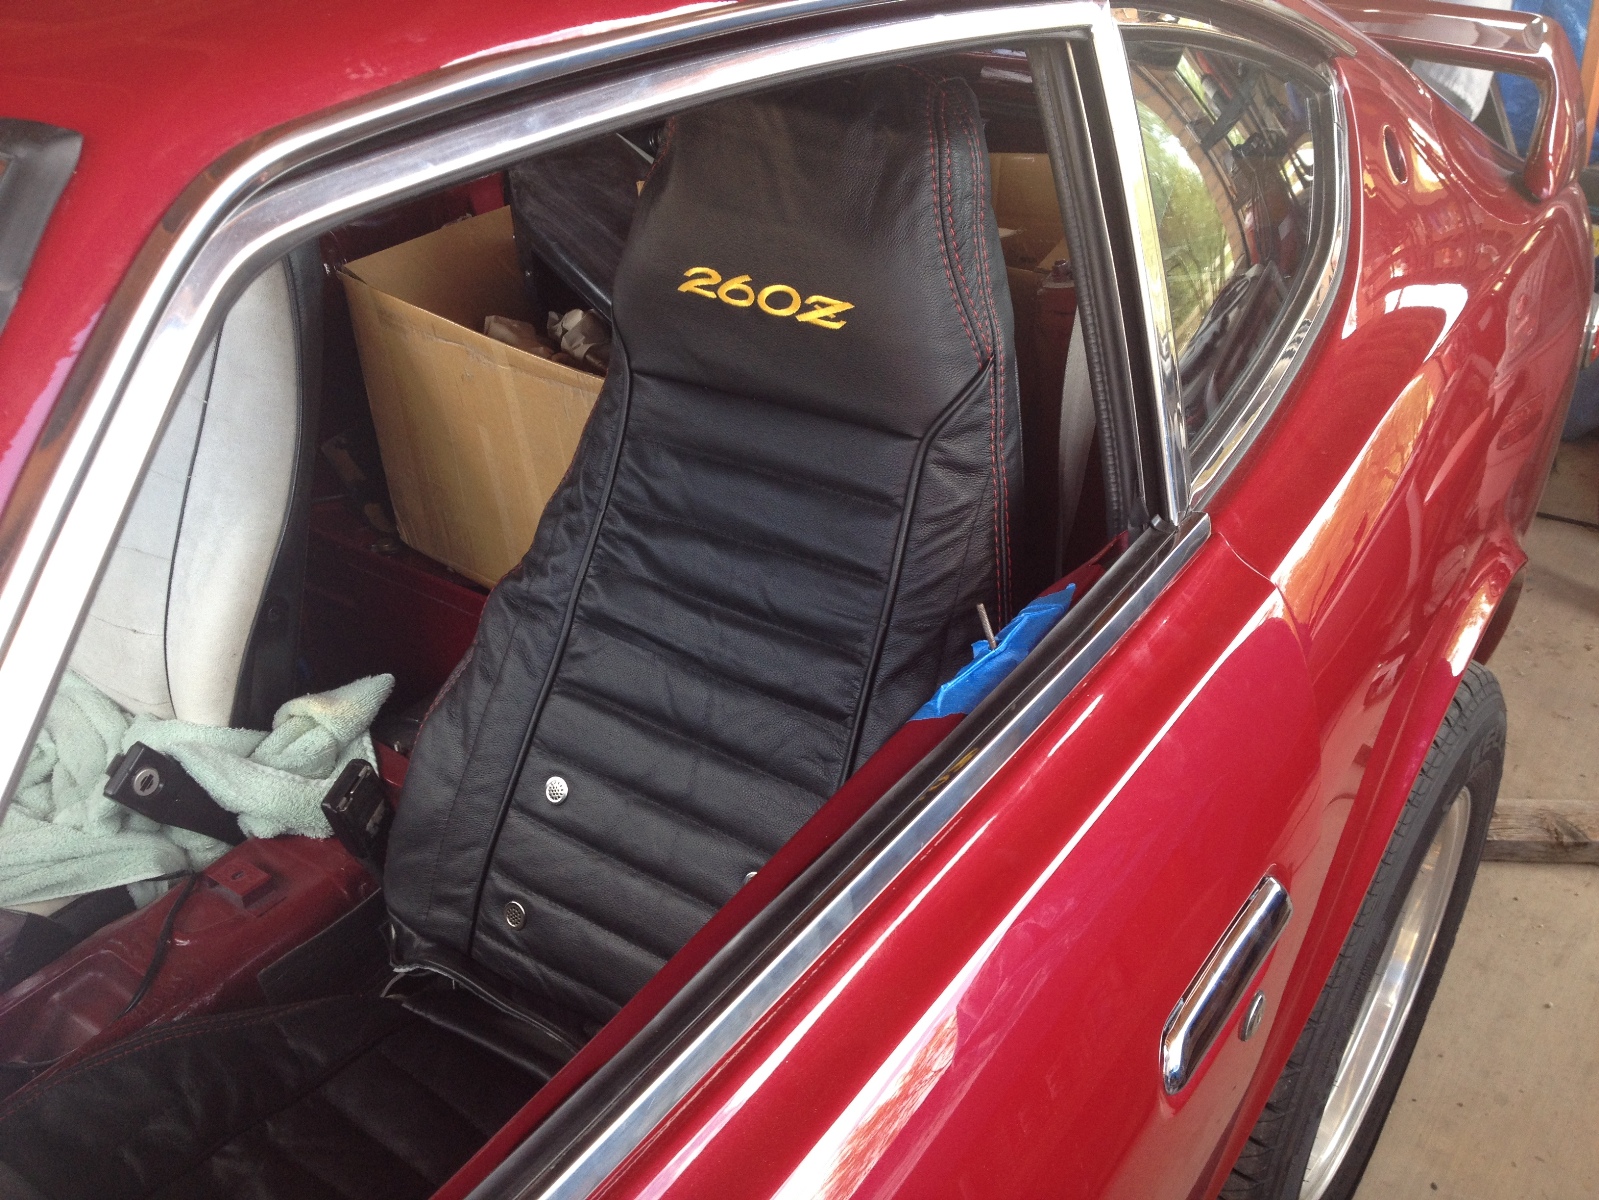
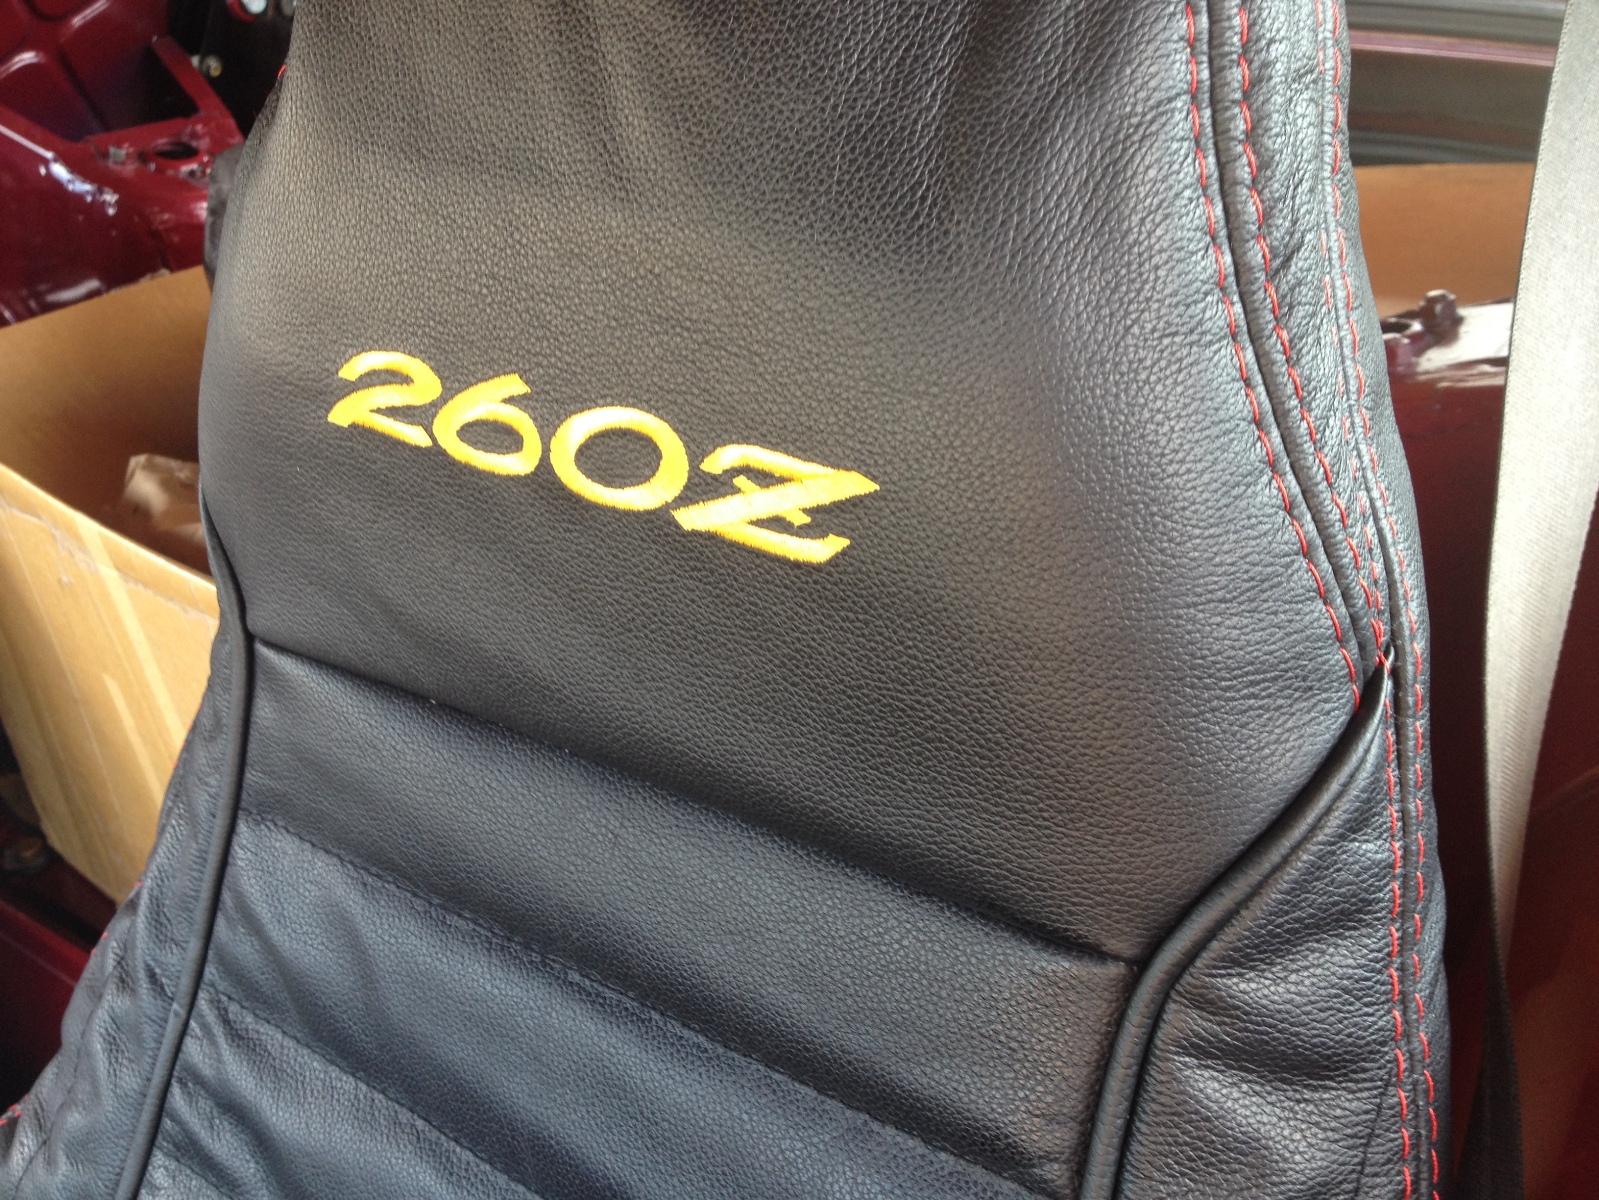
I have coming from "ridiescom" on eBay a customized set of seat covers. They are all black leather with deep red stitching and a yellow/gold 260Z logo on the headrest. Wow, I placed the order two days ago and they have already been made and shipped from .... Karachi Pakistan! As far as I know they have already made it through Germany and should be here by the end of the week. I'll post photos when they arrive.
I removed the metal strip that is stapled onto the stainless. It was pretty corroded but with a wire wheel it cleaned up OK. A little rust remediator and some satin black (not shown) and away we go.
New staples were out of the question as far as I was concerned, but ... I do have a pop rivet tool. That worked just fine. Photo is just a test, not the final painted part ...
Note: I did have to use a Dremel tool with a cutoff wheel to shorten the tail of the pop rivet a bit. It still holds very well.
Final product with the new squeegee rubber installed.
Installed the scuff plates the PO had bought. Very nice!
Now it was time to get the exhaust replaced. The old Flowmaster from the donor car just wasn't cutting it. Way too loud and lots of unnecessary bends in the pipe. Out with the old ...
Did I mention it gets hot in the Summer in Tucson?
And in with the new.
Nice new triple chrome exhaust tip too.
Have visited an A/C shop. They say I need a fan shroud. Imagine that ...
eBay has provided me with a shroud from a 280Z. Very nice except that my radiator is not original and somewhat bigger than OEM. Made some adaptor brackets and the shroud is in place. Still have to test drive it but we'll see soon enough.
Also visited an upholsterer. Wow, this guy does great custom work but ... his high estimate for all new stuff is on the order of $5K! He will work with me though. Turns out that if I supply things like seat covers, pre-cut foam, carpet kits and so on, the price goes way down.
I want to take the interior of the Z up a little. I never really liked the plastic covers in the rear nor did I like the diamond patterned vinyl on the tranny tunnel, the wheel arches and shock towers. The carpet kit I ordered should cover all that. As far as the plastic goes, I'm going to see if we can get a synthetic material that closely matches the seat leather and use it to cover the rear plastic panels. I'll also use it to redo the door cards.
I've ordered from MSA a carpet kit plus a seat foam kit.
I have coming from "ridiescom" on eBay a customized set of seat covers. They are all black leather with deep red stitching and a yellow/gold 260Z logo on the headrest. Wow, I placed the order two days ago and they have already been made and shipped from .... Karachi Pakistan! As far as I know they have already made it through Germany and should be here by the end of the week. I'll post photos when they arrive.
Thread Starter
Registered User
Joined: Apr 2013
Posts: 578
From: Tucson, Arizona USA
Rubber and Leather
After much deliberation, I decided to keep the existing wheels and go with some new tires with a little more sidewall. Went from a 215/50R15 to a 215/60R15 tire. Got about 3/4" all around to better fill the wheel well. It still sits a little high but I've got other things eating at my budget right now. Also got the front end aligned as during the restoration I had replaced all the old rubber bushings with polyurethane from Energy Suspension.

While at the shop, a package from Karachi, Pakistan arrived at the house. It was the new leather seat covers in from Ridies.com. All panels are black leather with a deep red stitching and a custom 260Z logo stitched on the headrest in gold. Cardinal and Gold are the colors of my alma mater BTW. Ridies did not have a pattern for the 260Z logo so I had to take a photo of one of my emblems and use a paint program to make a black and white version. Believe it or not, it took only 7 calendar days from placing the order to getting the product, custom-made, from half-way around the world. Amazing!
Although they aren't installed yet, the quality of the material is very good. I'm very pleased.
Next step is getting the air conditioning installed and then it's either the upholstery shop or back to the body shop for some remedial work that needs addressing.

Thread Starter
Registered User
Joined: Apr 2013
Posts: 578
From: Tucson, Arizona USA
More Coin ...
Time to make sure the "owner" of this car will stay as cool as she already is.
Purchased an "Underhood Upgrade Package" for the A/C. Mounted as many of the components (well, Ok, just one) as I could but I'm letting the professionals finish it up, crimp the hose connectors on and actually get the system running. The essential elements of the package include a modern high efficiency condenser, a rotary compressor with mount for this motor, a drier and new hoses with connectors for R134A.

Purchased an "Underhood Upgrade Package" for the A/C. Mounted as many of the components (well, Ok, just one) as I could but I'm letting the professionals finish it up, crimp the hose connectors on and actually get the system running. The essential elements of the package include a modern high efficiency condenser, a rotary compressor with mount for this motor, a drier and new hoses with connectors for R134A.
Thread Starter
Registered User
Joined: Apr 2013
Posts: 578
From: Tucson, Arizona USA
But when I wanted the customization, I ended up corresponding and ordering simply via e-mail. I think eBay may have lost out on a commission but I did try to go through their official "ask seller a question" route but a miscommunication caused me to email their customer support address: support@ridies.com
From there I was corresponding with "Adnan Masood". We got it done with PayPal.
If they don't have a 280Z logo in their files, you'll have to provide one for them. I did that with the 260Z and you can see from my post how well that came out. It did take about an hour with a primitive "Paint" program to get it just right.
Let me know how it goes.
Thread Starter
Registered User
Joined: Apr 2013
Posts: 578
From: Tucson, Arizona USA
Update
Still over at the A/C shop. Got a show scheduled in just two months.
Still have some remedial work to do back at the body shop and then over to upholstery.
I'm starting to sweat the schedule a little bit here. Thinking of taking door cards, interior panels, seats and so on over to the upholstery place now rather than wait ...
Still have some remedial work to do back at the body shop and then over to upholstery.
I'm starting to sweat the schedule a little bit here. Thinking of taking door cards, interior panels, seats and so on over to the upholstery place now rather than wait ...
Thread Starter
Registered User
Joined: Apr 2013
Posts: 578
From: Tucson, Arizona USA
Finally - A/C and Other Progress
Got the Z out of the A/C shop a couple of days ago and took it right over to the body shop for some remedial work. Didn't have time to take any photos of the installation as with the November 7 car show fast approaching, there's just so much left to do.
Body shop says they'll have it back to me in about seven business days. I'm hoping that works out and is on a Friday. That gives me the weekend to work on a couple of things.
1) For some reason after the A/C work the idle was up to 1600 RPM and by the time I drove it to the body shop, it was up to 3000 RPM. Haven't been able to figure out what it is (the A/C idle up is disconnected for now) but this should be a simple fix.
2) Going to install the vapor recovery line restrictor I discussed a few posts back. This might be related to the idle speed problem - the car was sitting for almost six weeks and that's a lot of time for vapor to accumulate in the charcoal canister. With all the extra flow, I can see that as an issue.
3) Got to disassemble, diagnose and repair the driver's shoulder belt mechanism. It has decided to stay locked in the fully retracted position and that just won't do.
4) Other odds and ends as time permits over the weekend.
But for some fun stuff and a photo op, I purchased a Retrosound Model 2 radio and got it installed in the new console. The console is not in the car, so that made things SO easy. It's only mounted and not yet wired but I'll start that work today.

The protective cover is still on the screen. Retrosound has provided some overlays that make the screen look like an old AM radio faceplate. I'll give one a try but if it interferes with the operational display, it might have to be removed.
The small blanking plate will be drilled to accommodate the A/C thermostat and, I see the choke light needs a little TLC with some white paint ...
It will never end - wifey thinks that is a good thing.
Body shop says they'll have it back to me in about seven business days. I'm hoping that works out and is on a Friday. That gives me the weekend to work on a couple of things.
1) For some reason after the A/C work the idle was up to 1600 RPM and by the time I drove it to the body shop, it was up to 3000 RPM. Haven't been able to figure out what it is (the A/C idle up is disconnected for now) but this should be a simple fix.
2) Going to install the vapor recovery line restrictor I discussed a few posts back. This might be related to the idle speed problem - the car was sitting for almost six weeks and that's a lot of time for vapor to accumulate in the charcoal canister. With all the extra flow, I can see that as an issue.
3) Got to disassemble, diagnose and repair the driver's shoulder belt mechanism. It has decided to stay locked in the fully retracted position and that just won't do.
4) Other odds and ends as time permits over the weekend.
But for some fun stuff and a photo op, I purchased a Retrosound Model 2 radio and got it installed in the new console. The console is not in the car, so that made things SO easy. It's only mounted and not yet wired but I'll start that work today.
The protective cover is still on the screen. Retrosound has provided some overlays that make the screen look like an old AM radio faceplate. I'll give one a try but if it interferes with the operational display, it might have to be removed.
The small blanking plate will be drilled to accommodate the A/C thermostat and, I see the choke light needs a little TLC with some white paint ...
It will never end - wifey thinks that is a good thing.


