
260Z Restoration as a Retirement Project


Thread Starter
Registered User
Joined: Apr 2013
Posts: 578
From: Tucson, Arizona USA
Thanks for checking in but no, fortunately those are not too hard to come by and I have a set. They go on the firewall and I need the dust boots that go on the carburetor end of the choke cables. Sometimes they are called cable protectors. I have only the remains:


Thread Starter
Registered User
Joined: Apr 2013
Posts: 578
From: Tucson, Arizona USA
 I will make along the way. He's had this product out for over eight years now. I think all the bugs are worked out and I don't have to **** the parts.
Thanks again for pointing me in his direction. We sort of discussed my comfort level with things, the state of my car and its harness connectors, and came to a good arrangement.

Thread Starter
Registered User
Joined: Apr 2013
Posts: 578
From: Tucson, Arizona USA
Had a good day today. CMS in the Netherlands has shipped what I hope will be a good substitute for the choke cable dust protectors. What I didn't like is they shipped them "Adult Signature Required", something usually reserved for booze. All this for part worth $4.50 and now my house sitter will have to be home ... hey, maybe they included some booze

The best part of the day is the Z got even more paint ... these photos are only the first coat of color. Two more coats of color to go plus three coats of clear on top of that.


Thread Starter
Registered User
Joined: Apr 2013
Posts: 578
From: Tucson, Arizona USA
Out In the Daylight - Polished
The shop just sent some photos after polish and a wash. It's in daylight but still in the shade. I'll head over during the week and get some better shots.

Thread Starter
Registered User
Joined: Apr 2013
Posts: 578
From: Tucson, Arizona USA
Time for an Update
Well folks, it's been almost a month since I've updated this thread. Yes, progress has been made.
Had a heck of a time solving a rather mundane problem, replacing the dust covers on the choke cables. I posted on another thread and got some good advice. Finally found a Suzuki motorcycle part that looked like it might fit the bill. The problem is that it is NLA and while some outfits here in the USA claimed to have them, once ordered, the system cancelled as there was no stock.
I found them in the Netherlands of all places. Cost was 3 Euros each plus 27 Euros shipping. If I'd been thinking I would have ordered a bunch and resold them here ... So, the photos show the parts compared to the original Nissan cover and then the installation. While they are a close match, I still had to use some tie wraps to cinch them down. Not as pretty as I'd hoped but they will still do the job.
I then dragged out the dashes (remember, I have two). I disassembled and cleaned everything I could, tested gauges, lights, the lighter and so on. If lights were burned out I scavenged to get one complete set. Suddenly it dawned on me. While the dash and gauges were out, it was easy to change the lights. Once installed back in the car it would be hell. A quick check of MSA's website revealed they had a full replacement set of lights which were an upgrade for brilliance as well. I also discovered they had a pretty much plug-n-play kit which uses a relay to bypass the current going through the combination switch and produces better voltage at all the dash, console and marker lights. Needless to say, all that has been installed as well.
Speaking of lights, I did get the headlight kit mentioned in an earlier post. While it wasn't set up specifically for my car, it was easy to make it work. That's installed too.
Also sent in my non-working clock to MSA and for $89 got back what looks like the same clock but it has modern guts. Turns out it runs on an AA battery which you tuck underneath the dash, supposedly good for two years.
Now the engineer in me reared its head. I decided that since I had the dash on a table, I'd hook up ALL the car's electrical harnesses and everything else I could so I could test and repair things BEFORE they were reinstalled. I figured this would be much easier than bending and twisting this decrepit body while emitting words that make sailors blush while I diagnose electrical issues.
This worked out very well. Using the FSM, I was able to test pretty much every circuit, relay, gauge, light, wiper motor, starter motor, interlock, switch, horn and so on. Most problems I encountered were simply dirty connectors. I did have to open a relay and the hazard switch to clean them up. The combination switch turned out to be a little worn as in light position 1 it was a little sensitive. I replaced it with the other I had and that is now all good.
So, I expect the brand-new looking rolling shell (see previous posts) back from the beauty shop at the end of this week. Initial plans are to install the refurbished fuel and brake lines from rear to front and then get the differential remounted and hooked up. I'm doing these first to clear some room in my work area.
From there I'm not sure what should be next and I'm open to suggestions. I'm thinking it's time to lay down sound deadening material, before I run the electrical harnessing.

Thread Starter
Registered User
Joined: Apr 2013
Posts: 578
From: Tucson, Arizona USA
Friends of mine who retired before me often state they don't have enough time to get everything done now that they're retired. I observe that when you're retired you take the time to do your projects right rather than rush through them. You often take on more projects as well (I resemble that remark).
Now that I have finished the "rat race" I realize just how much pressure that "race" put on me and I'm glad it's over.
Some days I'm out there working on the car from mid-morning until dusk, others I meander out there after lunch and work until happy hour. Of course there are some days a happily married man doesn't work on the car at all and takes his best girl out on the town. A couple of times a year, those days turn into weeks or months and that's OK as the car will still be there when I return.
Not finding enough time is certainly frustrating. I refused to start this restoration before I retired.
Thread Starter
Registered User
Joined: Apr 2013
Posts: 578
From: Tucson, Arizona USA
The 260Z Has Come Home From the Beauty Parlor
Got the car back today, minus doors, hood, wings and hatch. Left them at the shop so they'll stay safe while I start reinstalling parts. It's been 18 months since it left here. Once I get as much installed without those parts and, after the motor runs, the car drives and stops, it will go back to the shop for assembly of the rest of the parts.

BTW, the snowman is very impressed with the results.
Meanwhile I took a look at the somewhat faded and a little rusty dash finisher. Since that part is embossed with a kind of grain pattern to match the dash, I didn't want to blast it or apply a wire wheel. I first used some aircraft paint stripper to get the old paint off (took two applications). Then a good scrubbing with some steel wool followed by scuffing and a good cleaning. A couple of light coats of self-etching primer followed by two light coats of black semi-gloss lacquer and it looks as good as new.
Last edited by beg3yrs; Dec 19, 2014 at 03:45 PM.
Thread Starter
Registered User
Joined: Apr 2013
Posts: 578
From: Tucson, Arizona USA
Just a quick update.
She's on jack stands, wheels are off and parts are going back in. As stated before, I figure the brake and fuel lines in the tunnel need to go back in first. Looking at all that mess, I realized it would be good to have something to hold the lines in place in the engine bay. That led to needing the vacuum booster and master cylinder along with the clutch cylinder being installed with the first proportioning valve. Sure is nice working on a clean car.

She's on jack stands, wheels are off and parts are going back in. As stated before, I figure the brake and fuel lines in the tunnel need to go back in first. Looking at all that mess, I realized it would be good to have something to hold the lines in place in the engine bay. That led to needing the vacuum booster and master cylinder along with the clutch cylinder being installed with the first proportioning valve. Sure is nice working on a clean car.
Thread Starter
Registered User
Joined: Apr 2013
Posts: 578
From: Tucson, Arizona USA
Oh Crap - Need Advice
It had to happen sooner or later. Started the installation of the fuel and brake lines, boy that's a real puzzle. Finally got them in correctly (I think) and am feeling pretty smug.


*************************************************
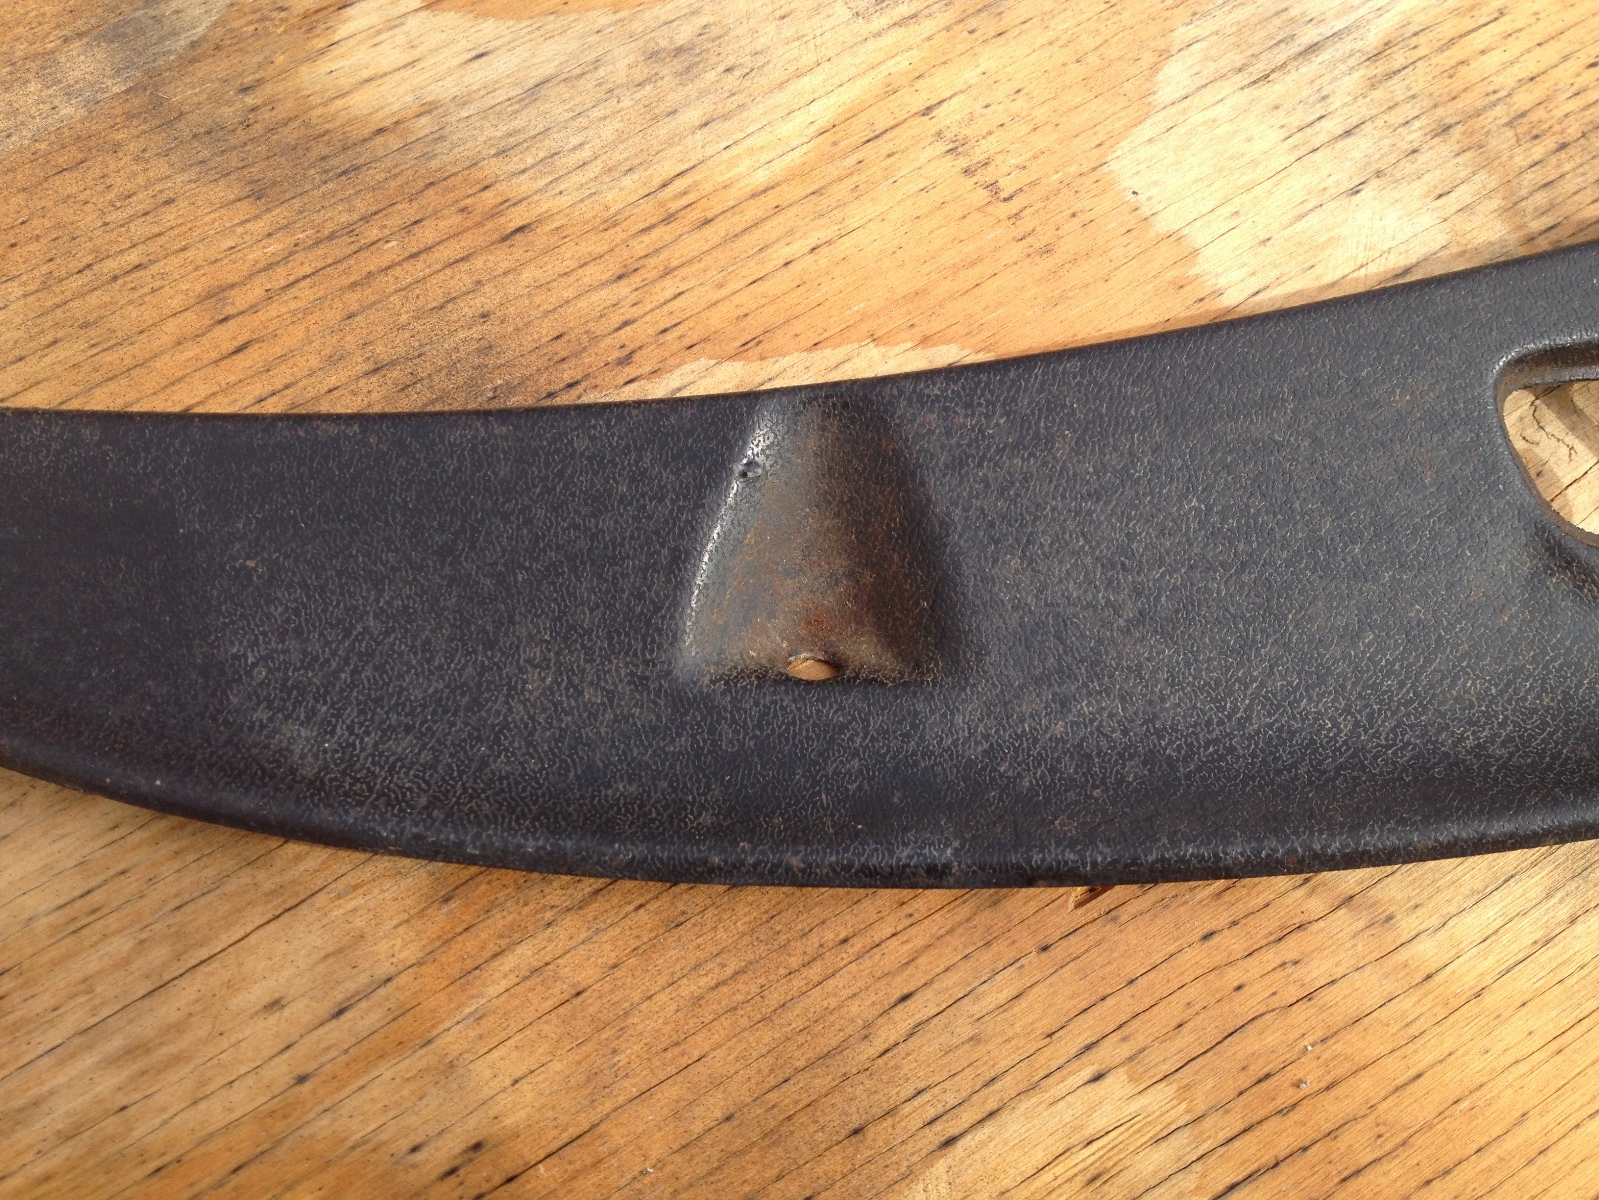
So I get all the way to the back of the car and this happens ...

The central connection to the three-way connector is rounded and stripped, and yes, I contributed to that.
That's the long brake line that goes front-to-back through the tunnel. The folk at the local auto parts store recommend having a new line formed to match this old one. I'm a brake-line novice and suppose that's likely the most reliable and safe thing to do.
I can call around town and see if there are any shops willing to take this on.
Does anyone have an alternate repair method that will still be reliable and safe?
Otherwise, are there any national shops that y'all would trust with this work?
Cheers,
Scott
*************************************************
So I get all the way to the back of the car and this happens ...
The central connection to the three-way connector is rounded and stripped, and yes, I contributed to that.
That's the long brake line that goes front-to-back through the tunnel. The folk at the local auto parts store recommend having a new line formed to match this old one. I'm a brake-line novice and suppose that's likely the most reliable and safe thing to do.
I can call around town and see if there are any shops willing to take this on.
Does anyone have an alternate repair method that will still be reliable and safe?
Otherwise, are there any national shops that y'all would trust with this work?
Cheers,
Scott

Registered User
Joined: Feb 2002
Posts: 2,906
From: Saskatoon, SK
If you can't find a new long brake line (probably best way to go, don't be afraid to do your own bends), have you given it thought to cut and re-flare? It isn't that hard to do, you can get this one off with vicegrips (I have always had good results with removing stripped nipples and lines with vicegrips). Cut off the edge, slide a new fitting on and re-flare. You would have to unbolt all the way to the front, so you can get a little more out of it to reach the splitter. Just an idea maybe.
Thread Starter
Registered User
Joined: Apr 2013
Posts: 578
From: Tucson, Arizona USA
Well, that's a good thought. I've got some room under there as the diff and gas tank are out. It's too bad that's the innermost line, all the others have to come out before this one does.
I may give that a go as failure doesn't leave me any worse than I am now.
I may give that a go as failure doesn't leave me any worse than I am now.
Thread Starter
Registered User
Joined: Apr 2013
Posts: 578
From: Tucson, Arizona USA
Learning Lots of "Stuff"
Time for an update folks.
I solved the brake line issue and used all y'all's advice.
Couldn't easily get a length of brake line to replace the whole front to back piece (would have had to get a 25' roll) so instead I went with a 20" piece, and bent it to shape with an Eastwood tool. I borrowed a double-flare kit from the local O'Reilly's Auto Parts and practiced making double flares using some old line so I wouldn't make mistakes on the good stuff.
Yay, it worked! Used the proper high pressure union and it's done. It is interesting to note that making the double flares on the original line is significantly more tricky than using the modern brake line material (Poly Armor I think).
Looking at the other two pieces going out of the three-way I thought the connectors on them were pretty ratty as well. Testing them out revealed they were on their last legs so with my new-found confidence and skills I made two new replacement lines.
The union won't win me any Concours titles but it is solid, stable and safe. BTW, you'll notice I just can't keep paint on those old lines. They were cleaned, scuffed, primed with self-etching primer and painted but it just won't stick! Too late now. At least Arizona isn't a wet State so rust isn't an issue here.

Decided to do an easy job. I gathered all the rubber bits (mostly plugs and grommets), cleaned them thoroughly and conditioned with a rubber restorer. They're now installed back in the car.

Once I got that done my daily driver decided to sag in the front worse than Ciaro at 90 years old. Again, using skills, tools and confidence developed on the Z project, I took some time and replaced upper strut mounts, the strut, the upper ball joint and the tie rod ends. Point is, this work took time away from the Z project.
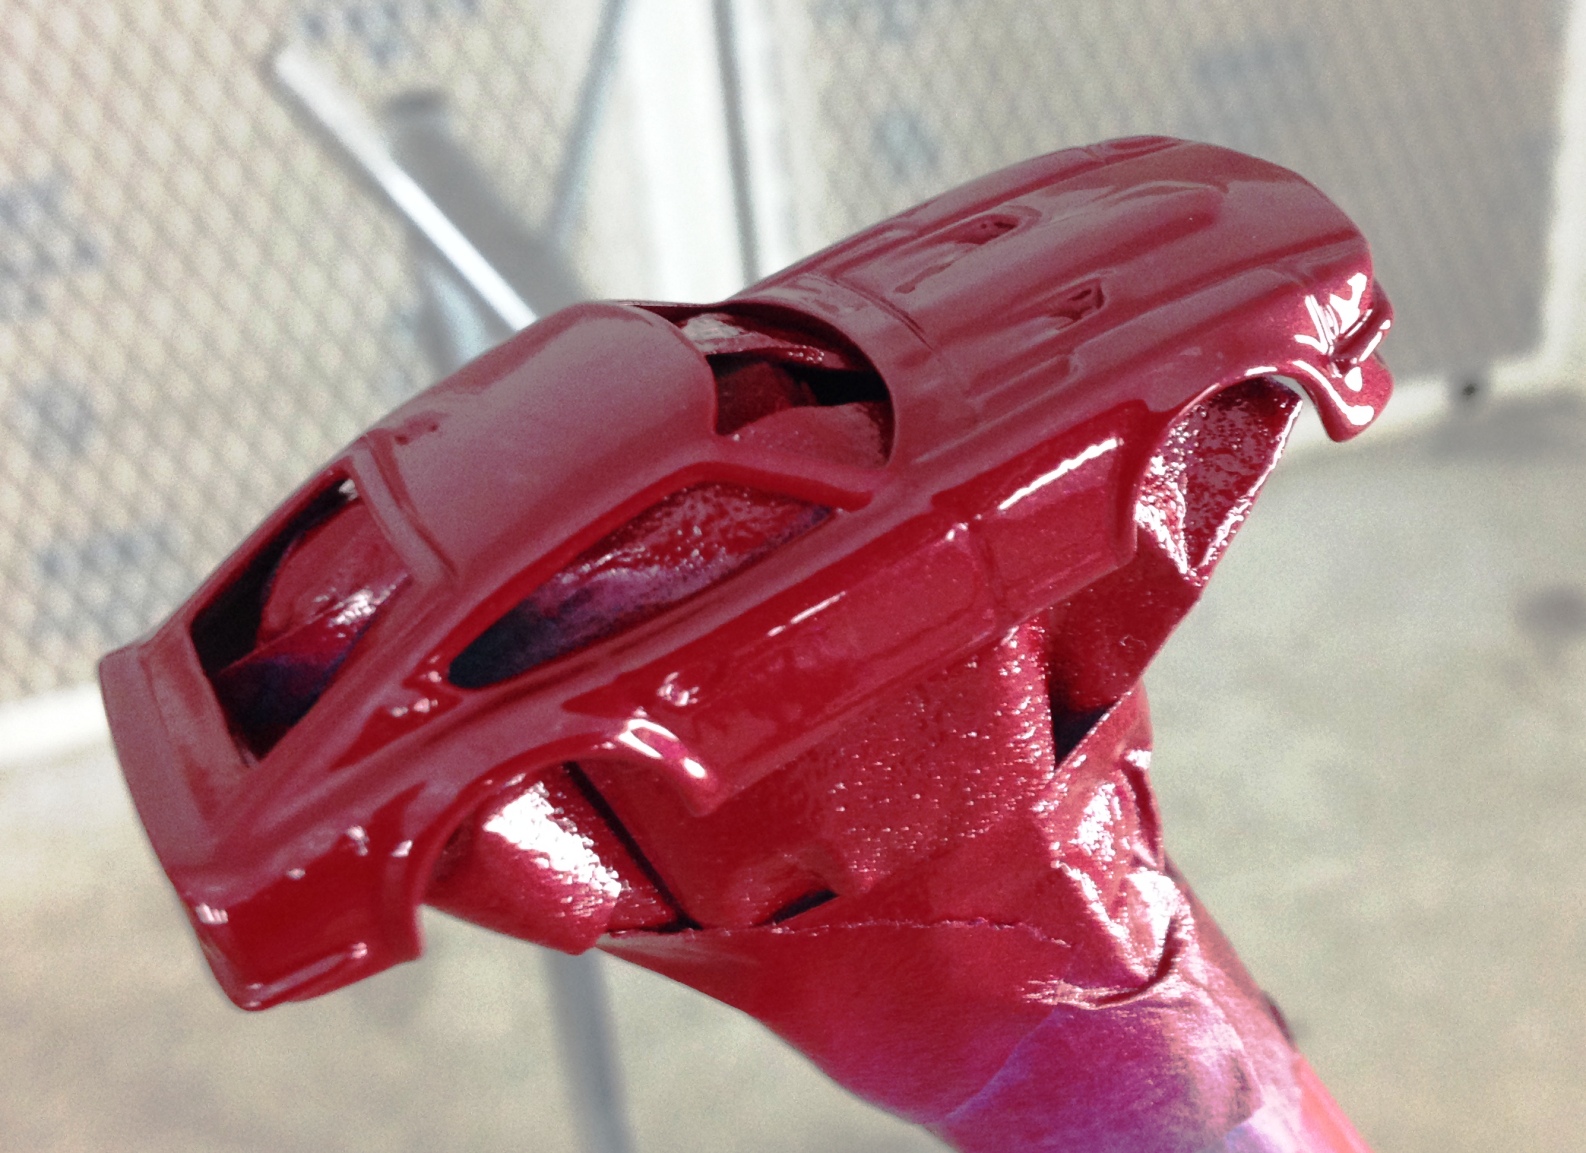
Well, back to the Z. The body shop called and said they'd finished off some of the residual bits (tail light finisher, surrounds, front grill and so on) so would I please come by and pick them up. Went over and found that the painter had picked up a 240Z Matchbox car and has painted it with left-over paint from my job. That's fun!
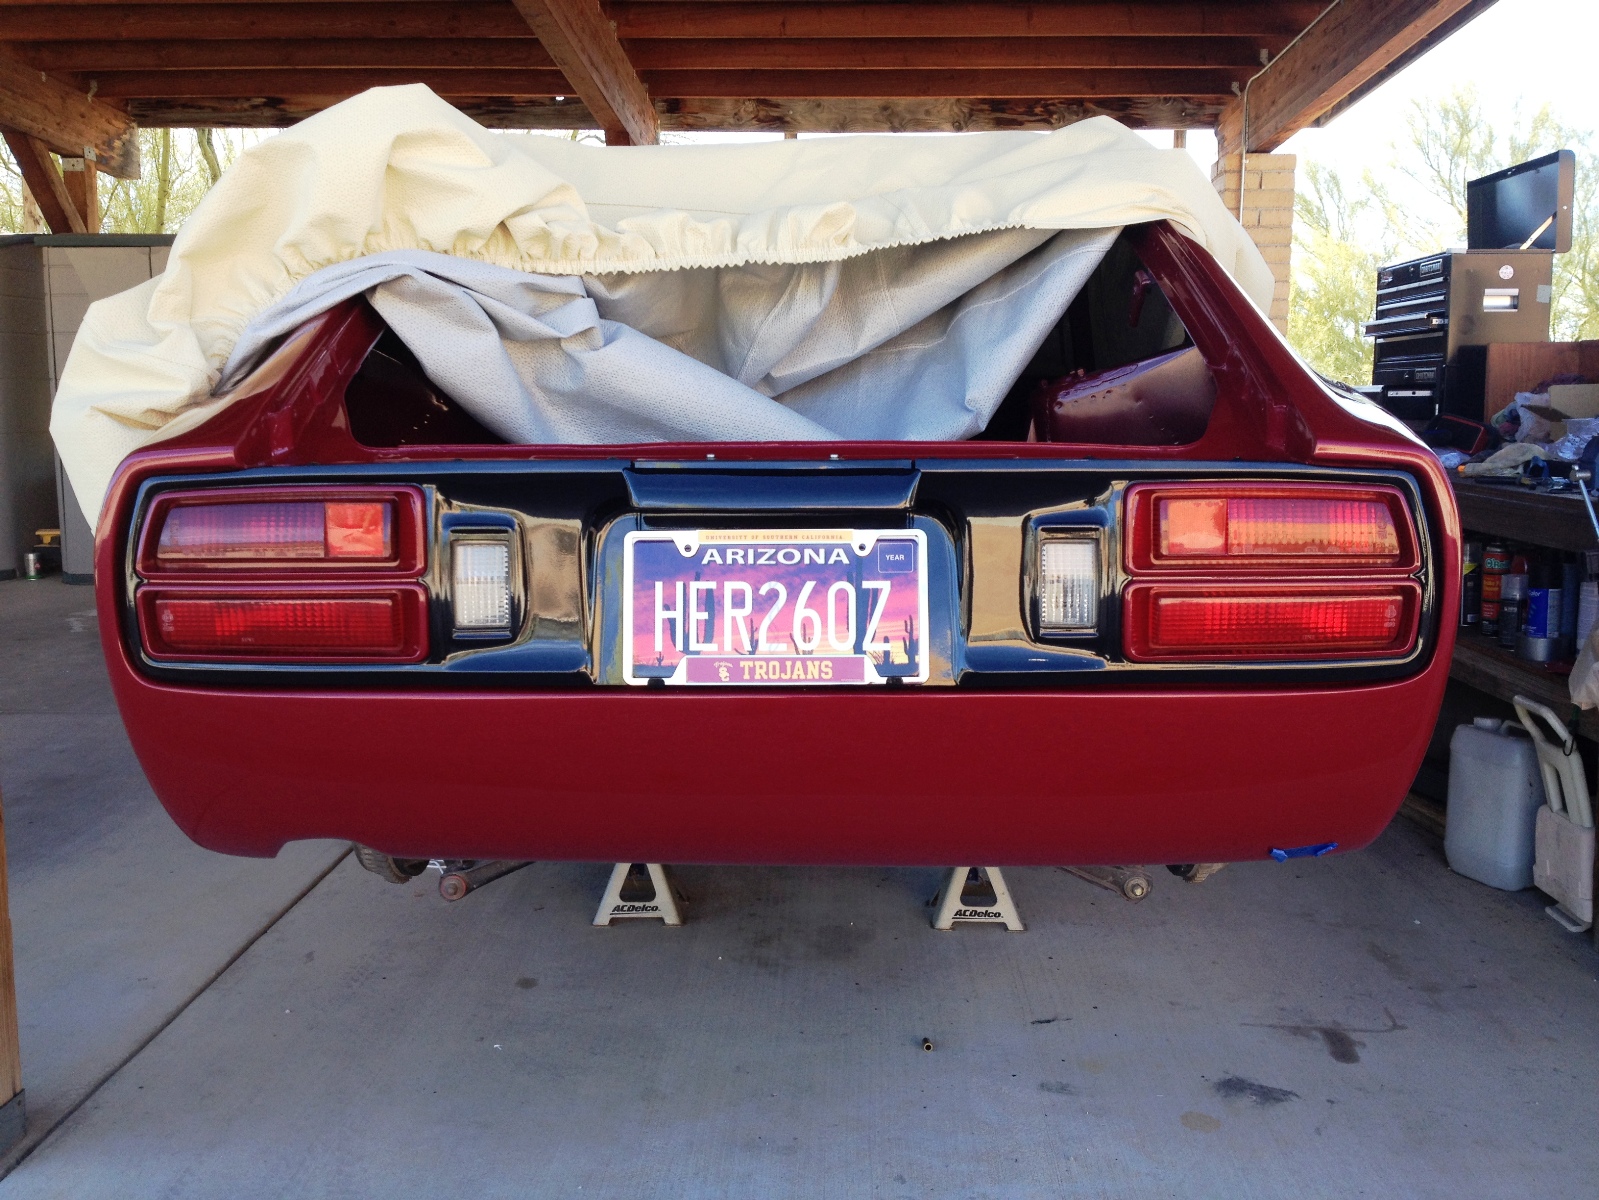
Even though there's more to do with the brakes, I couldn't wait so I installed the rear lights. Needed to show the 'owner' of this car some visible progress.
So, after all that brake line fuss, I realized if I charge up the brake system now with the car so empty, if I have a problem (i.e. leaks), it will be so much easier to correct with all the room to work. So, that means I have to finish the front and rear brakes, get them installed and then reinstall the pedal assembly which probably also means installing the dash and the steering wheel. Isn't it funny how one little (but important) test requires so many more bits. Hey, at least there's a plan.
More later,
Scott
I solved the brake line issue and used all y'all's advice.
Couldn't easily get a length of brake line to replace the whole front to back piece (would have had to get a 25' roll) so instead I went with a 20" piece, and bent it to shape with an Eastwood tool. I borrowed a double-flare kit from the local O'Reilly's Auto Parts and practiced making double flares using some old line so I wouldn't make mistakes on the good stuff.
Yay, it worked! Used the proper high pressure union and it's done. It is interesting to note that making the double flares on the original line is significantly more tricky than using the modern brake line material (Poly Armor I think).
Looking at the other two pieces going out of the three-way I thought the connectors on them were pretty ratty as well. Testing them out revealed they were on their last legs so with my new-found confidence and skills I made two new replacement lines.
The union won't win me any Concours titles but it is solid, stable and safe. BTW, you'll notice I just can't keep paint on those old lines. They were cleaned, scuffed, primed with self-etching primer and painted but it just won't stick! Too late now. At least Arizona isn't a wet State so rust isn't an issue here.
Decided to do an easy job. I gathered all the rubber bits (mostly plugs and grommets), cleaned them thoroughly and conditioned with a rubber restorer. They're now installed back in the car.
Once I got that done my daily driver decided to sag in the front worse than Ciaro at 90 years old. Again, using skills, tools and confidence developed on the Z project, I took some time and replaced upper strut mounts, the strut, the upper ball joint and the tie rod ends. Point is, this work took time away from the Z project.
Well, back to the Z. The body shop called and said they'd finished off some of the residual bits (tail light finisher, surrounds, front grill and so on) so would I please come by and pick them up. Went over and found that the painter had picked up a 240Z Matchbox car and has painted it with left-over paint from my job. That's fun!
Even though there's more to do with the brakes, I couldn't wait so I installed the rear lights. Needed to show the 'owner' of this car some visible progress.
So, after all that brake line fuss, I realized if I charge up the brake system now with the car so empty, if I have a problem (i.e. leaks), it will be so much easier to correct with all the room to work. So, that means I have to finish the front and rear brakes, get them installed and then reinstall the pedal assembly which probably also means installing the dash and the steering wheel. Isn't it funny how one little (but important) test requires so many more bits. Hey, at least there's a plan.
More later,
Scott
Thread Starter
Registered User
Joined: Apr 2013
Posts: 578
From: Tucson, Arizona USA
Thanks for the encouragement sir Skully. Much appreciated.
Here's a small update on the progress.
Now that the brake lines are installed, I figure it is time to test them for leaks. So, what does that mean? It means I have to finish the front disc and rear drums and get them installed.


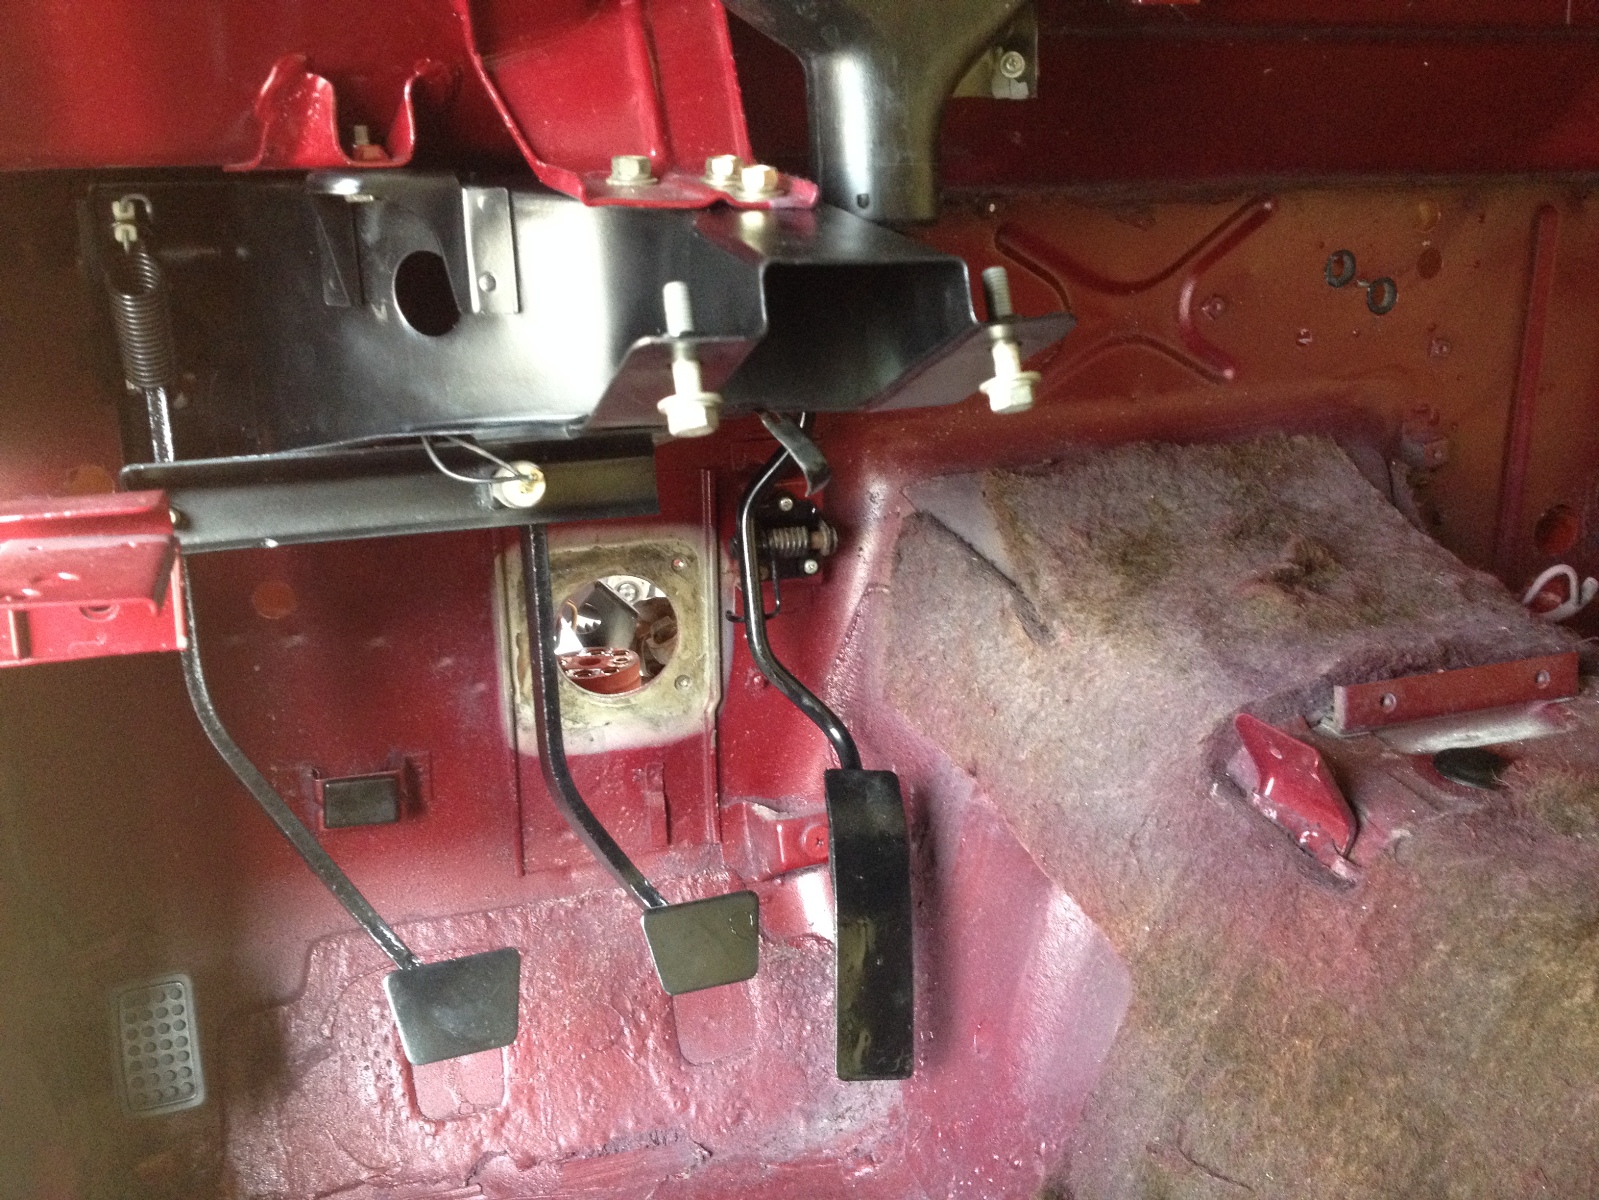
Hmm ... I'll need some way to pump the lines so they can be bled and pressure checked. That means I need to refinish and install the pedal assembly. This is the mounting "box" in primer. It had a bit of surface rust at the firewall. Figuring this should have been a dry location I did some investigation and found two tiny screw holes had been drilled above it, under the cowling. I have no idea what the PO might have mounted there but now I've got to fill them. BTW, that's the "parts car" in the background. Kind of sad, but it has an important purpose.

Even the pedal levers had a bit of surface rust so they've been refinished too. Sorry for the iPhone photo quality, the LED flash was used and it looks like crap. Since this photo was taken, a new set of rubber pedal pads has been installed. BTW, in my last post I thought I'd have to reinstall the steering wheel and dash to mount the pedals. Thankfully I was wrong.
Thankfully I was reminded that the new master cylinder had to be bench bled. Otherwise bleeding the whole brake system would have been a nightmare. Thanks to wifey's aquarium supplies, I was able to loop the fluid back into the cylinder using some air hose. The little pieces that came with the master cylinder were way too short. Once bled I was able to reinstall the master cylinder in the car without dripping any brake fluid on the paint. Copious amounts of Saran Wrap were used in this process.

When there's only a little time left in the day, not enough to really get started on a bigger project, I go into the storage area and pull out some of the odds and ends that must eventually be installed. These spring latches for the hatch are terribly expensive. The brownish bumpers on the originals (both sets) had decayed over the last forty years and were just a kind of nasty goo. I had sandblasted the originals to prep for zinc coating but without the bumpers, I realized the spring would go popping out, probably at the wrong time (is there a right time?). So, I forked over about $65 for a set of new ones. They aren't readily available either which probably is why the price is so high.

Next I'll temporarily reinstall the driver's seat so my wife can push on the brake pedal while the brakes are bled and any leaks are corrected.
Once that's done, it will be time to re-install the differential. Just got a new differential arrester strap from MSA. It's a little different as it actually provides some tension on the diff to help prevent the "clunk" that so many report. We'll see how that goes ...
Here's a small update on the progress.
Now that the brake lines are installed, I figure it is time to test them for leaks. So, what does that mean? It means I have to finish the front disc and rear drums and get them installed.
Hmm ... I'll need some way to pump the lines so they can be bled and pressure checked. That means I need to refinish and install the pedal assembly. This is the mounting "box" in primer. It had a bit of surface rust at the firewall. Figuring this should have been a dry location I did some investigation and found two tiny screw holes had been drilled above it, under the cowling. I have no idea what the PO might have mounted there but now I've got to fill them. BTW, that's the "parts car" in the background. Kind of sad, but it has an important purpose.
Even the pedal levers had a bit of surface rust so they've been refinished too. Sorry for the iPhone photo quality, the LED flash was used and it looks like crap. Since this photo was taken, a new set of rubber pedal pads has been installed. BTW, in my last post I thought I'd have to reinstall the steering wheel and dash to mount the pedals. Thankfully I was wrong.
Thankfully I was reminded that the new master cylinder had to be bench bled. Otherwise bleeding the whole brake system would have been a nightmare. Thanks to wifey's aquarium supplies, I was able to loop the fluid back into the cylinder using some air hose. The little pieces that came with the master cylinder were way too short. Once bled I was able to reinstall the master cylinder in the car without dripping any brake fluid on the paint. Copious amounts of Saran Wrap were used in this process.
When there's only a little time left in the day, not enough to really get started on a bigger project, I go into the storage area and pull out some of the odds and ends that must eventually be installed. These spring latches for the hatch are terribly expensive. The brownish bumpers on the originals (both sets) had decayed over the last forty years and were just a kind of nasty goo. I had sandblasted the originals to prep for zinc coating but without the bumpers, I realized the spring would go popping out, probably at the wrong time (is there a right time?). So, I forked over about $65 for a set of new ones. They aren't readily available either which probably is why the price is so high.
Next I'll temporarily reinstall the driver's seat so my wife can push on the brake pedal while the brakes are bled and any leaks are corrected.
Once that's done, it will be time to re-install the differential. Just got a new differential arrester strap from MSA. It's a little different as it actually provides some tension on the diff to help prevent the "clunk" that so many report. We'll see how that goes ...
Thread Starter
Registered User
Joined: Apr 2013
Posts: 578
From: Tucson, Arizona USA
Learning the Hard Way
Well, I got wifey out in the carport today so we could bleed the brakes. I temporarily installed a seat so she'd be comfortable. BTW, isn't this the UGLIEST seat you've ever seen?

Funny, she took her crocheting out with her so she wouldn't be bored while pressing the brake pedal.
Well, starting at the left rear wheel (longest run from the master cylinder) we successfully completed that wheel - yay!
On to the right rear wheel and couldn't get any fluid to flow. I completely removed the bleed nipple and used my finger to see if there was any pressure. Yes! Ok, just lots of air in the lines.
OK sweetheart, release the pedal and pump again! Then I hear a popping sound from the left rear wheel. I'm on the ground on my back so I squirm around and see a big puddle of brake fluid under the other wheel. Getting up to examine things I see the wheel cylinder has popped open and blown all the fluid out. The reservoir in the master cylinder is dry as well. Wifey is SO impressed with my mechanical skill.
I seem to have missed the part that you should not be pumping drum brakes without the drums in place. I wanted to see if they were operating - bad idea I've now learned.
Makes sense that without something for the cylinder to push on, you'll eventually pop the cylinder.
So, I decided since I wasn't terribly comfortable with the heritage of the old cylinders anyway, I'd order a new set. Back to brake work next week.
Maybe I'll install the differential while I'm waiting for the parts. Could also do the sound deadening as well ...
Funny, she took her crocheting out with her so she wouldn't be bored while pressing the brake pedal.
Well, starting at the left rear wheel (longest run from the master cylinder) we successfully completed that wheel - yay!
On to the right rear wheel and couldn't get any fluid to flow. I completely removed the bleed nipple and used my finger to see if there was any pressure. Yes! Ok, just lots of air in the lines.
OK sweetheart, release the pedal and pump again! Then I hear a popping sound from the left rear wheel.
I'm on the ground on my back so I squirm around and see a big puddle of brake fluid under the other wheel. Getting up to examine things I see the wheel cylinder has popped open and blown all the fluid out. The reservoir in the master cylinder is dry as well. Wifey is SO impressed with my mechanical skill.I seem to have missed the part that you should not be pumping drum brakes without the drums in place. I wanted to see if they were operating - bad idea I've now learned.
Makes sense that without something for the cylinder to push on, you'll eventually pop the cylinder.
So, I decided since I wasn't terribly comfortable with the heritage of the old cylinders anyway, I'd order a new set. Back to brake work next week.
Maybe I'll install the differential while I'm waiting for the parts. Could also do the sound deadening as well ...
Last edited by beg3yrs; Feb 2, 2015 at 05:12 PM.
Registered User
Joined: Feb 2002
Posts: 2,906
From: Saskatoon, SK
LOL@ crocheting!!!!
Ahh thats too bad about popping out the cylinders, but oh well, upgrade time, when it comes to stopping, you really want to be 100% on everything anyways.
That is a one sweet seat!! What seats are you going with, just restoring old ones to leather or?
What sound deadening are you going to use? I don't have anything on my floors, just rustproofing, I am not concerned with carpet at the moment, but maybe one day...
Thread Starter
Registered User
Joined: Apr 2013
Posts: 578
From: Tucson, Arizona USA
LOL@ crocheting!!!!
Ahh thats too bad about popping out the cylinders, but oh well, upgrade time, when it comes to stopping, you really want to be 100% on everything anyways.
That is a one sweet seat!! What seats are you going with, just restoring old ones to leather or?
What sound deadening are you going to use? I don't have anything on my floors, just rustproofing, I am not concerned with carpet at the moment, but maybe one day...
Ahh thats too bad about popping out the cylinders, but oh well, upgrade time, when it comes to stopping, you really want to be 100% on everything anyways.
That is a one sweet seat!! What seats are you going with, just restoring old ones to leather or?
What sound deadening are you going to use? I don't have anything on my floors, just rustproofing, I am not concerned with carpet at the moment, but maybe one day...
Yes, that seat. Kind of funny. Between the early and late model 260Z cars, there are different mounts! The early seats will still mount in the late cars but not the other way around. The brackets and mounts for the late version seats are a bit beefier and I think that means sturdier in case of a crash. Nissan left the old style mounting holes in place, hence the partial compatibility.
My older seats (not shown) are in much better shape. They're the original black vinyl. I just left them in storage for now. I'll definitely be redoing whichever existing seat I choose. Yes, I'm thinking black leather or something close (I really do have a budget, contrary to what my wife thinks) with red stitching to match the body. I'll get the wheel redone the same way.
Haven't yet looked and compared the frames and mechanisms to see what goes and what stays though I am thinking I'll go with the brackets that are safer.
So, you ask about sound deadening. There's been lots of previous discussions about dynamat and all the other similar products. Just google "240Z sound deadening" and you'll find lots of discussion. There was even a tip on one of the Velocity Channel (don't know if you get that up north) car shows that HVAC insulation can work.
I went over to our local Home Depot today and I think I've found the right stuff. It is a material used as an underlayment for hardwood floors. It has a rubber base topped with aluminum foil, much like some of the car products. It has both sound deadening and insulating properties.
I didn't purchase it right away as I wanted to compare its thickness to some of the other products. Turns out at 2.4 mm thick, it is thicker than the padding GM and BMW uses which is right at 2 mm thick. Not a big difference but it is in the right direction.
Cost is only about one USD per square foot too. That's about three to five times less than the official "car products". I will have to use a spray adhesive but that's no problem.
I'll post a photo of the label when I do purchase a roll. I'm thinking that based on some other posts I only need their 40 sq ft roll.
Thread Starter
Registered User
Joined: Apr 2013
Posts: 578
From: Tucson, Arizona USA
Weekend Update - More fun in the sun.
Apologies to you northern types but I've been working in shirtsleeves outdoors for the last couple of days. Full sun and temps in the mid-to-high '70s F.
Hey, at least the weather has been joyful.
I did purchase the hardwood floor underlayment from Home Depot. Turns out it's 100 sq ft for $45 US. I expect to have quite a bit left over. I'll post with photos once the installation is complete.

Got my new drum brake cylinders from Rock Auto and had the time to install them the same day. I'm getting better at this every time. Good thing because once in I pumped the brake pedal a few times (with the drums on this time too) and things seemed OK. No leaks at any of the connections. Was going to put off the final bleeding process until the next day. That evening Wifey and I were heading out to a local watering hole and I noticed, to my dismay, I puddle of brake fluid under the left rear wheel. I threw a bucket underneath, put some Saran Wrap on the reservoir to create a seal and left. This morning I confirmed that the brake cylinder itself was the source of the leak - bad seal it seems. Rock Auto handled everything easily and a new part should be here early next week.
OK, next topic is the emergency brake cable. When I first disassembled both my cars, I wasn't real happy with the condition of either e-brake cable. During one of the many late night part searches on the Internet, I ended up purchasing an e-brake cable from Thailand. Of course the site said this cable was compatible with a 260Z. Well, I found out that's not the case. Check out this link and you'll get much of the story: https://www.zdriver.com/forums/240z-...fitment-40638/
So, today I took both original cables and selected one as generally being in better shape. It was covered with caked-on mud and had some wear-through and cuts on the outer casing. Gave it a good scrubbing for further evaluation.

MSA, if they had one, will sell you a new cable like the for around $280 US. Other on-line vendors just don't have them either. Decided this has to work. The cable itself moves through its sleeve quite nicely and the connectors and flanges really aren't in too bad of shape, once the crud is gone. The biggest problem was the ratty interfaces between the cable rubber and the connectors. I remembered from a previous refurbishment of the choke cables that heat-shrink tubing might do the trick. The cable itself has a diameter of about 9/16" (I really need a metric ruler) and the spring is a a diameter of 5/8". The connectors and flanges are at most 3/4".
I found some 3/4" heat-shrink tubing at a mega-Ace Hardware store and bought 6' of it. This stuff has a max shrinkage of 2 to 1 so it should fit nicely around the existing e-brake cable. Got it home and installed it over the whole cable and added and extra layer at the flanges. Looks pretty good IMHO. I'll install it tomorrow.

Right now it's hanging up with a bunch of WD-40 draining down its length. The connector ends aren't going to be as nice looking as a new cable but it will do.
Hey, at least the weather has been joyful.
I did purchase the hardwood floor underlayment from Home Depot. Turns out it's 100 sq ft for $45 US. I expect to have quite a bit left over. I'll post with photos once the installation is complete.
Got my new drum brake cylinders from Rock Auto and had the time to install them the same day. I'm getting better at this every time. Good thing because once in I pumped the brake pedal a few times (with the drums on this time too) and things seemed OK. No leaks at any of the connections. Was going to put off the final bleeding process until the next day. That evening Wifey and I were heading out to a local watering hole and I noticed, to my dismay, I puddle of brake fluid under the left rear wheel.
I threw a bucket underneath, put some Saran Wrap on the reservoir to create a seal and left. This morning I confirmed that the brake cylinder itself was the source of the leak - bad seal it seems. Rock Auto handled everything easily and a new part should be here early next week.OK, next topic is the emergency brake cable. When I first disassembled both my cars, I wasn't real happy with the condition of either e-brake cable. During one of the many late night part searches on the Internet, I ended up purchasing an e-brake cable from Thailand. Of course the site said this cable was compatible with a 260Z. Well, I found out that's not the case. Check out this link and you'll get much of the story: https://www.zdriver.com/forums/240z-...fitment-40638/
So, today I took both original cables and selected one as generally being in better shape. It was covered with caked-on mud and had some wear-through and cuts on the outer casing. Gave it a good scrubbing for further evaluation.
MSA, if they had one, will sell you a new cable like the for around $280 US. Other on-line vendors just don't have them either. Decided this has to work. The cable itself moves through its sleeve quite nicely and the connectors and flanges really aren't in too bad of shape, once the crud is gone. The biggest problem was the ratty interfaces between the cable rubber and the connectors. I remembered from a previous refurbishment of the choke cables that heat-shrink tubing might do the trick. The cable itself has a diameter of about 9/16" (I really need a metric ruler) and the spring is a a diameter of 5/8". The connectors and flanges are at most 3/4".
I found some 3/4" heat-shrink tubing at a mega-Ace Hardware store and bought 6' of it. This stuff has a max shrinkage of 2 to 1 so it should fit nicely around the existing e-brake cable. Got it home and installed it over the whole cable and added and extra layer at the flanges. Looks pretty good IMHO. I'll install it tomorrow.
Right now it's hanging up with a bunch of WD-40 draining down its length. The connector ends aren't going to be as nice looking as a new cable but it will do.


