
Brakes and suspension upgrades, finally...

Thread Starter
Registered User
Joined: Apr 2005
Posts: 69
From: Sandy Oregon
Brakes and suspension upgrades, finally...
I was able to finally find time to install all my new suspension goodies this weekend. The suspension was all original including the worn out OE �93 struts. The Tension rod bushing were dripping their fluid on the shop floor, the rear sub frame was wandering all around under any cornering activities, brake booster would wheeze and whistle under spirited braking events, etc.
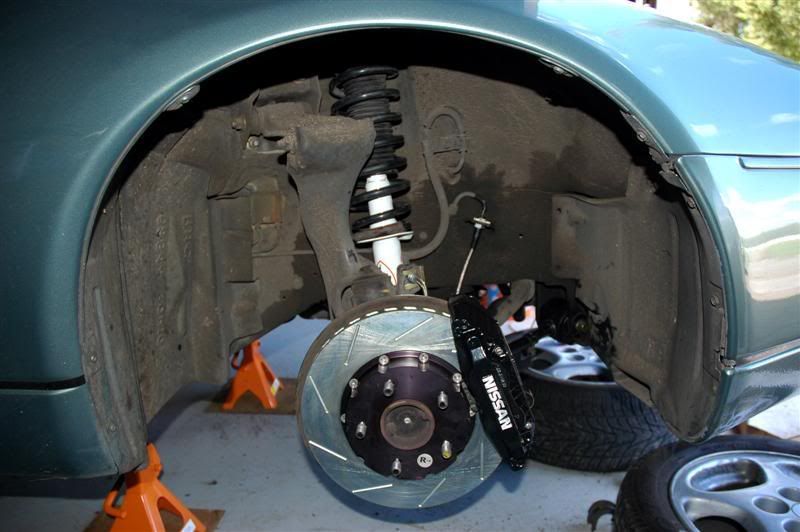
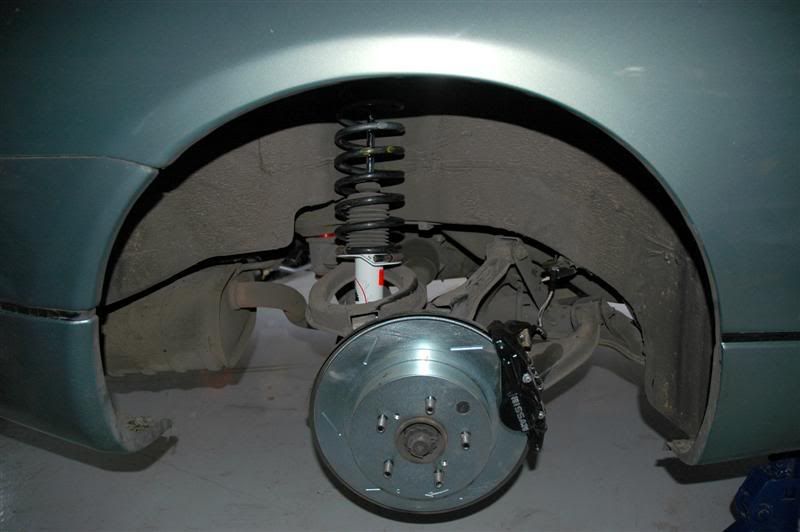
Ok, so the new brake parts consist of the Specialty Z brake kit with the slotted light weight 2 piece BAER front rotors, (saves 5 lbs PER rotor over stock), and slotted Baer rear rotors, stainless brake lines, and �The Brake Man� pads front and rear, (the Specialty z brake kit front rotors will work with �90 N/A calipers with a .100� shim between the caliper and hub on the later cars, so I also installed set of �90 N/A aluminum calipers in place of the iron calipers, another approx 2 lbs of unsprung weight savings per wheel), Also, a replacement brake booster to replace my intermittent whistling and wheezing booster. Suspension upgrades consisted of rear sub frame collars, front LCA Poly bushings, Poly Tension rod bushings, Poly rack bushings, and Tokico Illumina 5 way adjustable struts front and rear with all new strut bushings and hardware, (Nismo upgrades where available).
WOW!!! This a whole new car. The chassis has new �light on its feet� feeling. With struts on setting 4 all around, the car just begs to be tossed and flicked around the back roads corners. The sub frame collars reduced so much of that vague rubbery numbness that the rear of car exhibited prior. Also, the ply bushings, LCA, rack, and T/C rod bushings, gave the front end a tight connected feel that communicates exactly what is going on between the rubber and the road right back to the driver. Ah, this Z-32 feels more like a high end sports car now. This car feels 700 lbs lighter and is much more nimble and light on its feet. The perfect spirited daily driver sports car.
Being as the struts are adjustable and I am an avid autocrosser, I felt that access to the rear strut adjustment was imperative. I know, some of you purist are going to flame me for carving holes in the interior body work, (those same people will be screaming when they find out I plan to install a V-8 under the hood. Preferably the VH45DE from my totaled Q-45 sitting in front of the shop). My excuse is that I bought this car to DRIVE, not just look at. If I have to make an alteration to the cosmetics or interior for performance reasons and it doesn�t make a drastic negative visual impact, then be all means, it needs to be done in the name of �enjoying the ride�. So I located the exact location where the Tokico strut adjuster would be under the rear interior panels and proceeded to carve a hole for access, but only large enough for reasonable visual access and that allowed a somewhat clean plug to be installed. (see pics below)
The brake upgrade is also pretty nice. It is pretty difficult to get real feel of what the upgrade brings to the car as the used brake booster has a busted diaphragm, and I also think the master cylinder might be bad, but having driven sports cars of all levels to full tilt road race cars, these pads and rotors do feel like they are indeed a nice noticeable upgrade of the OE/Brembo rotors and metal master pads.
When I did the brakes, I contemplated painting the calipers bright Red. If this car was painted in a bright flashy color, then I would�ve in a heart beat. Being as this car is a nice elegant pearl green, I opted for a more contemporary gloss black which doesn�t stand out as much, but still adds a touch of class to the overall visual package.
Here are some before and after shots, (sorry, nothing real exciting.)
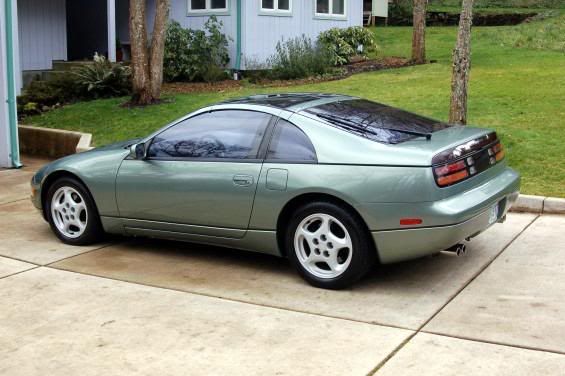
1 The car..
2-3 Front suspension before and after
4-5 Rear suspension before and after
6-7 Rear strut adjuster access.
Front suspension�

Rear Suspension�

Rear adjuster�


Ok, so the new brake parts consist of the Specialty Z brake kit with the slotted light weight 2 piece BAER front rotors, (saves 5 lbs PER rotor over stock), and slotted Baer rear rotors, stainless brake lines, and �The Brake Man� pads front and rear, (the Specialty z brake kit front rotors will work with �90 N/A calipers with a .100� shim between the caliper and hub on the later cars, so I also installed set of �90 N/A aluminum calipers in place of the iron calipers, another approx 2 lbs of unsprung weight savings per wheel), Also, a replacement brake booster to replace my intermittent whistling and wheezing booster. Suspension upgrades consisted of rear sub frame collars, front LCA Poly bushings, Poly Tension rod bushings, Poly rack bushings, and Tokico Illumina 5 way adjustable struts front and rear with all new strut bushings and hardware, (Nismo upgrades where available).
WOW!!! This a whole new car. The chassis has new �light on its feet� feeling. With struts on setting 4 all around, the car just begs to be tossed and flicked around the back roads corners. The sub frame collars reduced so much of that vague rubbery numbness that the rear of car exhibited prior. Also, the ply bushings, LCA, rack, and T/C rod bushings, gave the front end a tight connected feel that communicates exactly what is going on between the rubber and the road right back to the driver. Ah, this Z-32 feels more like a high end sports car now. This car feels 700 lbs lighter and is much more nimble and light on its feet. The perfect spirited daily driver sports car.
Being as the struts are adjustable and I am an avid autocrosser, I felt that access to the rear strut adjustment was imperative. I know, some of you purist are going to flame me for carving holes in the interior body work, (those same people will be screaming when they find out I plan to install a V-8 under the hood. Preferably the VH45DE from my totaled Q-45 sitting in front of the shop). My excuse is that I bought this car to DRIVE, not just look at. If I have to make an alteration to the cosmetics or interior for performance reasons and it doesn�t make a drastic negative visual impact, then be all means, it needs to be done in the name of �enjoying the ride�. So I located the exact location where the Tokico strut adjuster would be under the rear interior panels and proceeded to carve a hole for access, but only large enough for reasonable visual access and that allowed a somewhat clean plug to be installed. (see pics below)
The brake upgrade is also pretty nice. It is pretty difficult to get real feel of what the upgrade brings to the car as the used brake booster has a busted diaphragm, and I also think the master cylinder might be bad, but having driven sports cars of all levels to full tilt road race cars, these pads and rotors do feel like they are indeed a nice noticeable upgrade of the OE/Brembo rotors and metal master pads.
When I did the brakes, I contemplated painting the calipers bright Red. If this car was painted in a bright flashy color, then I would�ve in a heart beat. Being as this car is a nice elegant pearl green, I opted for a more contemporary gloss black which doesn�t stand out as much, but still adds a touch of class to the overall visual package.
Here are some before and after shots, (sorry, nothing real exciting.)
1 The car..
2-3 Front suspension before and after
4-5 Rear suspension before and after
6-7 Rear strut adjuster access.
Front suspension�
Rear Suspension�
Rear adjuster�


Thread Starter
Registered User
Joined: Apr 2005
Posts: 69
From: Sandy Oregon
Originally Posted by CanyonCarver
Congrats on those upgraded brakes. That's a interesting color of Z. Your front wheels are on backwards. 
 , That is the picture of the car when I purchased it a mere couple months ago. I immediately had the tire shop swap the front tires on the front rims as the tires are also directional, (I probably should get take some current shots�) Most people don�t notice things like that, only a true Z-32 aficionado would, good catch.
 The color is definitely not a typical bright flashy �sports car� color, it is a little feminine, but I like it.
Thread Starter
Registered User
Joined: Apr 2005
Posts: 69
From: Sandy Oregon
That is the correct direction for these BAER rotors. As for why the slots are scooping vs sweeping, I have no idea on the theory behind that.
FWIW, the cooling vanes are curved and Baer included a sheet with specific instructions showing the direction of rotation, especially in regards to the vanes, and each front rotor also has a nifty little sticker attached the hub with a big �R� and �L� and a redundant arrow showing the direction of vehicle travel. The rear rotors have an embossed arrow indicating direction of rotor rotation. On the front you have 3 different indicators and all three indicators coincide with each other...
If you look close at the pics of the new rotors, you can barely make out that that is the passenger side of the car and that the sticker and embossed arrows all match up, at least as I understand it.
So far, the brakes are VERY nice� I�m just waiting for the replacement booster�.

Thread
Thread Starter
Forum
Replies
Last Post
lightspeed
300ZX (Z32) Brakes, Wheels, Suspension and Chassis
7
Jun 30, 2005 10:13 PM
Bookmarks


