Valve and time adjustment clearances on a Shneider 274F Camshaft
 04-02-2015, 01:38 PM
#1
Registered User
Thread Starter

Join Date: Jan 2014
Posts: 68
Valve and time adjustment clearances on a Shneider 274F Camshaft
Got an old school mechanic who came to my house today and inspect the car. After lifting the valve cover, He found out that the engine valves were too tight and will need to adjust them all. He did not brought his feeler gauge and will need to take care of that on monday. He is quoting me US$100 for the following:
1. Valve adjustments which according to my Schneider 274F cam should be set to 0.8 and 0.10. Am i correct?
2. Timing Chain and distributor adjustment.
He also noted the car is leaving black residues out of the muffler due to the bad valve adjustment. Is there any additional recommendation i can give him before he starts to adjust the valves? The shop that installed the cam has followed all the steps mentioned in the Hayes Manual and adjusted the timing to 10 degrees. Maybe here is my problem and after all this adjustements are concluded, there will be no more hesitation in 1st gear and backfiring,enabling me to adjust the carbs to 2.5 turns.
Any opinions?
 04-03-2015, 10:46 AM
#2

Not sure how he knew the valve rockers were too tight if he didn't have the needed feeler gauges... 
Black residue is probably from running too rich... tuning / syncing the carbs should help. I'd leave the timing at 10-15 degrees.
Black residue is probably from running too rich... tuning / syncing the carbs should help. I'd leave the timing at 10-15 degrees.
04-11-2015, 07:28 PM
#3
Registered User
Thread Starter
Join Date: Jan 2014
Posts: 68
12 valves
valve guides
valve seats
and a gasket that goes underneath.
Please give me your input, if i should settle his opini�n and if so where should i purchase OEM Nissan quality valves, valve guides, and valve seats
04-11-2015, 10:51 PM
#4
Registered User
Join Date: Aug 2009
Location: Phoenix AZ + (Q8)
Posts: 1,223
Oh no here we go again.....
Get your manual and do it yourself....there are a lot of youtube Videos that show you how to adjust your valves.........
I will not let anybody work on my car except me!!!!
Get your manual and do it yourself....there are a lot of youtube Videos that show you how to adjust your valves.........
I will not let anybody work on my car except me!!!!
04-15-2015, 04:00 PM
#5
Registered User
Thread Starter
Join Date: Jan 2014
Posts: 68
Just did a compression test on the cylinders and a fuel pressure test.
The compression test drew the following results:
Cylinder 1 : 180 PSI
Cylinder 2: 180 PSI
Cylinder 3: 185 PSI
Cylinder 4; 180 PSI
Cylinder 5: 180 PSI
Cylinder 6: 175 PSI
The fuel pressure was 3 PSI. I am running A Carter P60504 Electric Fuel Pump. Is this pressure enough for both carbs?
http://www.summitracing.com/int/part...0504/overview/
I have both carbs set to 3.5 turns and i am still having a back and forth motion after stepping on the gas and releasing the pedal before reaching 3000 RPM.
With all of this information, what would you recommend? If this is the compression the valves should be fine? THe back and forth movement/ hesitation below 3,000 RPM is annoying, how do i get rid of it?
04-16-2015, 09:00 PM
#6
I have a present for you...

Join Date: Mar 2003
Location: dayton, nevada usa
Posts: 1,691
#3 plug is fouled or bad plug wire. Carbs are gummed up.
Throw that Haynes in the trash, tell your wanna be mechanic to FO. Download the FSM. The SU carbs are very simple. Make sure your chokes are open all the way. You can do this!
Throw that Haynes in the trash, tell your wanna be mechanic to FO. Download the FSM. The SU carbs are very simple. Make sure your chokes are open all the way. You can do this!
04-18-2015, 07:10 PM
#7
Registered User

Join Date: Mar 2014
Location: North Central
Posts: 23
This quote is by far the best advice before attempting any carb tuning.
He is talking about British SU's but the same thing as a Z car.
" Before even going near your carbs make sure that you have checked at least the following:"
� A good spark reaching the spark plugs (remove one and hold it tight against the engine block with something to insulate you from the spark)
� Spark plug gaps are set correctly
� Ignition timing is set appropriate to the engine and level of modification. A hotter cam may require greater advance than a standard cam. By way of example a Kent AH2 mild road cam at 278 degrees requires a static timing advance of around 14 degrees in my experience. Make sure you are using static timing figures for static timing and not static figures for strobe timing.
� Points are not pitted. If using electronic ignition, this will not be an issue of course.
� Distributor cap is in good condition – that is that the contact surfaces inside the cap are not pitted or black. Also check that the cap itself is clean inside to avoid conduction across the surface.
� Ignition leads – check these are fully home and not cracked or damaged.
� Vacuum line – make sure this is attached to the distributor (if applicable) and that the servo take off is tight and the rubber is not perished (leading to leaks).
� Gaskets – it is not unknown for these to be put on upside down which means that the vacuum transfer holes (which allows atmospheric pressure to push the piston up to its correct height) at the front of the carbs are blocked by the gasket. This will ruin all attempts to properly tune the carbs.
� Valve clearances are correct.
One thing that fails on the Z distributor is the vacuum dashpot. You will need a hand
vacuum pump to test with the cap removed to see if it is moving the distributor plate.
Your engine seems to be in very good condition. I would not even bother with the
head if it were mine.
04-20-2015, 02:14 PM
#8
Registered User
Thread Starter
Join Date: Jan 2014
Posts: 68
This quote is by far the best advice before attempting any carb tuning.
He is talking about British SU's but the same thing as a Z car.
" Before even going near your carbs make sure that you have checked at least the following:"
� A good spark reaching the spark plugs (remove one and hold it tight against the engine block with something to insulate you from the spark)
� Spark plug gaps are set correctly
� Ignition timing is set appropriate to the engine and level of modification. A hotter cam may require greater advance than a standard cam. By way of example a Kent AH2 mild road cam at 278 degrees requires a static timing advance of around 14 degrees in my experience. Make sure you are using static timing figures for static timing and not static figures for strobe timing.
� Points are not pitted. If using electronic ignition, this will not be an issue of course.
� Distributor cap is in good condition � that is that the contact surfaces inside the cap are not pitted or black. Also check that the cap itself is clean inside to avoid conduction across the surface.
� Ignition leads � check these are fully home and not cracked or damaged.
� Vacuum line � make sure this is attached to the distributor (if applicable) and that the servo take off is tight and the rubber is not perished (leading to leaks).
� Gaskets � it is not unknown for these to be put on upside down which means that the vacuum transfer holes (which allows atmospheric pressure to push the piston up to its correct height) at the front of the carbs are blocked by the gasket. This will ruin all attempts to properly tune the carbs.
� Valve clearances are correct.
One thing that fails on the Z distributor is the vacuum dashpot. You will need a hand
vacuum pump to test with the cap removed to see if it is moving the distributor plate.
Your engine seems to be in very good condition. I would not even bother with the
head if it were mine.
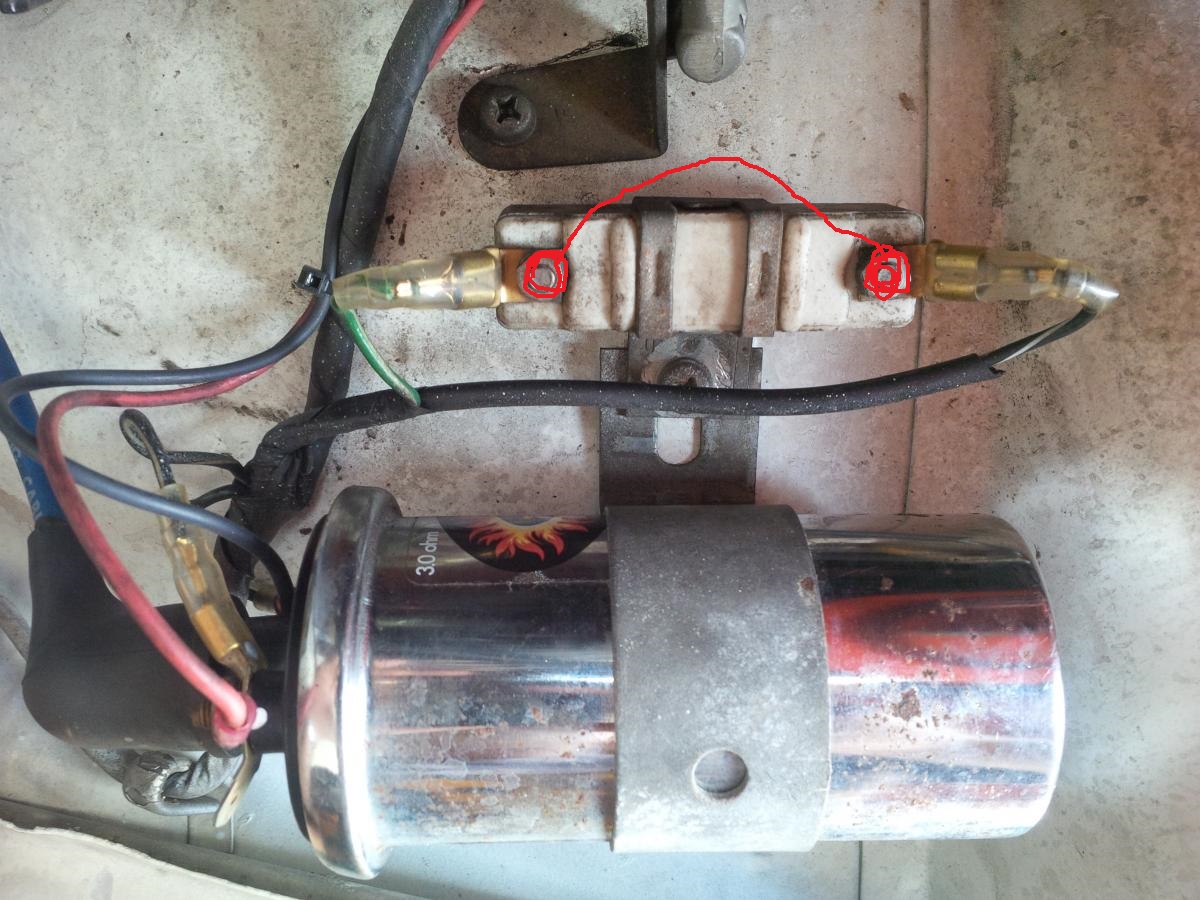
I have a Pertronix Flamethrower coil installed in my car (3.0 ohms) which the former owner had it connected through the ballast coil. However, i have read in this f�rum that if you have a 3.0 0hms you should not use the ballast resistor. Is this correct? the car cranks up fine and runs fine but idles rough in traffic jams. If i leave it idling at the parking for more than 10 mins, rpm starts to drop from 1,000 to 800 to 600 RPM. Same happens in traffic jams.
Could the coil be damaged? or is it wired wrongly? It should only be wired with no resistor? Could the Ballast resistor be damaged?
04-20-2015, 03:20 PM
#10
Registered User
Thread Starter
Join Date: Jan 2014
Posts: 68
Please advise how do i connect it. THis is my actual setup.
04-20-2015, 03:53 PM
#11
Registered User

Join Date: Feb 2002
Location: Saskatoon, SK
Posts: 2,893
Yes it very well could, with the ballast you are showing around 4.5 ohms. Read the coil part of this. Good writeup, explains wiring and tach issues. Make SURE SURE SURE you are a 3ohm coil (*I see now that it is in the picture lol), and since it is oilfilled you should run that coil upright, don't know if its just rumors and hearsay, but I have been told to run oil cooled coils upright position.
http://www.atlanticz.ca/zclub/techti...tor/index.html
Sorry I guess I should ask what year you are? The above might not work on older tachs.
Just doing this, will bypass it, you can try to run it for a while. See if your spark improves
Sorry for all the edits, I am so bad at explaining things at times. The coil should not over heat at all, as it is 3 ohms. This should give you a better spark (bypassing the resistor for sure). The tach part seems to be up in air, depending on year of car as far as if it would work or not.
Last edited by Skully; 04-20-2015 at 04:48 PM.
04-20-2015, 06:55 PM
#12
Registered User
Thread Starter
Join Date: Jan 2014
Posts: 68
Yes it very well could, with the ballast you are showing around 4.5 ohms. Read the coil part of this. Good writeup, explains wiring and tach issues. Make SURE SURE SURE you are a 3ohm coil (*I see now that it is in the picture lol), and since it is oilfilled you should run that coil upright, don't know if its just rumors and hearsay, but I have been told to run oil cooled coils upright position.
http://www.atlanticz.ca/zclub/techti...tor/index.html
Sorry I guess I should ask what year you are? The above might not work on older tachs.
Just doing this, will bypass it, you can try to run it for a while. See if your spark improves

Sorry for all the edits, I am so bad at explaining things at times. The coil should not over heat at all, as it is 3 ohms. This should give you a better spark (bypassing the resistor for sure). The tach part seems to be up in air, depending on year of car as far as if it would work or not.
http://www.atlanticz.ca/zclub/techti...tor/index.html
Sorry I guess I should ask what year you are? The above might not work on older tachs.
Just doing this, will bypass it, you can try to run it for a while. See if your spark improves
Sorry for all the edits, I am so bad at explaining things at times. The coil should not over heat at all, as it is 3 ohms. This should give you a better spark (bypassing the resistor for sure). The tach part seems to be up in air, depending on year of car as far as if it would work or not.
04-20-2015, 09:56 PM
#13
Registered User
Join Date: Feb 2002
Location: Saskatoon, SK
Posts: 2,893
No gator clips, use a proper gauge wire, and jump it, if you are having issues you can take the jumper out. Are you going to damage the car? With a 3ohm coil, in the 240z, everything should be fine and dandy with the ballast bypassed, with that said I am not a dealership I can't give you warranty on my suggestion. Here is a link to MSA website where the same coil is sold, with instructions to bypass the ballast to run proper OHMS.
Scroll down, read the instructions regarding 240z with points dizzy.
Motorsport! PerTronix 3.0 Ohm Coil, Chrome, 70-83 Z/ZX - The Z Store! Nissan-Datsun 240Z-260Z-280Z-280ZX-300ZX(Z31/Z32)-350Z-370Z Parts
Point Type Distributors:
For 240Z's with points, do NOT use this coil with a Ballast Resistor. This Pertronix is a 3 ohm coil, and the 240Z had an original (Coil + Ballast Resistor) resistance of approximately 3 ohms. If you use this coil plus the original Ballast Resistor, you will have around 4.6 ohms of resistance, which will not work properly. If you are using your original Ballast Resistor, choose the 1.5 ohm PerTronix coil instead (see Related Items below).
04-21-2015, 12:14 PM
#14
Registered User
Join Date: Mar 2014
Location: North Central
Posts: 23
People need to realize that unleaded fuel leaves a black residue.
And since we now have to use unleaded fuel, black residue is
expected. You can no longer read too much into that issue now days.
04-22-2015, 05:06 PM
#15
Registered User
Join Date: Mar 2014
Location: North Central
Posts: 23
Are you running the Pertronix electronic points replacement or are
you running points? Coil does not mean much if we don't know
what you are running inside the distributer.
04-22-2015, 09:11 PM
#16
Registered User
Thread Starter
Join Date: Jan 2014
Posts: 68
I want to replace the coil as it is not delivering enough spark to the spark plugs, which coil should i get? Pertronix 3.0 0hms or 1.5 ohms? Please clear me first on the issue of leaving or removing the Ballast Resistorin the circuit and then make your recommendations. I really need to move forward with this before purchasing a new coil
04-23-2015, 10:16 AM
#17
Registered User
Join Date: Feb 2002
Location: Saskatoon, SK
Posts: 2,893
Alright, well if you are hesitant to remove the ballast resistor, which all it does is bump up your resistance to about where your 3ohm coil is if you had a 1.5 ohm coil, then buy a 1.5 ohm coil and keep the resistor in. This way your resistance will be 3 ohms in the end which I am positive will fix your spark issue, which is same as removing it with the 3 ohm coil.
To paint a better picture of what is going on now.
Lets say your voltage at coil when the car is running is 12V
Voltage 12v x Resistance 4.5 ohms (what you have now) = current 2.6
Without resistor (or with resistor and a 1.5 ohm coil)
Voltage 12v x Resistance 3 ohms = current 4
You can see how much current you are dropping with the resistor and a 3ohm coil, vs a 1.5 ohm coil and resistor, or a 3ohm coil and no resistor.
Up to you
Last edited by Skully; 04-23-2015 at 10:27 AM.
04-23-2015, 08:41 PM
#18
Registered User
Join Date: Mar 2014
Location: North Central
Posts: 23
You keep your stock ballast resistor and your stock coil.
Wire per the third diagram here. You should have no problems.
This is how others have done it.
the Z Car Home Page
Click on Technical Library to go to ignition upgrades.
Wire per the third diagram here. You should have no problems.
This is how others have done it.
the Z Car Home Page
Click on Technical Library to go to ignition upgrades.
04-24-2015, 12:57 PM
#20
Registered User
Thread Starter
Join Date: Jan 2014
Posts: 68
You keep your stock ballast resistor and your stock coil.
Wire per the third diagram here. You should have no problems.
This is how others have done it.
the Z Car Home Page
Click on Technical Library to go to ignition upgrades.
Wire per the third diagram here. You should have no problems.
This is how others have done it.
the Z Car Home Page
Click on Technical Library to go to ignition upgrades.
By the way, Is the Pertronix 91761 Ignitor II any real improvement (45,000 v) for a 1972 240z? I read it is used with a Pertronix Ignition Coil 45011 which is 0.6 ohms only http://www.amazon.co...bxgy_auto_img_y ! In this scenario, i have the following questions:
1. would i still need to connect to the stock ballast resistor?
2. Would it affect the Original Stock Tachometer?
3. Would i need to buy other type of spark plugs which are not the blue stock NGK labeled Spark Plug set?
4. Would i need to switch to other spark plugs? At the moment i am using NGK BP6ES.
Please advise.
04-24-2015, 01:33 PM
#21
Registered User
Join Date: Feb 2002
Location: Saskatoon, SK
Posts: 2,893
sigh..
Either revert to a 1.5 ohm coil and ballast (like lumens suggested, this will more likely make the tach run proper)
or
3ohm coil and no ballast
pick one, go with it, deal with the tach, figure it out.
Im out.
Either revert to a 1.5 ohm coil and ballast (like lumens suggested, this will more likely make the tach run proper)
or
3ohm coil and no ballast
pick one, go with it, deal with the tach, figure it out.
Im out.
04-24-2015, 10:26 PM
#22
Registered User
Join Date: Mar 2014
Location: North Central
Posts: 23
Do what Skully suggests. He is correct. After reading more from Pertronix, you have all you need. 3 ohm for 6 cyl. Just take out the ballast.
Zhome needs to update and clarify that section.
I had added the MSD to mine. We will not go there. Does not apply.
Zhome needs to update and clarify that section.
I had added the MSD to mine. We will not go there. Does not apply.
04-25-2015, 05:47 AM
#23
Registered User
Thread Starter
Join Date: Jan 2014
Posts: 68
Is this acceptable? Or is it weak?
04-30-2015, 12:18 PM
#24
I have a present for you...
Join Date: Mar 2003
Location: dayton, nevada usa
Posts: 1,691
Check all these results by pulling one plug wire and touching it to ground. You should have a popping blue spark. Yellow spark is weak. You could also measure your voltage when your idle drops, your coil may be getting hot and breaking down.
Another thing is when you idle any carbureted car for that long it loads up the plugs especially if it's tuned to rich. You have a racing cam not a sit in traffic cam.
Another thing is when you idle any carbureted car for that long it loads up the plugs especially if it's tuned to rich. You have a racing cam not a sit in traffic cam.


