
Body Work
 07-01-2014, 12:29 PM
#1
Body Work
I am trying to teach myself some body working skills. My 280zx has a few problem areas, caved in rear quarter panel, rust hole in the spare tire well, nice dent on the front edge of the hood and a nice dent on the passenger door. Ill post pics of all the panels, before and afters and where I am now. I was particularly inspired by the quality of work TheRamZ was able to accomplish in his garage, no paint booth, but he was able to get it really looking nice. One thing I have to keep reminding myself, this is a very time consuming process and you really can't rush it or cut corners. So far I have been fairly happy with my progress, but I have a long way to go.
 07-01-2014, 12:40 PM
#2
Dents
Every last dent I was able to get to the back side of the dent with a rod or sled hammer handle (rear quarter). I managed to push out most of the caved in rear quarter with the sledge hammer, someone had already covered it in up to an inch of bondo. My plans for the rear quarter and wheel well area involve adding a fiberglass bumper cover / rear fascia piece. That piece will cover a lot of the area that needs work. Combine the Fiberglass Rear Skirt with wheel flares and a good share of my problem is hidden.
Motorsport! Fiberglass Rear Skirt, 79-81 280ZX Non Turbo, Style 2 - The Z Store! Nissan-Datsun 240Z-260Z-280Z-280ZX-300ZX(Z31/Z32)-350Z-370Z Parts
Motorsport! Fiberglass Rear Skirt, 79-81 280ZX Non Turbo, Style 2 - The Z Store! Nissan-Datsun 240Z-260Z-280Z-280ZX-300ZX(Z31/Z32)-350Z-370Z Parts
07-01-2014, 12:44 PM
#3
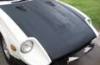
bondo
I have a grinding wheel on my drill, it cuts through bondo pretty fast. After removing a lot, it was scary how many holes were drilled in the panel. I ended up removing the rear bumper, grinding down all the bondo, which went right to the back of the doors. I hammered on them as much as possible to get it a close as possible before I started filling it back in, I am using the bondo with fiberglass in it, it dries extremely hard, which has slowed the final sanding process a bit dealing with that. It's basically a few steps repeated over and over, apply as smooth of a layer as you can, shaping if possible, wait for it to cure and sand down the high spots, check with a strait edge to judge flatness when possible and then starting over with another thin smooth layer. During the sanding I run into little metal peaks that I hammer down into slight depressions, then another layer of filler and more sanding to get a ruff shape. Once I am pretty sure I am close to where I want to be I switch to a long sanding block and work the area in long strokes. repeat and rinse a few times. Eventually I am filling my sanding marks with a light weight sand-able filler and switching to a 220 sandpaper. After all of that, it is maybe 50% of where I need to be.
Last edited by PredatorZ; 07-01-2014 at 01:05 PM.
07-01-2014, 12:47 PM
#4
Body tools
I got this inexpensive Dolly and hammer set at harbor freight, they have been very useful.
7 Piece Body and Fender Set
7 Piece Body and Fender Set
07-08-2014, 01:55 PM
#5
Mr Z++ Wiki

Join Date: Sep 2009
Location: Victoria, BC
Posts: 2,195
I find that starting with a long sanding block makes for a lot less work down the road. Use as long of a block as works with the area you are working on. Cheese grater to shape and fill the entire panel working down to the first high spot and refill the entire panel again. You're just roughing in with those first two coats - I use the grater for the high spots and 40/80 grit to shape.

Thread
Thread Starter
Forum
Replies
Last Post
Bookmarks


