260Z Restoration as a Retirement Project
 05-19-2015, 11:18 AM
#126
Registered User
Thread Starter

Join Date: Apr 2013
Location: Tucson, Arizona USA
Posts: 576
Spent a LOT of dinero on this beast in the last month, much of it was not planned. Gotta wait for the next budget cycle to be prudent. At least for now I'll have a working tank.
 05-19-2015, 11:23 AM
#127
Registered User
Thread Starter
Join Date: Apr 2013
Location: Tucson, Arizona USA
Posts: 576
Also, thanks for the nuts and bolts offer, that's generous. I do have quite a few cans of those things, saved from two cars. What I am getting new are some of the more visible ones that also need to be new, i.e. anything that gets old and rusty with the potential of breaking. That "show car mechanic" may or may not have done me a favor.
05-20-2015, 05:55 PM
#128
Registered User
Thread Starter
Join Date: Apr 2013
Location: Tucson, Arizona USA
Posts: 576
More details...
Attached the front grill(s). Had to do a little bending of the mounts to get things lined up but the grill is attached.
Installed the combo lamps and realized right away that some PO's overspray on the lamp bodies looked awful. With all the other refinished stuff on this car, they stuck out like warts on the nose of a beauty queen.

All it took was a quick scrub, some adhesion promoter and a spray with black krylon. Done!

Also finished with the vintage steering wheel. Some sanding on the wood (actually lots), wire wheel on the spokes followed by lots of masking, red oak stain and marine spar varnish on the wood and then semi-gloss black laquer on the spokes followed by three clear coats.


Installed the combo lamps and realized right away that some PO's overspray on the lamp bodies looked awful. With all the other refinished stuff on this car, they stuck out like warts on the nose of a beauty queen.
All it took was a quick scrub, some adhesion promoter and a spray with black krylon. Done!
Also finished with the vintage steering wheel. Some sanding on the wood (actually lots), wire wheel on the spokes followed by lots of masking, red oak stain and marine spar varnish on the wood and then semi-gloss black laquer on the spokes followed by three clear coats.
 05-20-2015, 09:51 PM
#130
Registered User
Thread Starter
Join Date: Apr 2013
Location: Tucson, Arizona USA
Posts: 576
Thanks. I've got the original 260Z wheel but it's in bad shape and would need a complete tear down and rebuild. The other wheel I've got is one of those 'Performance' wheels from Grant. You know, the tiny ones you see all over the place with a tiny diameter you can hold with hand-cuffs on.
I really like the vintage look of the older wooden ones and when a guy in the local club offered one, I jumped on it.
I really like the vintage look of the older wooden ones and when a guy in the local club offered one, I jumped on it.
05-22-2015, 05:45 PM
#131
Registered User
Thread Starter
Join Date: Apr 2013
Location: Tucson, Arizona USA
Posts: 576
Vapor Recovery - Done
Now that the missing mount point for the charcoal canister has been identified, located, shipped, received and refinished, it's time for installation.

theramz, your wish is my command ...
Go figure the spot welds from theramz' 77 car weren't in the same locations as the ones in my car. Hey, didn't they use robots to do welding in the '70s? I suppose not.
A little bit of finagling and I've finally go the fuel system all closed up. No vapor problems now.
Met with the car spa folk yesterday. I've got a new punch list of items to prepare as she's almost ready to head back to get the rest of the body pieces fitted. Folks at the local Z club saw the video of me driving it around the property and have named the car "Mad Max".
05-22-2015, 09:26 PM
#133
Registered User
Thread Starter
Join Date: Apr 2013
Location: Tucson, Arizona USA
Posts: 576
05-25-2015, 05:39 PM
#134
Registered User
Thread Starter
Join Date: Apr 2013
Location: Tucson, Arizona USA
Posts: 576
Getting Ready
One of the things I remembered to do yesterday was to drain the water from the radiator and engine and replace it with 50/50 coolant. Hadn't had any leaks for a week so I figured it was time.
Got out all the door hardware, sorted and cleaned it in preparation for reinstallation. That's ready to go.
Spent some of the day gathering materials to go with the car back to the body shop where she'll get most of herself put back together.
Holy rubber stuff Batman! I didn't realize how much weatherstripping and other rubber bits I've gathered over the last couple of years. Anyway, that's all in a box now ready to go.
Located all the fasteners required to bolt on the fenders, cowling, air dam, rear wing and so on. Was amazed that a little organization goes a long way in keeping everything together. All those long days cleaning bolts and so on has paid off. Decide to place as many of the fasteners in their final location so the body shop folk won't have to guess. I'll likely be there assisting anyway, if they let me without charging more of course.
Installed the underbody splash guard. It is one of those things seem to get lost over time. I was amazed I had one. It was refinished a while ago and has been waiting patiently in storage.
Of course now that the splash guard is in place, it is difficult to see up into the engine bay from underneath. Given that and now there's coolant in the system, the baby rewarded me with a small puddle of coolant. Go figure. Try as I might, I could not find the source. Maybe it's some splash from refilling the radiator, we'll see tomorrow if there's a repeat performance.
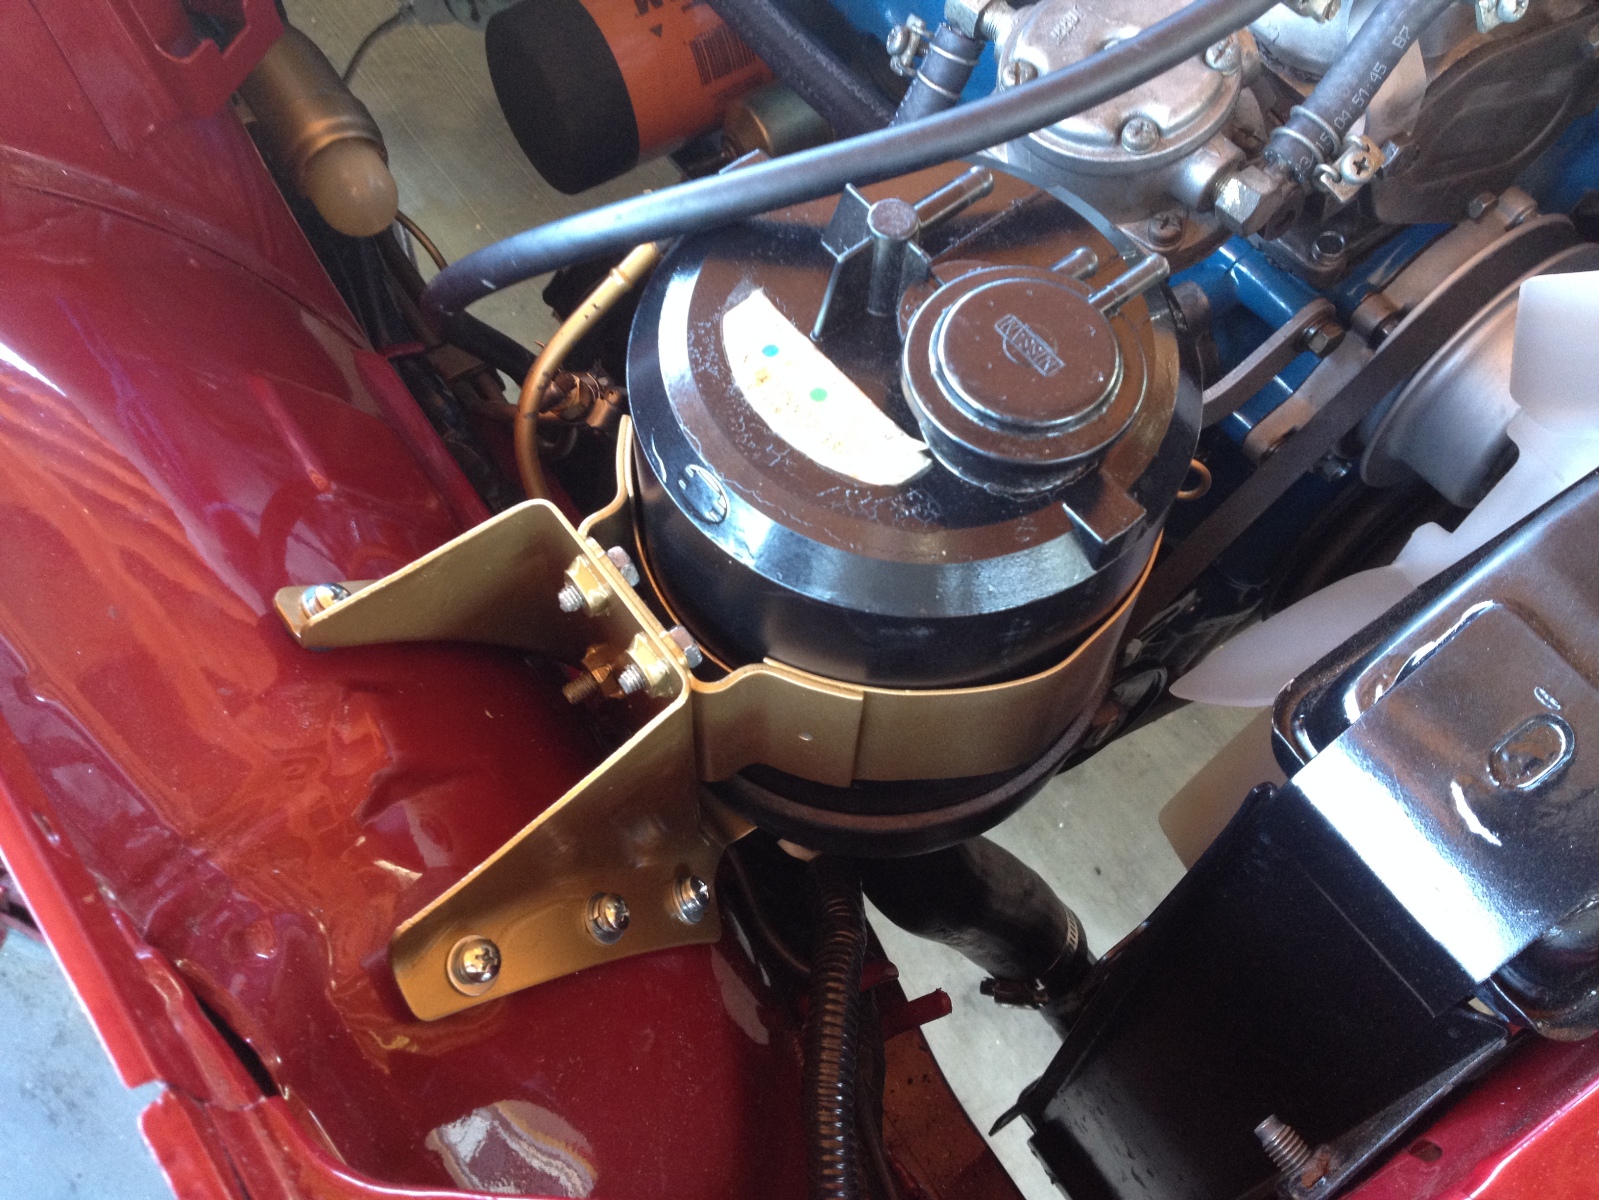
Installed the refinished air filter and hooked up the remaining lines to it. Kind of nice to see it in place, makes the engine bay look a lot more complete.

I've got some parts from MSA on the way. A new voltage regulator (shouldn't be getting 16.8V should I?) and some stuff to dress up the bay, i.e. those little doodads that help organize your ignition wires and some other minor stuff. Even started to think more about interior and have their rear speaker box on the way.
Got out all the door hardware, sorted and cleaned it in preparation for reinstallation. That's ready to go.
Spent some of the day gathering materials to go with the car back to the body shop where she'll get most of herself put back together.
Holy rubber stuff Batman! I didn't realize how much weatherstripping and other rubber bits I've gathered over the last couple of years. Anyway, that's all in a box now ready to go.
Located all the fasteners required to bolt on the fenders, cowling, air dam, rear wing and so on. Was amazed that a little organization goes a long way in keeping everything together. All those long days cleaning bolts and so on has paid off. Decide to place as many of the fasteners in their final location so the body shop folk won't have to guess. I'll likely be there assisting anyway, if they let me without charging more of course.
Installed the underbody splash guard. It is one of those things seem to get lost over time. I was amazed I had one. It was refinished a while ago and has been waiting patiently in storage.
Of course now that the splash guard is in place, it is difficult to see up into the engine bay from underneath. Given that and now there's coolant in the system, the baby rewarded me with a small puddle of coolant. Go figure. Try as I might, I could not find the source. Maybe it's some splash from refilling the radiator, we'll see tomorrow if there's a repeat performance.
Installed the refinished air filter and hooked up the remaining lines to it. Kind of nice to see it in place, makes the engine bay look a lot more complete.
I've got some parts from MSA on the way. A new voltage regulator (shouldn't be getting 16.8V should I?) and some stuff to dress up the bay, i.e. those little doodads that help organize your ignition wires and some other minor stuff. Even started to think more about interior and have their rear speaker box on the way.
05-25-2015, 08:14 PM
#136
Registered User
Thread Starter
Join Date: Apr 2013
Location: Tucson, Arizona USA
Posts: 576
Both bolts left enough out of the block that they were removable with PB Blaster, heat and vise-grips. I got real lucky with that one as the timing chain tensioner had let go (take a close look at the photo a few posts back) and was getting ready to destroy the motor. Put in a whole new timing kit, chain, gears and of course new bolts. Had a chance to refinish the timing cover as well.
05-26-2015, 05:15 PM
#138
Registered User
Thread Starter
Join Date: Apr 2013
Location: Tucson, Arizona USA
Posts: 576
That Little Puddle of Coolant
The car sat overnight and stayed dry.
Ran it today to see if anything happened. Yep. After it ran for a bit I saw the puddle and its source.
At the back of the motor where the heads meet the block.
I suppose this means a new head gasket. Going to spend some quality time with the FSM in the next day or two.
Anything else I should do while I've got this thing apart?
Any tips or tricks to make this job easier?
06-02-2015, 06:54 PM
#139
Registered User
Thread Starter
Join Date: Apr 2013
Location: Tucson, Arizona USA
Posts: 576
Resolved - Coolant Leak
Just a follow-up here. Resolved this in a different thread: https://www.zdriver.com/forums/240z-...ck-head-40953/
06-02-2015, 07:05 PM
#140
Registered User
Thread Starter
Join Date: Apr 2013
Location: Tucson, Arizona USA
Posts: 576
Next Phase of Project
Baby left the house today. Going back to get the rest of the body bits attached. The blue tape marks some areas where some paint issues will be addressed.

So, with no vehicle in the bay, I figured it's time to prep all the glass. Before I do interior work, I figure the interior should be sealed up from all the dust, dirt and plant parts that blow around here in Arizona.
Wow, those glass bits have been stored for quite a while. A quick clean up and they're ready for inspection. Realize from the photo that I've got two cars, hence the duplicate windows ...

Chose the best bits of the right window, disassembled and cleaned everything. Even these windows have some differences between the early and late model 260Zs.

In parallel I'm working on the quarter glass. I previously purchased a full weather strip kit from MSA so it's time to disassemble these babies and redo them. First thing I found out was two of the four screws were frozen. PB Blaster wouldn't loosen them and I wasn't going to torch them with all the fancy stainless as well as glass that could crack and rubber that could burn. So it was a "Grab It" tool that got the frozen screws out. Off to the mega-Ace Hardware tomorrow for new screws.
So, with no vehicle in the bay, I figured it's time to prep all the glass. Before I do interior work, I figure the interior should be sealed up from all the dust, dirt and plant parts that blow around here in Arizona.
Wow, those glass bits have been stored for quite a while. A quick clean up and they're ready for inspection. Realize from the photo that I've got two cars, hence the duplicate windows ...
Chose the best bits of the right window, disassembled and cleaned everything. Even these windows have some differences between the early and late model 260Zs.
In parallel I'm working on the quarter glass. I previously purchased a full weather strip kit from MSA so it's time to disassemble these babies and redo them. First thing I found out was two of the four screws were frozen. PB Blaster wouldn't loosen them and I wasn't going to torch them with all the fancy stainless as well as glass that could crack and rubber that could burn. So it was a "Grab It" tool that got the frozen screws out. Off to the mega-Ace Hardware tomorrow for new screws.
06-03-2015, 09:09 AM
#141
Registered User

Join Date: Feb 2002
Location: Saskatoon, SK
Posts: 2,893
Very nice !! Let us know what you think of the MSA weatherstripping, I bought the same stuff but have only done the doors, and the 1/4 windows. Hatch I am having issues with, almost seems the rubber is a little bit smaller, I stretched and glued the corners first and then the rest, but it just wasn't a fit I expected.
06-03-2015, 10:00 AM
#142
Registered User
Thread Starter
Join Date: Apr 2013
Location: Tucson, Arizona USA
Posts: 576
Very nice !! Let us know what you think of the MSA weatherstripping, I bought the same stuff but have only done the doors, and the 1/4 windows. Hatch I am having issues with, almost seems the rubber is a little bit smaller, I stretched and glued the corners first and then the rest, but it just wasn't a fit I expected.
I hope I won't have the problems you did. Temps here have been in the 38-40 C range lately. Maybe that will help with the stretchiness.
06-06-2015, 01:45 PM
#143
Registered User
Thread Starter
Join Date: Apr 2013
Location: Tucson, Arizona USA
Posts: 576
Glassy Eyed
Finished the prep work for the right and left door windows, best parts from both cars have made two pretty good window assemblies.
Started work on the quarter windows and have gotten pretty far. All my stainless frames have the same issue. At the lower front corner there is an L-shaped piece of steel (not stainless) which joins two of the frame parts. It is spot welded on both sides, or at least was. Being the lower corner they all seem to have collected water and the spot welds are now toast due to rust.
I'll be sending these frames to a local metal finishing shop for a professional re-polish (my own kit doesn't do much) and will ask if they can re-weld these two pieces without ruining anything. If they can't, it will time for JB-Weld.
Got my hatch glass out and cleaned it up. Got all the old sealant and adhesive gunk off and then a bunch of pine sap as well. This hatch was from the Flagstaff car so pine sap was to be expected.
At first glance, the defroster lines looked to be in real good shape. I was hopeful until a measurement with my trusty ohm-meter showed around 300 ohms, much too high for a defroster.
So, after spending a couple of hours with a test light, volt-meter, ohm-meter and a 12V battery charger I found every single line has an issue. The easier ones were full breaks in the lines although only one could be seen by eye, even with a magnifying glass. The sneaky ones were areas where the lines must be thin, increasing the resistance but still allowing some current to flow. Tracking those down is a little trickier but I got it done. I will have to check one more time once the initial repairs are complete. The simple methodology I used will only detect up to two breaks in each line. So, any line with two breaks will have to be rechecked to see if there are more.

Marked all the areas requiring repair and am waiting for the local auto supply to receive the repair kit from their warehouse. BTW, the glass doesn't normally sit on the plywood, that was just for the photo. Normally it sits on a nice soft blue blanket, but that would have made it hard to see the tape in the photo.
Going to call it quits early today as our five year-old granddaughter is coming over to swim and spend the night!
Started work on the quarter windows and have gotten pretty far. All my stainless frames have the same issue. At the lower front corner there is an L-shaped piece of steel (not stainless) which joins two of the frame parts. It is spot welded on both sides, or at least was. Being the lower corner they all seem to have collected water and the spot welds are now toast due to rust.
I'll be sending these frames to a local metal finishing shop for a professional re-polish (my own kit doesn't do much) and will ask if they can re-weld these two pieces without ruining anything. If they can't, it will time for JB-Weld.
Got my hatch glass out and cleaned it up. Got all the old sealant and adhesive gunk off and then a bunch of pine sap as well. This hatch was from the Flagstaff car so pine sap was to be expected.
At first glance, the defroster lines looked to be in real good shape. I was hopeful until a measurement with my trusty ohm-meter showed around 300 ohms, much too high for a defroster.
So, after spending a couple of hours with a test light, volt-meter, ohm-meter and a 12V battery charger I found every single line has an issue. The easier ones were full breaks in the lines although only one could be seen by eye, even with a magnifying glass. The sneaky ones were areas where the lines must be thin, increasing the resistance but still allowing some current to flow. Tracking those down is a little trickier but I got it done. I will have to check one more time once the initial repairs are complete. The simple methodology I used will only detect up to two breaks in each line. So, any line with two breaks will have to be rechecked to see if there are more.
Marked all the areas requiring repair and am waiting for the local auto supply to receive the repair kit from their warehouse. BTW, the glass doesn't normally sit on the plywood, that was just for the photo. Normally it sits on a nice soft blue blanket, but that would have made it hard to see the tape in the photo.
Going to call it quits early today as our five year-old granddaughter is coming over to swim and spend the night!
Last edited by beg3yrs; 06-06-2015 at 01:48 PM.
 06-12-2015, 08:51 PM
#145
Registered User
Thread Starter
Join Date: Apr 2013
Location: Tucson, Arizona USA
Posts: 576
Well yes of course. That's a good question. I have two cars, making one good one. That photo showed the red marker lights from both cars, one set polished and the other unpolished. My amber lights look just as good.
06-19-2015, 01:54 PM
#146
Registered User
Thread Starter
Join Date: Apr 2013
Location: Tucson, Arizona USA
Posts: 576
Putting It Together
Been working on this thing pretty steady. Starting to put bits and pieces together. Wow, what a crap load of stuff is in all the details!
Little things like latches. Here's the hood latch ready to go.

Fenders and headlights ready! You can also see the doors and hatch are ready as well.

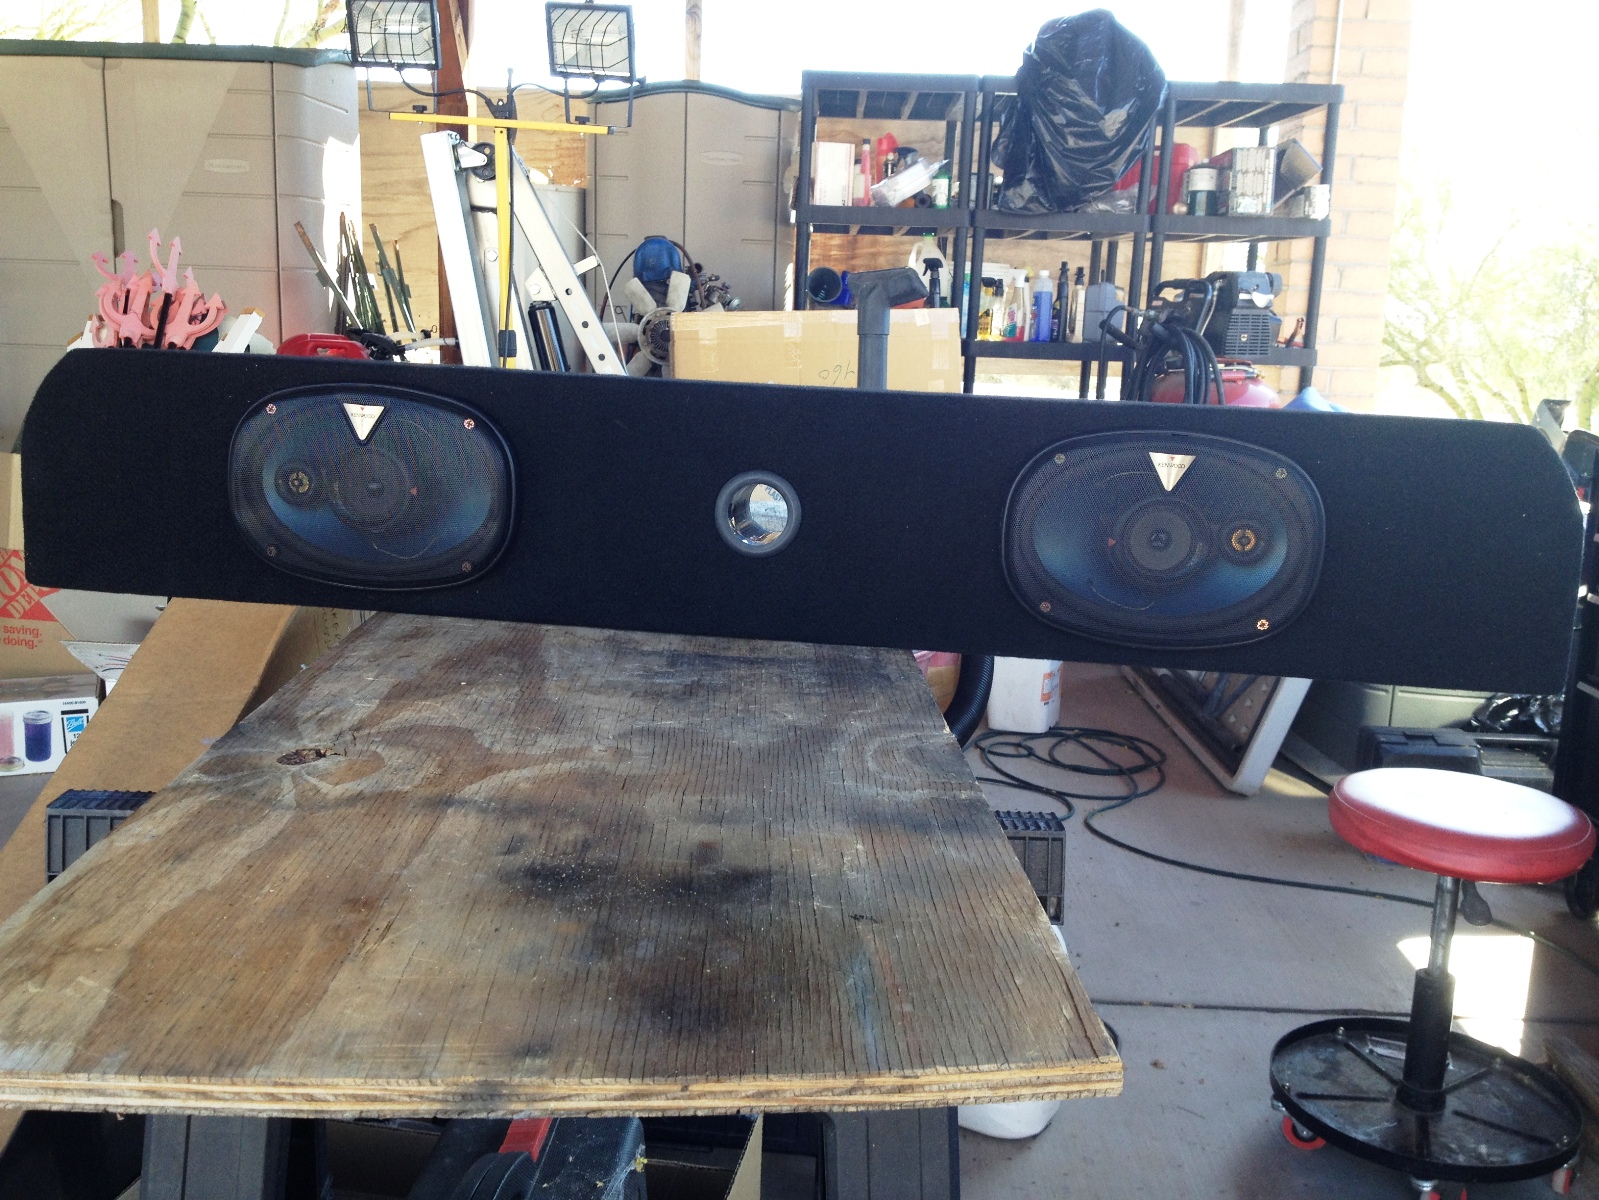
Been attending to some interior stuff too. Here's the rear speaker enclosure with some nice Kenwood 6x9's installed. These were left with the "Rust Z" and never installed. Fourteen years old and never been used. Hooked them up to an AMP I had laying around, cranked them up and they sound great with no distortion or buzzing.
But today was the best!!! Went over to the shop to install the front wheel well splash guards and to my surprise, the glass folks were there. The new windshield was already in and they were working on the hatch glass. Once I finished with the splash guards and the glass guys left, the shop folk decided it was time to attach the hood and hang the doors. This is really starting to look like a car.


Those of you who are observant will see in the last shot the hatch lock has been relocated. That's because there's going to be a spoiler located further down the hatch which doesn't allow access to the lock in the old location.
Little things like latches. Here's the hood latch ready to go.
Fenders and headlights ready! You can also see the doors and hatch are ready as well.
Been attending to some interior stuff too. Here's the rear speaker enclosure with some nice Kenwood 6x9's installed. These were left with the "Rust Z" and never installed. Fourteen years old and never been used. Hooked them up to an AMP I had laying around, cranked them up and they sound great with no distortion or buzzing.
But today was the best!!! Went over to the shop to install the front wheel well splash guards and to my surprise, the glass folks were there. The new windshield was already in and they were working on the hatch glass. Once I finished with the splash guards and the glass guys left, the shop folk decided it was time to attach the hood and hang the doors. This is really starting to look like a car.
Those of you who are observant will see in the last shot the hatch lock has been relocated. That's because there's going to be a spoiler located further down the hatch which doesn't allow access to the lock in the old location.
06-25-2015, 08:15 AM
#148
Registered User
Thread Starter
Join Date: Apr 2013
Location: Tucson, Arizona USA
Posts: 576
Regarding the insurance, for once I'm ahead of you. Believe it or not, this thing is already insured by Hagerty for an ungodly sum, between 25 and 30 big ones. It's also registered for the road through 2020 (gave the wife special plates for her birthday last year).
Just a little incremental progress at the shop, fenders!
Shop says they want to finish it and get it out of their place in a week. Yay!
They have to reshoot the cowl as they discovered a couple of rust bubbles. Evidently they gave the initial cowl work to an apprentice. This time the experienced paint technician will do the job. They also have to rework one of the inspection doors as they tweaked it when adjusting the fender. You can see dimples where the catch bar is spot welded under the door. Just minor stuff. The folks at this shop have been great, no problems with any rework and they warranty their work for life. Even more amazing is they let me come in work on the car while it's in their facility.
So, the plan in a week is to get the car back, install the roll-up windows, install driver's seat belts, put the plates on it along with registration and insurance papers inside, add Hagerty towing
 , increase the liability insurance and then drive it to:
1) Family mechanic for front end alignment. Two summers ago I put in an Energy Suspension full polyurethane kit. Replaced tie rod ends and ball joints too.
2) Exhaust shop - gotta quiet this thing down a bit, sounds like a small block Chevy with a lopey cam.
3) A/C shop - hey, it's Tucson and it's Summer! Nuff said.
4) Upholstery shop for seats, door cards and all that other fiddly stuff like headliners, pillar covers, strut tower covers, and wheel arch covers.
I fully expect to find some driveability issues during these initial drives, hence the towing coverage from Hagerty.
Of course there will be lots of interior details and so on. Install the dash cover and nice steering wheel for instance. A Model 2 Retrosound radio is on the list, carpet kit, etc.
To make sure I follow through, I'm going to register it for a November 7 show here in Tucson. It is a big show and has a Z Car only class.
Last edited by beg3yrs; 06-25-2015 at 08:38 AM.
06-25-2015, 08:33 AM
#149
Registered User
Thread Starter
Join Date: Apr 2013
Location: Tucson, Arizona USA
Posts: 576
Bumper Shaving
Got a request for pics regarding the shaving of the bumper.
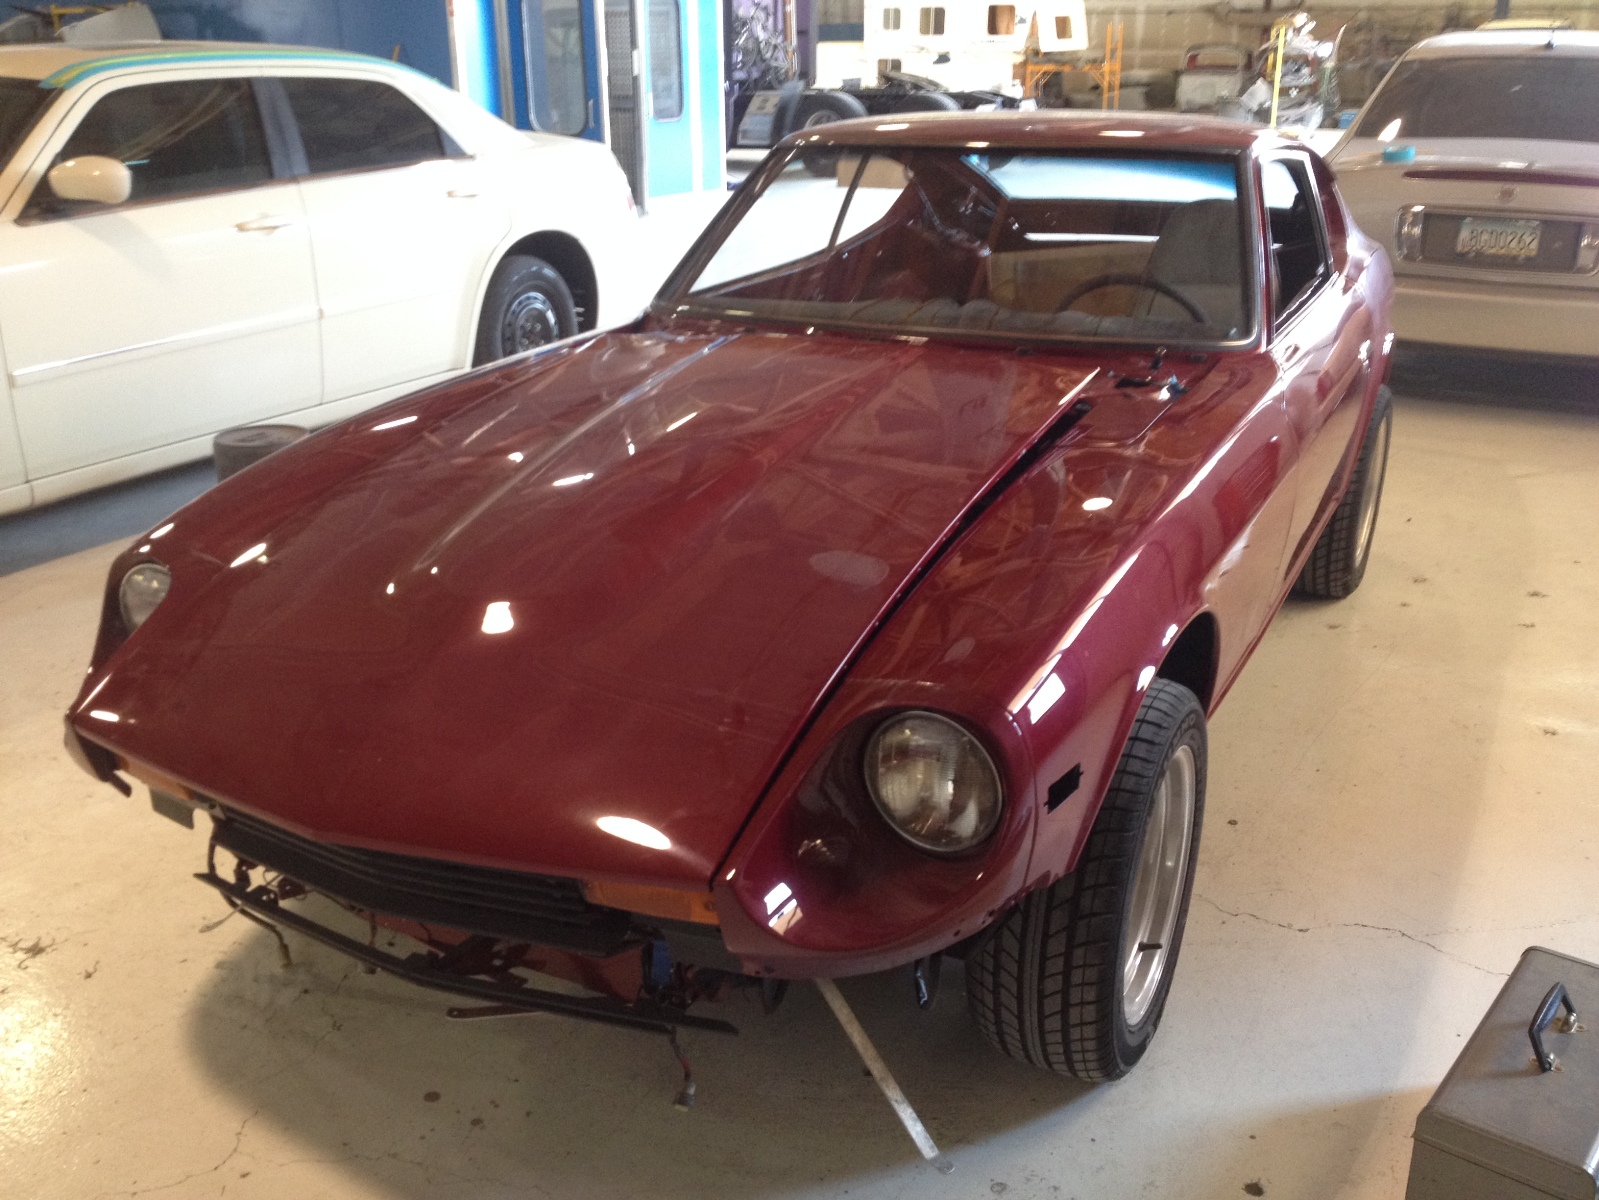
This is the state of the car just before the rear body work started.

As you can see, the back end and right rear quarter were in pretty rough shape.
Holes were closed up with patch panels. The indentations were also filled by cutting them out and replacing with smooth panels. Some were just covered over with welded panels.
Here it is ready for filling.
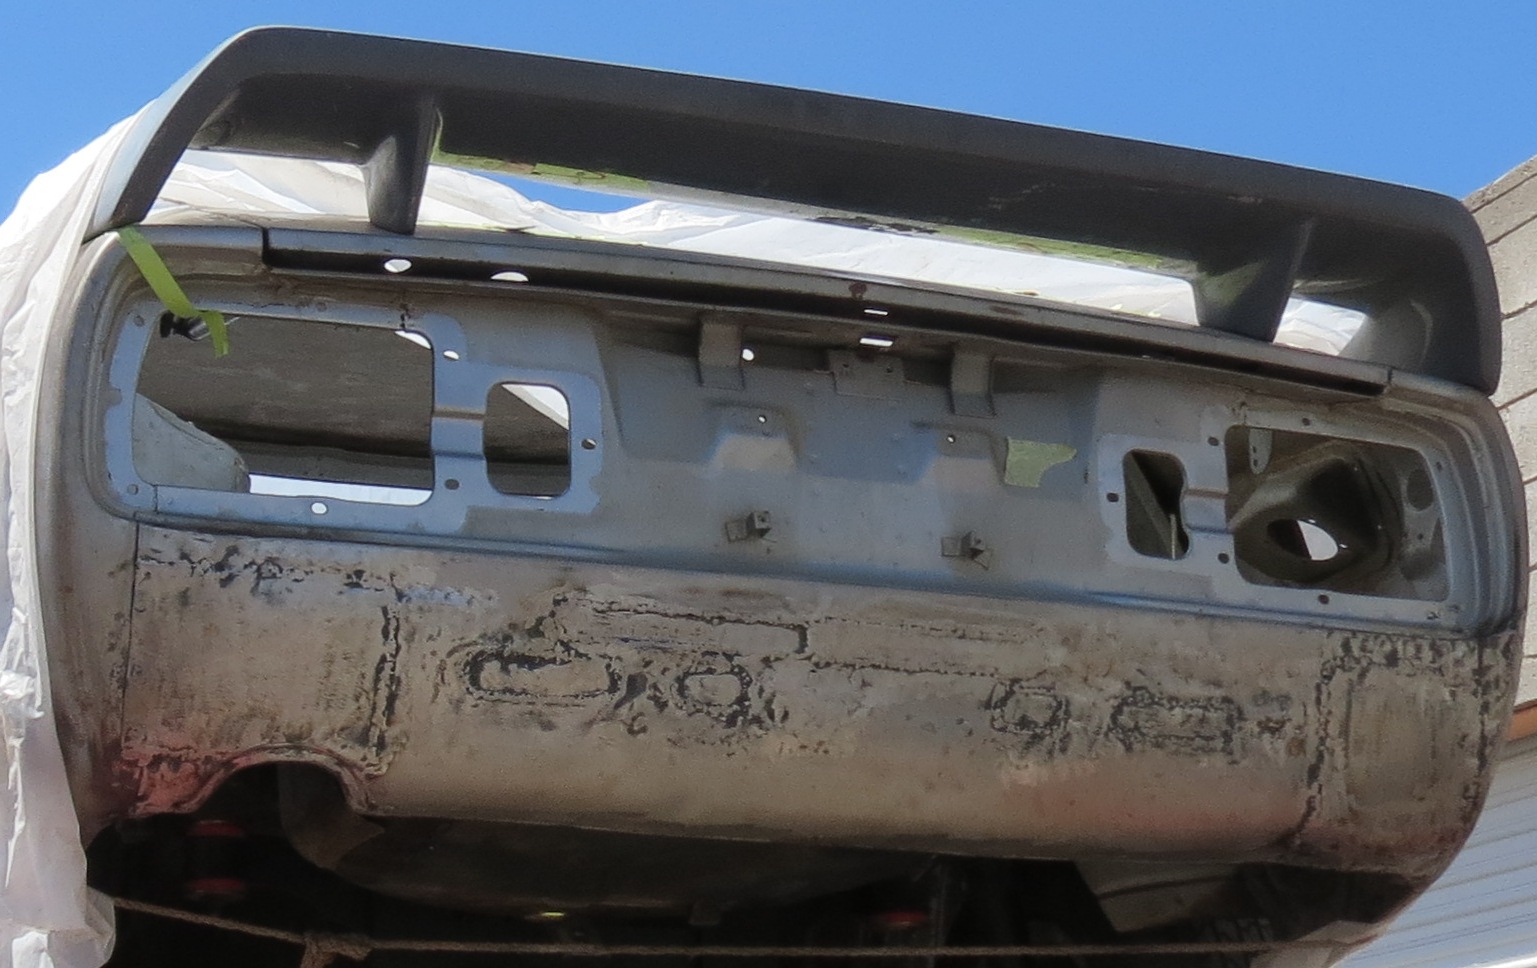
The RR quarter was prepared in a similar manner. Note the remaining bolt hole in the photo has been filled.

This is the state of the car just before the rear body work started.
As you can see, the back end and right rear quarter were in pretty rough shape.
Holes were closed up with patch panels. The indentations were also filled by cutting them out and replacing with smooth panels. Some were just covered over with welded panels.
Here it is ready for filling.
The RR quarter was prepared in a similar manner. Note the remaining bolt hole in the photo has been filled.
06-25-2015, 09:35 AM
#150
I have a present for you...

Join Date: Mar 2003
Location: dayton, nevada usa
Posts: 1,691
I predict an easy win in Nov.
You haven't been watching the ebay or CL. You really need to get that independent appraisal! $25k is no longer ungodly. Add up your receipts and total your hours. I'm sure you will see you are working for the love of it and minimum wage lol.
You haven't been watching the ebay or CL. You really need to get that independent appraisal! $25k is no longer ungodly. Add up your receipts and total your hours. I'm sure you will see you are working for the love of it and minimum wage lol.
Last edited by theramz; 06-25-2015 at 09:40 AM.


