260Z Restoration as a Retirement Project
 05-04-2015, 05:16 PM
#101
Registered User
Thread Starter

Join Date: Apr 2013
Location: Tucson, Arizona USA
Posts: 576

Yes, a video would be good. I'm already on to replacing the heater control valve. That was the source of water in the cabin. Had to disconnect the heater hoses so no tuning work until that's fixed.
Meanwhile, I've got a growing punch-list of things which need attention...
Last edited by beg3yrs; 05-04-2015 at 05:40 PM.
 05-04-2015, 07:25 PM
#102
I have a present for you...

Join Date: Mar 2003
Location: dayton, nevada usa
Posts: 1,691
When i lived in Cali my screws were about 3 !/2 turns out. At 4500 ft. I'm at 2 1/2 turns out. The timing, jets, and throttle sync are like a symphony. each one affects the other so go over and over it until it's good. Idle is different than wot.
05-06-2015, 01:30 PM
#103
Registered User
Thread Starter
Join Date: Apr 2013
Location: Tucson, Arizona USA
Posts: 576
HELP!
My cabin leak was the heater control valve. Pricey little buggers. Both of mine are bad too. At least I finally found one and it's on the way.
Did a pressure test on the whole system and aside from a couple of hose clamps that needed tightening, everything looked good.
Or so I thought. Noticed a drip coming from the water pump. Not surprised here given the age and miles on these cars. Got a new one today, pulled the radiator and then the fan blade. Dropped the fan blade - crack! Damn, there goes some bucks.
Put a socket on a bolt of the water pump. Uh oh, feels mushy right away. The damn thing has already snapped off. Same thing happened to another bolt. The other three came out OK, but the two snapped off are long ones - see the photo.
What do I do now??? I've got zero experience here. The water pump bolt kit write-up on MSA's "thezstore" web-site says this is common and the bolts can be removed but it gives no instructions or guidance as to how. The folks at MSA really don't know either.
What have y'all done to get these frozen bolt bits out??? Techniques and tool recommendations please!

Update: My initial search on the forum didn't find much. However, a Google search found these threads:
https://www.zdriver.com/forums/280zx...ghtmare-37001/
broken water pump bolt!!! - Engine and Drivetrain - Classic Zcar Club
I think I'm screwed here (pun sort of intended). Sure was hoping not to get that far into the motor ...
Still, any more advice will be appreciated!
Last edited by beg3yrs; 05-06-2015 at 01:55 PM.
05-06-2015, 02:33 PM
#104
I have a present for you...
Join Date: Mar 2003
Location: dayton, nevada usa
Posts: 1,691
You're supposed to do that BEFORE you install an engine.
New center punch
New center drill
New 1/8" drill bit (cobalt)
New "H" drill bit (cobalt)
New 8mm-1.25 tap
New "Q" drill (cobalt)
New 10mm- 1.5 tap
3/8 drill motor
tapping handle
Remove hood and radiator.
The most important thing is to get the center punch exactly in the middle of the bolt. Drill the center drill. Drill the 1/8 hole about 3/8 deep. This is your pilot hole, don't go deeper than that because you can break the drill of when it goes past the end of the bolt.
Drill the tap drill through to the bottom of the hole.
It's really important to drill a straight hole.
Thread the tap in carefully so as to follow the existing thread.
The alterative is to buy the helicoil set for each size and although it is more expensive it is easier.
You could convert to 5/16 and 3/8 thread helicoil, I have those if you want to borrow them.
05-06-2015, 06:05 PM
#106
Registered User
Thread Starter
Join Date: Apr 2013
Location: Tucson, Arizona USA
Posts: 576
You're supposed to do that BEFORE you install an engine.
New center punch
New center drill
New 1/8" drill bit (cobalt)
New "H" drill bit (cobalt)
New 8mm-1.25 tap
New "Q" drill (cobalt)
New 10mm- 1.5 tap
3/8 drill motor
tapping handle
Remove hood and radiator.
The most important thing is to get the center punch exactly in the middle of the bolt. Drill the center drill. Drill the 1/8 hole about 3/8 deep. This is your pilot hole, don't go deeper than that because you can break the drill of when it goes past the end of the bolt.
Drill the tap drill through to the bottom of the hole.
It's really important to drill a straight hole.
Thread the tap in carefully so as to follow the existing thread.
The alterative is to buy the helicoil set for each size and although it is more expensive it is easier.
You could convert to 5/16 and 3/8 thread helicoil, I have those if you want to borrow them.
New center punch
New center drill
New 1/8" drill bit (cobalt)
New "H" drill bit (cobalt)
New 8mm-1.25 tap
New "Q" drill (cobalt)
New 10mm- 1.5 tap
3/8 drill motor
tapping handle
Remove hood and radiator.
The most important thing is to get the center punch exactly in the middle of the bolt. Drill the center drill. Drill the 1/8 hole about 3/8 deep. This is your pilot hole, don't go deeper than that because you can break the drill of when it goes past the end of the bolt.
Drill the tap drill through to the bottom of the hole.
It's really important to drill a straight hole.
Thread the tap in carefully so as to follow the existing thread.
The alterative is to buy the helicoil set for each size and although it is more expensive it is easier.
You could convert to 5/16 and 3/8 thread helicoil, I have those if you want to borrow them.
OK, enough whining. Did a little more research. Seems if I've got to take the timing cover off with all the issues with oil pan and head gaskets plus, evidently the timing cover bolts can have the same issues as the water pump bolts, I'm going to punt this one off to my local family mechanic. He's never done us wrong in over twenty years. Plus, I want him to get a look at the baby, kind of proud of what's been done so far. I've also had real bad luck with taps, ez-outs and drilling straight.
Am getting a new set of bolts for the pump and timing cover and will even send my tube of anti-sieze compound over with the car.
Plenty of things to do here while she's in the clinic.
Got to refinish a steering wheel I scored at our local Z club. One of the older members can't work on his cars or even drive anymore. He took a shine to my project and supplied a vintage steering wheel.
Will also be refinishing a charcoal canister mounting bracket I got from a junk yard in Texas.
05-06-2015, 07:49 PM
#107
I have a present for you...
Join Date: Mar 2003
Location: dayton, nevada usa
Posts: 1,691
The bolts are frozen in from electrolisis.. If you break off an ez out the only thing that will drill it is carbide. The block will be junk. Trust me on this one guys, I've been doing it for 50 years. You're right about the timing cover.
Last edited by theramz; 05-06-2015 at 07:51 PM.
05-07-2015, 12:26 AM
#108
Registered User

Join Date: Feb 2002
Location: Saskatoon, SK
Posts: 2,893
Nothing better than experienced advice!! There you go. Let us know how it turns out and how you managed to tackle the issue!!
05-07-2015, 08:22 AM
#109
Registered User
Thread Starter
Join Date: Apr 2013
Location: Tucson, Arizona USA
Posts: 576
Got a bunch of bolt and gasket kits coming from MSA. I've read on some forums a few non-specific complaints about MSA but they've always come through for me. They don't always have the best prices (but they do give a discount for Z club members) but their write-ups and packages really help.
In preparation for a flatbed tow to the mechanic's shop, the car is now on all four wheels for the first time in a while and with more weight in her, the stance is improving. Last time on all fours it was just an empty shell.
Got to attach a steering wheel and get all the parts stored in the interior moved elsewhere.
In addition to working on some refinishing, I'll clean up the work area, store parts and generally get rid the clutter that seems to always reappear as one works.
Hmm.. my daily driver needs new door speakers ...
05-07-2015, 05:02 PM
#110
Registered User
Thread Starter
Join Date: Apr 2013
Location: Tucson, Arizona USA
Posts: 576
Sometimes I Get Lucky - Dodged a Bullet I Think
Sent her off to the shop this morning.

Well it seems these broken bolts were a signal from the Z God. Somebody is actually looking after this project.
Got the timing cover off and discovered this:

Imagine I didn't have a water pump leak followed by a broken bolt. Probably would have run the motor until this let go and then lots more things would be broken.
Timing kit is on the way and we'll be back in business probably by the middle of next week.
BTW, one broken bolt is out and the other can be seen protruding from the block. This one is being a bit more difficult but at least it is protruding, giving one something to grab.
Well it seems these broken bolts were a signal from the Z God. Somebody is actually looking after this project.
Got the timing cover off and discovered this:
Imagine I didn't have a water pump leak followed by a broken bolt. Probably would have run the motor until this let go and then lots more things would be broken.
Timing kit is on the way and we'll be back in business probably by the middle of next week.
BTW, one broken bolt is out and the other can be seen protruding from the block. This one is being a bit more difficult but at least it is protruding, giving one something to grab.
Last edited by beg3yrs; 05-07-2015 at 05:10 PM.
05-07-2015, 06:39 PM
#111
I have a present for you...
Join Date: Mar 2003
Location: dayton, nevada usa
Posts: 1,691
Well you definitely lucked out on the one bolt. Here's a trick that might work, heat the block around the bolt slowly. As it cools spray some PB Blaster on it. The cooling will help draw the PB in. Then try to loosen it with vise grips.
05-10-2015, 01:45 PM
#112
Registered User
Thread Starter
Join Date: Apr 2013
Location: Tucson, Arizona USA
Posts: 576
Hmm ... never tried posting a video before. This is from the first running so I'm not satisfied but ...
https://www.dropbox.com/s/gkkswosb4t...nning.wmv?dl=0
We'll see if this works..
https://www.dropbox.com/s/gkkswosb4t...nning.wmv?dl=0
We'll see if this works..
05-10-2015, 03:48 PM
#113
Registered User
Join Date: Feb 2002
Location: Saskatoon, SK
Posts: 2,893
Hmm ... never tried posting a video before. This is from the first running so I'm not satisfied but ...
https://www.dropbox.com/s/gkkswosb4t...nning.wmv?dl=0
We'll see if this works..
https://www.dropbox.com/s/gkkswosb4t...nning.wmv?dl=0
We'll see if this works..
Last edited by Skully; 05-10-2015 at 04:09 PM.
05-10-2015, 05:14 PM
#114
Registered User
Thread Starter
Join Date: Apr 2013
Location: Tucson, Arizona USA
Posts: 576
Its aliiiiive !!! Awesome...buuuut...and maybe wait until others chime in...is that a Fram I see on the side? Not to follow the sheep, but I have heard nothing but bad crap about Fram filters, so I decided to dig more. This experience comes from owning an F150 5.4 dry starts- needing a good anti-drain valve, due to top end oil starvation on start-up and destroying the variable cam timing. Fram is cardboard end caps which can soften up (not sure on that one), it does not seal good beacause valve is made of cheap rubber, and after a while it almost becomes stiff. And the filtration element is crapola. I only use Napa Gold or Wix filters, they have good rubber antidrain valves, and very good filtration. Now this is just what my research and I base my opinion on that, again worth looking into, I have no idea what their new stuff is like, I haven't used Fram since highschool!!
The mechanic who is working on this at our local shop is into show and muscle cars. He's all over my case about matching hose clamps, matching bolts and so on. He's even convinced me to paint the timing cover the same color as the block.
He told me to switch to Wix at the next oil change so there's two votes. I will likely change it earlier than that.
05-14-2015, 06:14 PM
#115
Registered User
Thread Starter
Join Date: Apr 2013
Location: Tucson, Arizona USA
Posts: 576
Chillin' Out
Baby's back from the clinic. Reassembled all the necessary bits and she fired right up. Installed the new "**** Water" as well. No visible leaks and a pressure test shows everything is fine in that department.
Purchased and received an under hood upgrade kit for the A/C. Installed the compressor today, will mount the condenser and drier next. I'll leave hoses and evaporator for later when I start to finish the interior.
Started the refinish on a steering wheel. Got it from a member of the local Z club. Early 240Z wheel, wood with no cutouts on the spokes. Have it sanded and just painted the spokes with a semi-gloss black lacquer with a couple of clear coats. I have some red oak stain and some marine spar varnish to apply to the wood when the lacquer has cured.
Other punch list items (not anywhere a complete list but just near term stuff):
Ground strap between engine and frame.
Install small coolant reservoir - yes, original Zs didn't come with them but since my radiator has a spigot, I'll connect it to a tank so I don't get spray all over the engine bay if things get too hot.
Figure out WTF is going on with the mounting my charcoal canister. I'll be posting photos soon. Since this is a late 260Z body, I found a canister and mounting bracket from an early 280Z, they match the diagrams in the 260Z FSM too. Got them both refinished, they look nice. Problem is I can't see where they mount in the engine bay. Looking at web photos I see them mounted right up at the passenger (right) side core support. I've got nothing obvious there for mounting in that location. There does seem to be a bracket on the right strut tower which would accommodate the bracket but that leaves the canister way too high in the bay, the hood wouldn't close.
Any comments you can make would be appreciated!
Last edited by beg3yrs; 05-14-2015 at 06:19 PM.
05-15-2015, 06:23 PM
#117
Registered User
Thread Starter
Join Date: Apr 2013
Location: Tucson, Arizona USA
Posts: 576
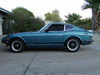
Charcoal Canister Mount
All right folks. Let's see who comes up with the winning answer ...
This is my charcoal canister and its mounting bracket.
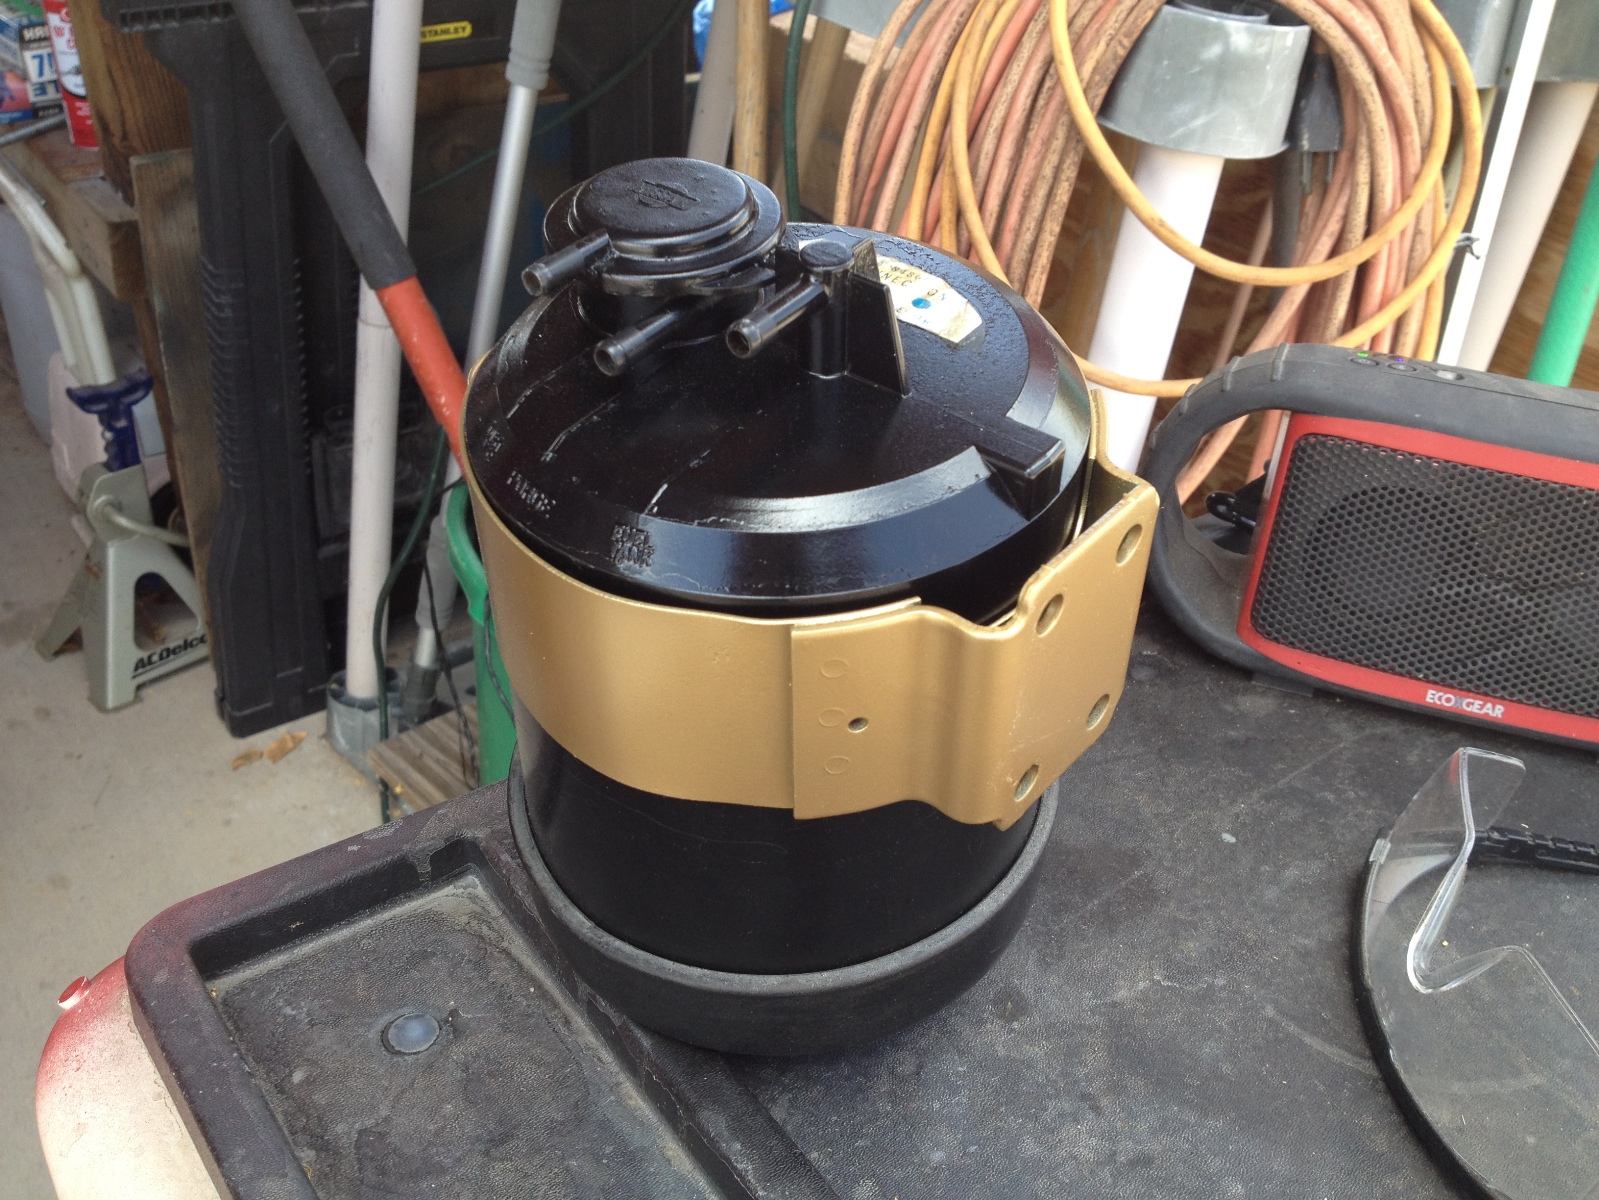
Here's a shot of my engine bay. You can see what might be a mount point on the strut tower but I can assure you it isn't for the canister and bracket I've got. If I were to mount it there, the hood would not close.
Here's a photo of the area where I do see other Zs with their canisters mounted. I don't see any mount points, do you?

This is a 9/74 260Z. Its VIN tells me that it is the 61st late-model 260Z to come off the assembly line. I've heard that often the first 100 cars of a production run can be kind of "special" and by that I mean not the same as the later cars. Don't know if that means anything here, just putting it out there for those more in the know than I.
Looking at that mounting point in the second photo, I'm wondering if there's yet another kind of canister that mounts there. Anybody know?
The third photo shows some holes in the wheel tub. They're only suitable for sheet metal screw type mountings and wouldn't be appropriate for something heavier like the charcoal canister. Besides, none of them match up to the canister bracket. I'll be sealing them toward the completion of this project.
If not, all you smart folk, what are your suggestions regarding getting MY canister mounted in this car?
Thanks in advance,
Scott
This is my charcoal canister and its mounting bracket.
Here's a shot of my engine bay. You can see what might be a mount point on the strut tower but I can assure you it isn't for the canister and bracket I've got. If I were to mount it there, the hood would not close.
Here's a photo of the area where I do see other Zs with their canisters mounted. I don't see any mount points, do you?
This is a 9/74 260Z. Its VIN tells me that it is the 61st late-model 260Z to come off the assembly line. I've heard that often the first 100 cars of a production run can be kind of "special" and by that I mean not the same as the later cars. Don't know if that means anything here, just putting it out there for those more in the know than I.
Looking at that mounting point in the second photo, I'm wondering if there's yet another kind of canister that mounts there. Anybody know?
The third photo shows some holes in the wheel tub. They're only suitable for sheet metal screw type mountings and wouldn't be appropriate for something heavier like the charcoal canister. Besides, none of them match up to the canister bracket. I'll be sealing them toward the completion of this project.
If not, all you smart folk, what are your suggestions regarding getting MY canister mounted in this car?
Thanks in advance,
Scott
05-15-2015, 07:34 PM
#119
Registered User
Thread Starter
Join Date: Apr 2013
Location: Tucson, Arizona USA
Posts: 576
Yet another item to chase down in my quest to rebuild a decent car. I've been trying to avoid personally going to junk yards but I'm beginning to think this may be the time....
Hmm ... I think I'll send a copy of your photo (if that's OK) to the chap that sold me the canister and mount. He might just have the car with the mount ...
05-16-2015, 05:40 PM
#122
Registered User
Thread Starter
Join Date: Apr 2013
Location: Tucson, Arizona USA
Posts: 576
Don't Have To Push Her Around Any More
Solved the driver's seat bracket problem today. I simply cut out 5/32" to the inside of each of the driver's side seat bracket bolt holes. This accommodated the 5/16" difference in my car's body and the seats that came with it. The seat is now bolted in straight with all four bolts instead of on a diagonal with only two bolts.
Futzed with the choke cables as well. They weren't really opening it up and it was real hard to start when cold. Realized the wires were originally bent for the flat-top carbs that were originally on the 260. Bending them a little closer solved all that. Now she only complains a little bit when cold starting.
OK, now that I've got a driver's seat, the engine runs OK and everything else "should" be OK, time for the big test. Got my wife out with a camera (and a fire extinguisher) and took her out for a spin around the property.
Wahoo! Like a go-cart on a dirt track. She's real light without much of a body or interior installed. Gotta love it. Here's the video ...
https://www.dropbox.com/s/32j0ymsis6...oving.wmv?dl=0
This was a nice test. First of all, the clutch works very nice. I'm used to working the clutch of an F350 diesel so this one seems like nothing at all. Second, the transmission shifts well, at least reverse through third. Brakes work but I'm getting intermittent feel, sometimes nice and tight, sometimes real mushy. Will have to look into that later. A loose shift lever has shown me the brittle shift lever bushing has completely disappeared, will have to get one of those...
And of course, I don't have to push her around any more!
05-18-2015, 06:04 PM
#123
Registered User
Thread Starter
Join Date: Apr 2013
Location: Tucson, Arizona USA
Posts: 576
Some Days Are For Details
Got the last coat of marine spar varnish on the steering wheel today. I'll post before and after photos later.
Spent most of the day attending to details as I want the engine bay pretty much done before it goes to the body & paint shop for fenders, hood, doors, mirrors, inspection panels, gas door, front air dam, hatch and wing attached.
Installed a line to take any radiator overflow down through the bottom of the car. I've got a small overflow tank but can't seem to find a decent place to mount it.
Went through my parts bin and selected a washer fluid reservoir that isn't cracked and has a working motor. Cleaned it up and refinished the spray nozzles. That tank and motor is real pricey if you can't find a decent old one. Had to swap the connector on this one for the style used on the older 260Z (matches my harness). It sure is good to have a parts car!


Trying to decide if I'll get new pistons for the hatch or go with the original pair on the parts car. Believe it or not, aside from some light refinishing, they're still working just fine. Did a quick internet search and haven't turned up any new ones so I don't even know where the price point would be.
My shopping list is getting pretty long as well. Mostly nuts, bolts, plug wire organizers and other shiny things to clean up they bay.
Spent most of the day attending to details as I want the engine bay pretty much done before it goes to the body & paint shop for fenders, hood, doors, mirrors, inspection panels, gas door, front air dam, hatch and wing attached.
Installed a line to take any radiator overflow down through the bottom of the car. I've got a small overflow tank but can't seem to find a decent place to mount it.
Went through my parts bin and selected a washer fluid reservoir that isn't cracked and has a working motor. Cleaned it up and refinished the spray nozzles. That tank and motor is real pricey if you can't find a decent old one. Had to swap the connector on this one for the style used on the older 260Z (matches my harness). It sure is good to have a parts car!
Trying to decide if I'll get new pistons for the hatch or go with the original pair on the parts car. Believe it or not, aside from some light refinishing, they're still working just fine. Did a quick internet search and haven't turned up any new ones so I don't even know where the price point would be.
My shopping list is getting pretty long as well. Mostly nuts, bolts, plug wire organizers and other shiny things to clean up they bay.