260Z Restoration as a Retirement Project
 02-17-2015, 06:26 PM
#76
Registered User

Join Date: Feb 2002
Location: Saskatoon, SK
Posts: 2,893
Looking good! Let us know how it is to work with that underlayment stuff, I might splurge this summer and do my floors! Ebrake cable looks mint, good work with the heat shrink, good idea.
Its warming up here too! Just still below 0 haha ! I got some goodies waiting for me when I get home next week can't wait!
Its warming up here too! Just still below 0 haha ! I got some goodies waiting for me when I get home next week can't wait!
 02-18-2015, 06:09 PM
#77
Registered User
Thread Starter

Join Date: Apr 2013
Location: Tucson, Arizona USA
Posts: 576
Progress
Well, let's see. Finally all done with the brakes. The replacement cylinder from Rock Auto came in and boy, I tell ya ... each time I do these things it is easier. Go figure. If this car could go, it would now be able to stop.
All the drama with the e-brake cable ended up OK as well. It looks decent with the install.

Got the differential in (all by myself) with a new aftermarket arresting strap from MSA.

Installed the sound deadening in the rear and front areas. Haven't done the doors yet as they are at the body shop, safe from my wild gyrations with sharp objects.

This stuff was relatively forgiving with some stretchiness. I didn't have to make a cut at every little dimple and curve. I used a carpet/headliner adhesive which seems to hold well. Some of you will note I have installed the foil side down. I see lots of photos of cars using auto-specific stuff with the foil up. I chose to have it down cuz in Arizona you want to keep the heat OUT, not in and besides, that's what the instructions on this material said to do.
Next up was the firewall. I chose to re-use the original jute firewall material as a couple of internal parts (steering wheel, heater box, etc.) mount over this material. What I did do was rejuvenate it a bit and place the floor underlayment underneath the jute. Rejuvenation was done with Gorilla Tape, that's duct tape on steroids. A lot of the top layer of the jute is a rubbery material which has become brittle with age. The Gorilla Tape holds it all together and should last for quite some time.


It all looks good and will be mostly hidden anyway under the dash when it goes back in.

Finally (for this post anyway), I re-installed the electrical harnesses. Having previously tested and reconfigured everything out of the car, this went pretty well. I was amazed I got the original firewall grommet to go back in unmolested. I did purchase an aftermarket one from MSA but it seems that I may not need if after all. I was worried that fishing the harness over the right rear wheel well was going to be a problem but thinking ahead and having a fish-tape, that went well too. My only residual issue is one of those early-late 260Z things. Seems one difference was the routing of the fuel pump and gas gauge harness in the rear of the beast. Looks like I'm going to have to cut a hole as the harness came from an early 260Z and my late 260Z doesn't have a hole in the right place.

In an earlier post I discussed what I had learned about seats. Well, was that ever wrong! I had temporarily installed a seat so wifey could help with bleeding the brakes. When I did that I noticed the brackets didn't really line up. Since it was only brake bleeding, I put the seat in a bit cross-wise, using only two bolts, front of one bracket and rear of another.
After all that I decided to do a little sleuthing. When I originally disassembled the car I did note the seats were not fully bolted down. Chalking it up to PO goofiness, I simply moved on. Now after taking measurements, I realize the seats that I got with this car can not be the original seats. They just won't fit and I'm not sure which kind of Z these came from. If I take the brackets off the seat, they will bolt to the car but the width spacing when attached to the seat doesn't work.
Measuring my parts car (an early 260Z), I see quite a difference in the width as well. Turns out a significant difference in these two 1974 260Z cars is the addition of a transmission tunnel bump on the driver's side to accommodate a future catalytic converter. Hence the bracket spacing for the later seats is narrower and, doesn't match the passenger side.
This is a puzzle which is yet to be solved. I don't have all the information yet. If anyone has some nuggets of wisdom here, please please send them on.
All the drama with the e-brake cable ended up OK as well. It looks decent with the install.
Got the differential in (all by myself) with a new aftermarket arresting strap from MSA.
Installed the sound deadening in the rear and front areas. Haven't done the doors yet as they are at the body shop, safe from my wild gyrations with sharp objects.
This stuff was relatively forgiving with some stretchiness. I didn't have to make a cut at every little dimple and curve. I used a carpet/headliner adhesive which seems to hold well. Some of you will note I have installed the foil side down. I see lots of photos of cars using auto-specific stuff with the foil up. I chose to have it down cuz in Arizona you want to keep the heat OUT, not in and besides, that's what the instructions on this material said to do.
Next up was the firewall. I chose to re-use the original jute firewall material as a couple of internal parts (steering wheel, heater box, etc.) mount over this material. What I did do was rejuvenate it a bit and place the floor underlayment underneath the jute. Rejuvenation was done with Gorilla Tape, that's duct tape on steroids. A lot of the top layer of the jute is a rubbery material which has become brittle with age. The Gorilla Tape holds it all together and should last for quite some time.
It all looks good and will be mostly hidden anyway under the dash when it goes back in.
Finally (for this post anyway), I re-installed the electrical harnesses. Having previously tested and reconfigured everything out of the car, this went pretty well. I was amazed I got the original firewall grommet to go back in unmolested. I did purchase an aftermarket one from MSA but it seems that I may not need if after all. I was worried that fishing the harness over the right rear wheel well was going to be a problem but thinking ahead and having a fish-tape, that went well too. My only residual issue is one of those early-late 260Z things. Seems one difference was the routing of the fuel pump and gas gauge harness in the rear of the beast. Looks like I'm going to have to cut a hole as the harness came from an early 260Z and my late 260Z doesn't have a hole in the right place.
In an earlier post I discussed what I had learned about seats. Well, was that ever wrong! I had temporarily installed a seat so wifey could help with bleeding the brakes. When I did that I noticed the brackets didn't really line up. Since it was only brake bleeding, I put the seat in a bit cross-wise, using only two bolts, front of one bracket and rear of another.
After all that I decided to do a little sleuthing. When I originally disassembled the car I did note the seats were not fully bolted down. Chalking it up to PO goofiness, I simply moved on. Now after taking measurements, I realize the seats that I got with this car can not be the original seats. They just won't fit and I'm not sure which kind of Z these came from. If I take the brackets off the seat, they will bolt to the car but the width spacing when attached to the seat doesn't work.
Measuring my parts car (an early 260Z), I see quite a difference in the width as well. Turns out a significant difference in these two 1974 260Z cars is the addition of a transmission tunnel bump on the driver's side to accommodate a future catalytic converter. Hence the bracket spacing for the later seats is narrower and, doesn't match the passenger side.
This is a puzzle which is yet to be solved. I don't have all the information yet. If anyone has some nuggets of wisdom here, please please send them on.
02-18-2015, 06:35 PM
#78
Registered User
Thread Starter
Join Date: Apr 2013
Location: Tucson, Arizona USA
Posts: 576
Oh Yeah, Almost Forgot
Got the wiper motor assembly reinstalled too. This is not a job I would want to do very often. It certainly helped the engine bay was empty.
Yes, I did have the bag painted to match the car (got some touch up to do on it).
Decided I will have the wiper arms and blade attachments chromed.
Yes, I did have the bag painted to match the car (got some touch up to do on it).
Decided I will have the wiper arms and blade attachments chromed.
 02-27-2015, 06:44 PM
#82
Registered User
Thread Starter
Join Date: Apr 2013
Location: Tucson, Arizona USA
Posts: 576
More Progress
Spent some more time in the cabin. Refinished the old kick panels and installed them. Then spent some time figuring out that Chinese (Japanese?) Puzzle that is the cabling and electrics on the passenger kick panel and foot well.
Unrefinished left kick panel and refinished right side.

The Chinese (Japanese?) Puzzle
Got bit again by the early versus late model 260Z demon. This time it was the electronic ignition module. Early 260Zs have them on the firewall and the late ones have them on the kick panel. Since my Z is a late model and the harness is from an early model, I had to splice in an extension to the five wires on my module. Looks a little goofy but it seems to fit fine (now).

Decided to populate the electrical bracket in the engine bay. You know, the one that doesn't exist in a 240 or an early 260 but does in a late 260 and probably in the 280 ... sorry for the photo quality. The iPhone 4S camera just doesn't do well when there's a bright light just outside the field of view. Photographers call that bad stray light rejection.

Then just today I decided it was time to bite the bullet and push toward getting some extra space in the work area, i.e. getting the motor and transmission installed in the car. First order of business was to check out some niggling little details on the motor. I was worried I'd reinstalled the distributor wrong. I pulled the number one plug and checked for a compression stroke and confirmed TDC. Then confirmed we were all good with the rotor pointing to wire #1. I pulled the rest of the plugs and poured in a little bit of Marvel Mystery Oil. This motor has been sitting without oil for about 18 months now. Figured a little TLC wouldn't hurt. Slowly turned the crank and worked it all in. A quick inspection of the plugs show they are in good shape (son-in-law had replaced them years ago, just before they moved away - no real miles on them). Put them all back in.
Next was to pull out the new set of NGK high tension wires I'd been storing just for this occasion. Installed those.
Now it was time to get out the engine hoist (bought on sale a year ago) and get this motor off the stand so I can get at the flywheel. Yay, that worked.
Installed the clutch and the spring assembly. It was off one of the cars and was so fresh you could still read all the markings on the friction plate. Torqued everything down to FSM spec.

And finally, the transmission. Installed the throw-out bearing and the push lever. Was careful to follow the FSM's instructions about grease. Then the hardest part of all. Getting the darn thing to mate up with the engine while it's on a hoist. Thank goodness I followed someone's suggestion to spend about $5 and get one of those clutch plate alignment tools. This would have been a of a job if I was unsure about that as well. The setup I finally got to work was to place the tranny on a small table and bring it up to the motor on the hoist. I had a leveler on the hoist which really helped. Once I got all the parts lined up, it took a couple of tries with some small adjustments of the crankshaft and finally after about an hour, the thing slid into place. I quickly bolted it in, set the whole assembly down on a tire for cushioning and went in for a beer, dinner and then writing this post - in that order.
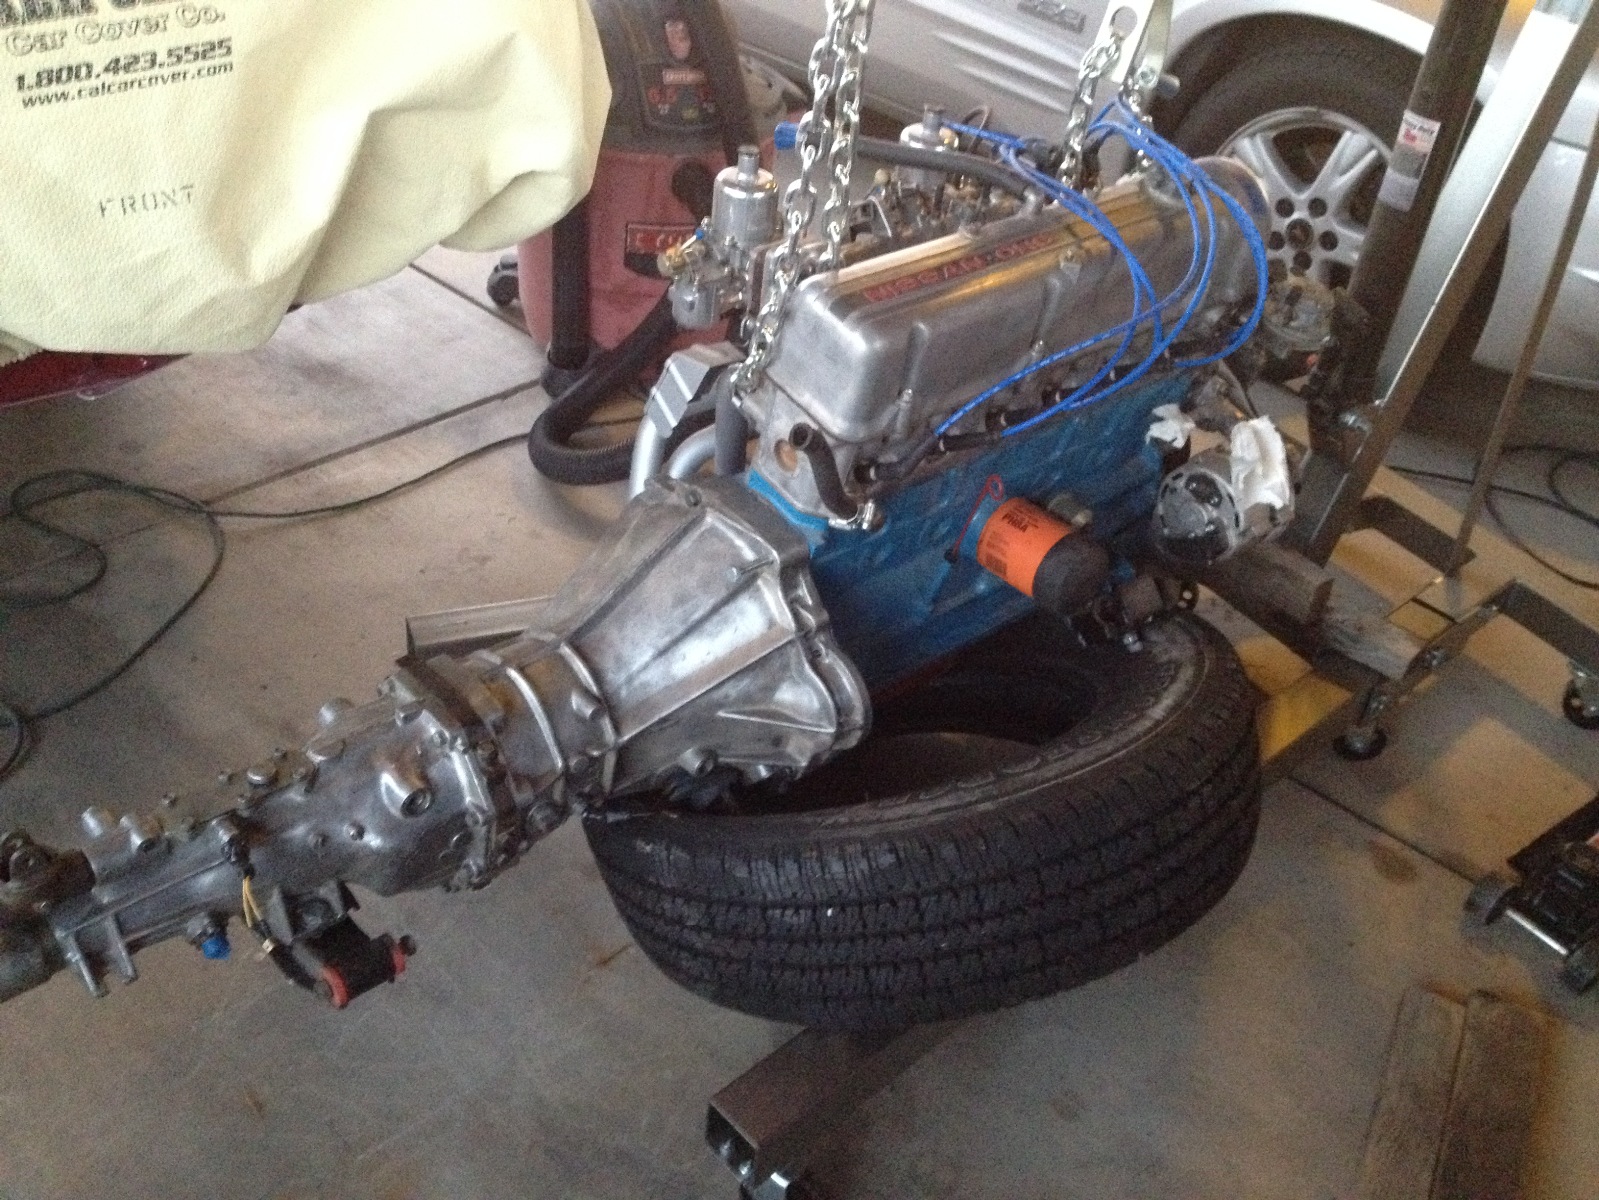
All this was done without assistance BTW. For the next step of installing this assembly in the car, I think it will be wise to have some help. My son lives in town and will come by Monday morning. Meanwhile I'll be putting some wheels and tires back on the car and taking it off the jacks as I want it as low as possible when we hoist this mess over the core support.
Heck, I might, just might, give it a go myself as tomorrow is Saturday.
If anyone's got some pointers on an unassisted motor/tranny install, I'd love to read about them.
Unrefinished left kick panel and refinished right side.
The Chinese (Japanese?) Puzzle
Got bit again by the early versus late model 260Z demon. This time it was the electronic ignition module. Early 260Zs have them on the firewall and the late ones have them on the kick panel. Since my Z is a late model and the harness is from an early model, I had to splice in an extension to the five wires on my module. Looks a little goofy but it seems to fit fine (now).
Decided to populate the electrical bracket in the engine bay. You know, the one that doesn't exist in a 240 or an early 260 but does in a late 260 and probably in the 280 ... sorry for the photo quality. The iPhone 4S camera just doesn't do well when there's a bright light just outside the field of view. Photographers call that bad stray light rejection.
Then just today I decided it was time to bite the bullet and push toward getting some extra space in the work area, i.e. getting the motor and transmission installed in the car. First order of business was to check out some niggling little details on the motor. I was worried I'd reinstalled the distributor wrong. I pulled the number one plug and checked for a compression stroke and confirmed TDC. Then confirmed we were all good with the rotor pointing to wire #1. I pulled the rest of the plugs and poured in a little bit of Marvel Mystery Oil. This motor has been sitting without oil for about 18 months now. Figured a little TLC wouldn't hurt. Slowly turned the crank and worked it all in. A quick inspection of the plugs show they are in good shape (son-in-law had replaced them years ago, just before they moved away - no real miles on them). Put them all back in.
Next was to pull out the new set of NGK high tension wires I'd been storing just for this occasion. Installed those.
Now it was time to get out the engine hoist (bought on sale a year ago) and get this motor off the stand so I can get at the flywheel. Yay, that worked.
Installed the clutch and the spring assembly. It was off one of the cars and was so fresh you could still read all the markings on the friction plate. Torqued everything down to FSM spec.
And finally, the transmission. Installed the throw-out bearing and the push lever. Was careful to follow the FSM's instructions about grease. Then the hardest part of all. Getting the darn thing to mate up with the engine while it's on a hoist. Thank goodness I followed someone's suggestion to spend about $5 and get one of those clutch plate alignment tools. This would have been a
of a job if I was unsure about that as well. The setup I finally got to work was to place the tranny on a small table and bring it up to the motor on the hoist. I had a leveler on the hoist which really helped. Once I got all the parts lined up, it took a couple of tries with some small adjustments of the crankshaft and finally after about an hour, the thing slid into place. I quickly bolted it in, set the whole assembly down on a tire for cushioning and went in for a beer, dinner and then writing this post - in that order.All this was done without assistance BTW. For the next step of installing this assembly in the car, I think it will be wise to have some help. My son lives in town and will come by Monday morning. Meanwhile I'll be putting some wheels and tires back on the car and taking it off the jacks as I want it as low as possible when we hoist this mess over the core support.
Heck, I might, just might, give it a go myself as tomorrow is Saturday.
If anyone's got some pointers on an unassisted motor/tranny install, I'd love to read about them.
02-28-2015, 07:26 AM
#83
Registered User
Join Date: Feb 2002
Location: Saskatoon, SK
Posts: 2,893
Very nice, the floor matting looks really good, and looks like it bends and contours easy to the shapes, I will definitely go that route. As far as installing the motor and trans yourself, I would just wait for another set of hands. I have done it myself, and banged up everything and anything under the car and in the bay, especially if you don't have a tilt bar on your picker.
02-28-2015, 08:02 AM
#84
Registered User
Thread Starter
Join Date: Apr 2013
Location: Tucson, Arizona USA
Posts: 576
Very nice, the floor matting looks really good, and looks like it bends and contours easy to the shapes, I will definitely go that route. As far as installing the motor and trans yourself, I would just wait for another set of hands. I have done it myself, and banged up everything and anything under the car and in the bay, especially if you don't have a tilt bar on your picker.
I was a little worried about leaving the motor/trans hanging on the picker. However the old tire seems to be keeping things stable and the picker is only a backup, keeping it from falling over.
BTW, that tilt bar was certainly worth its cost, even if I only use it once.
03-02-2015, 04:17 PM
#85
Registered User
Thread Starter
Join Date: Apr 2013
Location: Tucson, Arizona USA
Posts: 576
A Heart, a Brain and an Unexpected Guest
Yesterday I got the Z prepped for a new motor/tranny as well as a dashboard installation.

This morning, got ready for the arrival of two helpers.
Coffee - check
Cinammon rolls - check
Work gloves - check
Eye protection - check
Buzzing sound - WTFO?????
Where's that coming from? Under the radiator fan? OMG.

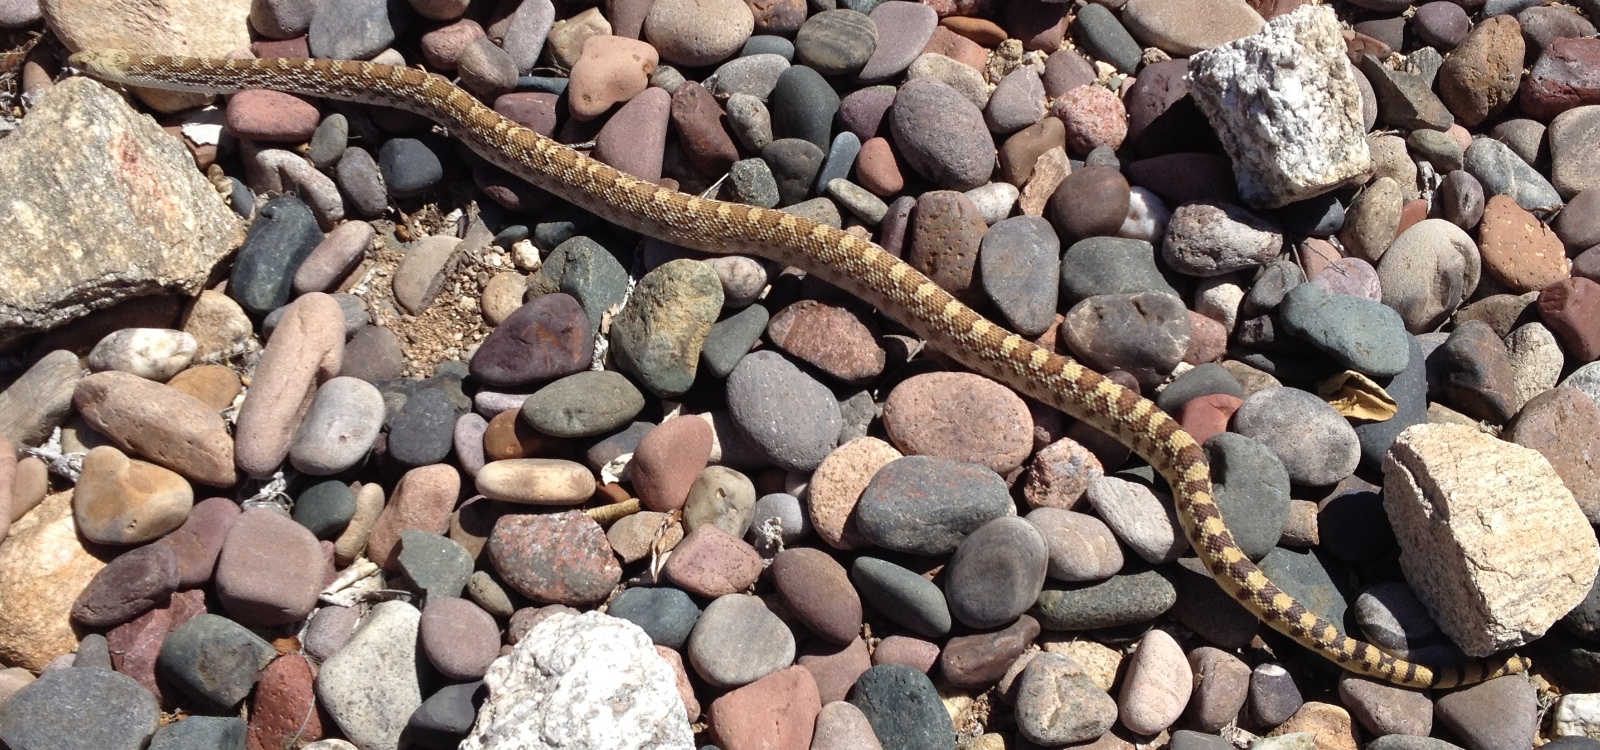
Yes, it's a little out of focus but I wasn't going to wait for the camera (or my hand) to settle down.
Fortunately, being a long-time Arizona resident, I had a tool kept just for this purpose. Within a minute or two this guy was safely contained in an empty trash can.

That's a fully grown Western Diamondback Rattlesnake. They don't get real big, this one was about 28 inches long. Our studly local fire department relocates them as part of their services ...

OK, back to work. My son and another car buddy arrived. They got fed and coffeed and the work proceeded.
Won't bother y'all with ALL the details however there are some important ones.
During the prep I had made sure the picker/hoist would lift the assembly high enough to clear the core support. I also made sure the legs of the picker would reach under the car, between the tires. Then I checked to see if it would hang the assembly back to where the back of the tranny met the firewall. All this was OK.
What I did not do was check to see if the picker would hang the assembly far enough back so that when lowered, the motor would be positioned over the mounts.
Found out the hard way that was a problem. Removing the hood torsion bar mounts got us the space we needed except for about a half-inch. Solved that with appropriate application of force, i.e. pushing the motor just enough.
So, we got the mount on the left side bolted in.
Looking at the right side mount we decided to reverse what we did on the left side and first bolt the mount to the cross-member and then bolt the mount to the engine. That's when we discovered that these mounts don't really fit. Turns out the DEA A2401 mounts which I purchased from RockAuto just don't fit our cars. There's a locating pin that's about a sixteenth of an inch too far from the bolt. Our temporary solution was to put an old mount on the right side for now and continue on with tidying up the transmission mounts. I'll get some true Nissan mounts (pricey) and come back to them later. Not a tough job to change them out (I think).
Getting the transmission mount bolted up to the body took some convincing as I had installed some polyurethane bushings which needed some C-clamp persuasion but we eventually got the job done.
There she is, all nestled in her new home.

After all that, installing the dashboard was very uneventful. But, there it is, waiting for its new cover. That will come after the doors are reinstalled as part of the glue down process includes placing padding (like a pillow) between the doors and the dashboard and then shutting the door to keep everything pressed while the adhesive dries.

She's starting to look like a car again. This is cool!
Still got a long way to go.
This morning, got ready for the arrival of two helpers.
Coffee - check
Cinammon rolls - check
Work gloves - check
Eye protection - check
Buzzing sound - WTFO?????
Where's that coming from? Under the radiator fan? OMG.
Yes, it's a little out of focus but I wasn't going to wait for the camera (or my hand) to settle down.
Fortunately, being a long-time Arizona resident, I had a tool kept just for this purpose. Within a minute or two this guy was safely contained in an empty trash can.
That's a fully grown Western Diamondback Rattlesnake. They don't get real big, this one was about 28 inches long. Our studly local fire department relocates them as part of their services ...
OK, back to work. My son and another car buddy arrived. They got fed and coffeed and the work proceeded.
Won't bother y'all with ALL the details however there are some important ones.
During the prep I had made sure the picker/hoist would lift the assembly high enough to clear the core support. I also made sure the legs of the picker would reach under the car, between the tires. Then I checked to see if it would hang the assembly back to where the back of the tranny met the firewall. All this was OK.
What I did not do was check to see if the picker would hang the assembly far enough back so that when lowered, the motor would be positioned over the mounts.
Found out the hard way that was a problem. Removing the hood torsion bar mounts got us the space we needed except for about a half-inch. Solved that with appropriate application of force, i.e. pushing the motor just enough.
So, we got the mount on the left side bolted in.
Looking at the right side mount we decided to reverse what we did on the left side and first bolt the mount to the cross-member and then bolt the mount to the engine. That's when we discovered that these mounts don't really fit. Turns out the DEA A2401 mounts which I purchased from RockAuto just don't fit our cars. There's a locating pin that's about a sixteenth of an inch too far from the bolt.
Our temporary solution was to put an old mount on the right side for now and continue on with tidying up the transmission mounts. I'll get some true Nissan mounts (pricey) and come back to them later. Not a tough job to change them out (I think).Getting the transmission mount bolted up to the body took some convincing as I had installed some polyurethane bushings which needed some C-clamp persuasion but we eventually got the job done.
There she is, all nestled in her new home.
After all that, installing the dashboard was very uneventful. But, there it is, waiting for its new cover. That will come after the doors are reinstalled as part of the glue down process includes placing padding (like a pillow) between the doors and the dashboard and then shutting the door to keep everything pressed while the adhesive dries.
She's starting to look like a car again. This is cool!
Still got a long way to go.
03-02-2015, 05:00 PM
#86
Registered User
Join Date: Feb 2002
Location: Saskatoon, SK
Posts: 2,893
 :armata_PDT_4 0:


Looking better and better!!! I am so happy that the smallest thing that can kill me up here I can see coming from miles, thank you -40.
03-03-2015, 08:42 AM
#88
Registered User
Thread Starter
Join Date: Apr 2013
Location: Tucson, Arizona USA
Posts: 576
We get pretty used to these critters down here. It's part of the price of having sunshine over 340 days a year. In a typical year we encounter anywhere from three to six snakes on the property. We'll probably get more this year as our Winter has been mild and there's been a nice amount of rain. It's also a little early for them to come out in numbers but the day before was very warm (low '80s F) which likely encouraged this guy to come out and go hunting. I was fortunate the morning was cooler and this snake wasn't lively at all.
Most of the snakes here are pretty shy and are not aggressive unless cornered (or stepped on). You just have to learn to ALWAYS look first before reaching somewhere.
It's good to learn the difference between the poisonous ones and non-poisonous ones. IMHO, the former has to either live somewhere else or get split into two with a long handled axe. The latter can stay as they eat the same things as the poisonous ones, thus making it less attractive for the bad guys to move in as well as keeping those damned pack-rats out of the cars. The pack-rats love to chew through wire and rubber as well as fill your engine bay with cholla cactus. So as far as I'm concerned the more non-poisonous snakes in the area, the better.
Even wifey has learned the difference. She once put up with a big Sonoran Gopher Snake that was hanging around. I'd go outside and she'd let me know it was in the area so I wouldn't step on it. Even named it Fred, that is until we starting seeing tiny Sonoran Gopher Snakes when Fred became Frederica.
03-19-2015, 04:08 PM
#90
Registered User
Thread Starter
Join Date: Apr 2013
Location: Tucson, Arizona USA
Posts: 576
No, no hard spot hit. Dealing with a housecleaning. You probably know the kind ... passing your junk on to your kids so you can get "stuff" from older parents who are going from two houses to one. You end up throwing half your stuff away cuz the kids either don't want it or don't have the room.
Doing this kind of thing without complaint and with a bit of enthusiasm garners the kind of favor required to spend more time with the project. All in all, wifey has been a treasure about this. Nary a word of complaint about all the two cars in various states of disrepair and repair out in the yard. When she wants help, she gets it.
Currently sorting out vapor recovery tanks. Turns out the early '74 tank won't fit the late '74 and my late '74 didn't come with one. I think tanks from early 280Zs fit and one has just arrived from West Virginia via eBay.
I did remember to put oil in the transmission and the motor.
Once that's confirmed, new hoses everywhere and back to reassembly.
1) Vapor recovery tank
2) Fuel filler
3) Gas tank
4) Combo/starter switches at steering column.
5) Heater assembly
At that point it may be time to put a couple of gallons of fresh gas in the tank and see if this thing will fire ...
Any pointers or words of wisdom out there???? Things to check and double-check?
03-20-2015, 09:35 AM
#91
I have a present for you...

Join Date: Mar 2003
Location: dayton, nevada usa
Posts: 1,691
I know how that goes, seems to take forever.
What I like to do on a new start up is to take little steps. Key on, check amp gauge for draw. Have your helper watching under the hood for any signs of problems. Always be ready for a quick disconnect of the batery.
Turn the engine over with coil wire out until you've got oil pressure.
Check for leaks.
Coil wire in, start. Run for few seconds, turn off, check all.
Let er run, observe oil pressure, water temp etc.
Give your helper a hug, your gettin some tonight.
03-20-2015, 04:53 PM
#94
Registered User
Thread Starter
Join Date: Apr 2013
Location: Tucson, Arizona USA
Posts: 576
I know how that goes, seems to take forever.
What I like to do on a new start up is to take little steps. Key on, check amp gauge for draw. Have your helper watching under the hood for any signs of problems. Always be ready for a quick disconnect of the batery.
Turn the engine over with coil wire out until you've got oil pressure.
Check for leaks.
Coil wire in, start. Run for few seconds, turn off, check all.
Let er run, observe oil pressure, water temp etc.
Give your helper a hug, your gettin some tonight.
What I like to do on a new start up is to take little steps. Key on, check amp gauge for draw. Have your helper watching under the hood for any signs of problems. Always be ready for a quick disconnect of the batery.
Turn the engine over with coil wire out until you've got oil pressure.
Check for leaks.
Coil wire in, start. Run for few seconds, turn off, check all.
Let er run, observe oil pressure, water temp etc.
Give your helper a hug, your gettin some tonight.
03-31-2015, 10:15 AM
#95
Registered User
Thread Starter
Join Date: Apr 2013
Location: Tucson, Arizona USA
Posts: 576
My Assistant Showed Up - Not Quite Like The Picture from Ramz
Thanks to Ramz, my assistant did show up but then left, hissing something about going off to Law School. She reappears now and then and does a service by eating lizards and pack-rats. It must be a tough journey between Nevada and Arizona. She still wriggles and has curves but somehow she's just not as attractive as the photo from Ramz. The good thing is I don't get in trouble with wifey. BTW Ramz, she's not a Cobra but a Sonoran Gopher Snake. Locally known as a Bull Snake, she's not poisonous.
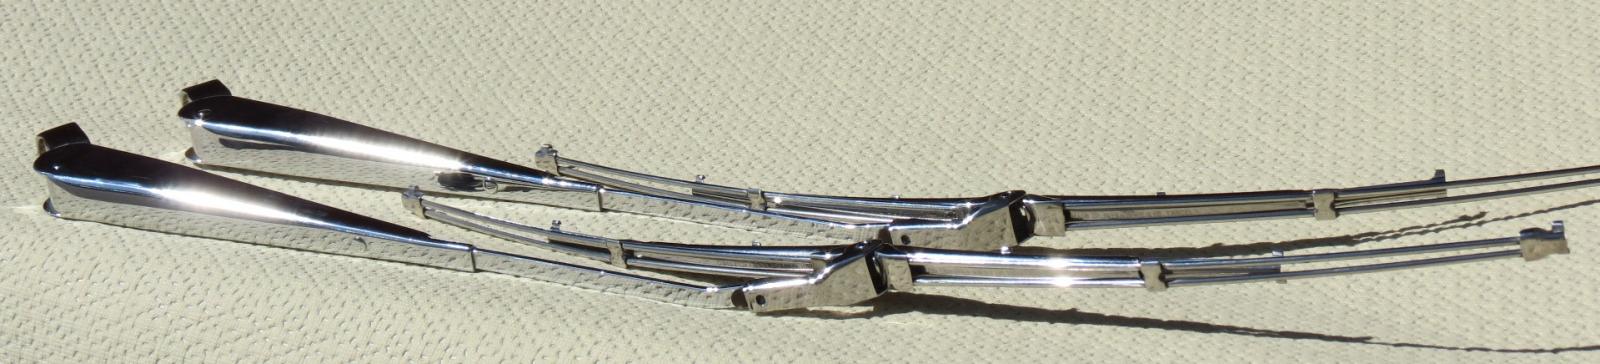
Anyway, there's a little bit of bling to report. I finally got the original equipment wiper arms back from the chrome shop. It took them a long time as they are made of two different types of metal with the pot-metal base being very difficult do. They did turn out nice IMHO.


 05-03-2015, 12:43 PM
#96
Registered User
Thread Starter
Join Date: Apr 2013
Location: Tucson, Arizona USA
Posts: 576
Been Back On The Job - Need Some Advice
After helping with all the furniture moving and household re-arranging, I took my best girl (that's my wife for all you folk who think differently) on a cruise. All in all we were gone for about three weeks.
Been back for about a week and a half and have made some good progress on the Z.
Spent some quality time researching the vapor recovery system and decided it must be installed. Seems all the reports from folk who removed it showed it mostly caused more trouble. The vapor tank from the early 260Z doesn't fit the late 260Z and I didn't get a tank with the late model car. I ended up finding one on eBay in West Virginia. I then had to find a charcoal canister in Texas and am still searching for the canister's mounting bracket.
All that is now installed as well as the gas tank. I got all new hoses for anything to do with fuel and they're installed as well.
Finished up wiring the headlight and parking light kits that reduce the amperage going through the combo switch and at the same time provide better voltage to the lights themselves.
Installed the heater box (new hoses in there too) and then realized I'm going to have to remove the dash to install the A/C evaporator assembly. Crap. Oh well, I'll get to that in a week or two. New A/C components for under the hood are on their way from Texas. When they arrive, they'll be next on the list.
Added water to the radiator and fuel to the gas tank. Hurray! No leaks ... yet ... fingers are crossed.
------------------------
Here's where I need some advice. Time to see if I can get this thing fired.
Followed TheRamz's advice, electrical looks good, no fuses blowing and everything that should have been working was.
Time to turn it over. Starter engaged and the engine turns nicely! First time in over eight years.
Realized I needed to hook up the muffler. Did that.
Hooked up the choke cables.
I've got remanufactured round top carbs from Z-Therapy. They are unmolested out of the box.
Fuel is flowing to the carbs - bowls are full. No evidence of gas appearing where it should not.
I have triple verified the firing order multiple times.
Replaced the spark plugs today. The old
If I use some starting fluid, it will fire a little bit.
Put a timing light on it. As my trusty assistant wasn't available, I couldn't really check the timing BUT I did discover this.
I am getting spark on the odd numbered cylinders but no spark on the even numbered ones.
Using the timing light I could see a triple fire on the coil wire followed by a pause and another triple fire. Subsequent testing showed spark on the odd wires and no spark on the even ones.
I note the firing order is all the odd cylinders followed by the even ones. To me this makes me think there's an issue with the distributor. With my mish-mash of parts, I had three to choose from. The original one that was working with this motor, one from the bad motor (this was set up for an automatic tranny) and one that looked pristine and was remanufactured.
I chose the remanufactured one. Visually it looks real nice. The air gaps on the reluctor are correct as well.
I intend to swap this remanufactured one (of unknown history) with the original unit that was known good at the time the motor was pulled from the donor car.
-----------
Now, if y'all have any experience with no spark on sequential cylinders, I'd love to hear it!
Any advice on what else to check as well will be appreciated.
05-03-2015, 11:08 PM
#97
Registered User
Thread Starter
Join Date: Apr 2013
Location: Tucson, Arizona USA
Posts: 576
Update on Missing Spark
Swapping the distributors solved the problem. Now have spark on all cylinders.
Motor will now run for a few seconds on starting fluid. What a sweet sound. It's been a long time since this motor has run at all.
Seems there's no fuel getting into the motor. Next step as far as I know is to be sure I've got vacuum so the fuel gets sucked through the needle into the intake.
Advice???
05-04-2015, 11:23 AM
#98
I have a present for you...
Join Date: Mar 2003
Location: dayton, nevada usa
Posts: 1,691
since the carbs are new you can safely drop the bowls without damage to the gaskets and verify that gas is filling them. Not a good idea to repeatedly start/run with starter fluid.
05-04-2015, 01:41 PM
#99
Registered User
Thread Starter
Join Date: Apr 2013
Location: Tucson, Arizona USA
Posts: 576
It's Alive!
Futzed with the mixture settings. First verified they were set at 2 1/2 turns as stated from the factory. Then 1/2 a turn at a time I made them richer. At 1/2 turn further down the motor tried to run on its own a little more so I kept going, two more 1/2 turn twists and ...
Wahoo! We're running! Had to go to 4 turns. Once it warmed up, things settled down and while it sounds a little "lopey", I don't hear any strange sounds from the motor other than a sweet exhaust note.
Checked the timing again and it was at about 12 degrees BTDC, reset it to 8. Didn't help much but there's lots more to adjust and so on.
For some reason I think 4 turns is probably too rich so I'll have to do some more learning and investigating. Going to review Z-Therapy's "Just SUs" video tonight.
Oil pressure is reading a little below half scale while idling.
Ammeter shows we're charging. That's a relief.
Not getting a temperature reading on the gauge but the upper radiator hose is warm so I think the thermostat has opened. Will have to check out the temp sensing system to see what's going on.
Got some water leaking in the cabin, going to pull the heater box and examine the setup. I previously had the heater core checked and I've got new rubber inside. Probably the valve or I didn't tighten something enough.


