260Z Restoration as a Retirement Project
 06-09-2013, 05:15 PM
#1
Registered User
Thread Starter

Join Date: Apr 2013
Location: Tucson, Arizona USA
Posts: 576
260Z Restoration as a Retirement Project
Hello to you all, I believe this is my first post on the forum although I've been lurking and researching for some time now.
Many moons ago I purchased my son-in-law's early 260Z when he and my daughter were busy getting started with kids and such. It was his first car in life and spent most of its life in Detroit (you guessed it, rust city). It had been sitting on our property in Arizona for a couple of years before the purchase and sat a few more until I retired at the beginning of last year. I knew this thing needed a full down to the metal restoration.
Both son-in-law and daughter are car nuts and long-distance from Detroit have provided lots of encouragement and advice on restoring the Z.
Work began in earnest last June when we stripped the 260. This work revealed someone had fiberglassed the floor and when removed showed pretty much Swiss cheese. Knowing floor plans were available, I kept plodding along. Finally completed the strip and began work on the undercarriage.
Examination of all the suspension parts showed that if I ground off the rust I wouldn't have much left. I realized the economics of parts and as such said "get a parts car, it will cost less than buying all these parts separately."
It didn't take very long but late model 260Z came available in Arizona, perfect as a project car the ad said. Driving four hours to see the car revealed pretty much a rust free car with completely oxidized paint, a crappy interior and a blown engine. I didn't care about the engine as I knew the current 260Z's motor was good. Interior from existing car was OK. I purchased the car and brought it home.
Closer examination revealed this newer model structurally was so good we decided to switch. The older model is now the parts car and the later model is being restored. It has been stripped as well and I've completed the refurbishment of the suspension.
I'm farming out the body work as I'm not experienced in that area and making mistakes there in my book is too expensive to do over.
So, I've moved on to the motors. Here's the discovery and learning taking place. It is also WHERE I NEED HELP from those wiser and more experienced on this forum.
Turns out the blown motor is an L24, not an L26. That's OK. But the opportunity here is the L24 has round-top carbs as opposed to the flat-tops (which were giving son-in-law fits before the car was "retired"). Having been installed in a 260, the linkages have already been modified.
What I want to do is move the round top carbs, linkage, intake and balance tube from the L24 motor to the L26 motor. It looks like a fairly straight forward job. FWIW, the L26 motor has headers replacing the stock exhaust manifold.
What I am unsure about is removal of all smog-related junk. In Arizona I will not need this car to pass smog.
It seems to me I should just disconnect all the water stuff running through the intake manifold and the balance tube. Not really necessary in Arizona and just something else to go wrong. Advice?
I'm also not sure what to do about the EGR valve. First thought is to simply disable it. Is there a plate available to cover the holes in the balance tube or is there another better way to do this?
The air pump is already gone so that decision has already been made for me.
This is as far as I've gotten in my thinking. Those of you who have done this, please chime in. If there are other threads I've not found, I'd appreciate someone pointing them out!
Scott
Last edited by beg3yrs; 08-03-2013 at 11:18 AM.
 06-09-2013, 05:53 PM
#2
Registered User

Join Date: Dec 2012
Posts: 41
All smog related items can be removed. Cap off all water lines and such with rubber caps and clamps available at any car parts store. Caps may need to be replaced in a few years if they break down. Adjust the round tops carbs yourself! TECHNICAL TIP #6. You can either run the original air cleaner or go to the dual K&N type filters available. If you do this , I suggest that the float overflow tubes be joined with a T and exited in a safe manner. Good luck!
06-10-2013, 06:24 AM
#3
I have a present for you...

Join Date: Mar 2003
Location: dayton, nevada usa
Posts: 1,691
You can remove the egr valve and plug it with a standard pipe plug, the threads are the same as the metric plugs, same with the thermostat housing and the intake manifold though you may have trouble getting the old fittings out. Don't block the balance tube or you will have tuning problems on the carbs. The SU carbs are suprisingly easy to rebuild.
06-21-2013, 04:40 PM
#5
Registered User
Join Date: Sep 2012
Location: Alb NM
Posts: 16
your engine setup sounds very similar to mine. I have an header and the bell type SU carbs. all of my smog, heating and cooling and whatever else isn't necessary removed. I run one belt and it goes to the water pump and alternator (no fan as I went dual electric 20" fans) I did have the l24 block but upgraded to an F-54 l28. head is the original late e-88. my balance tube has 2 hoses, one for the brake booster and the other for the pcv valve. also I eliminated the water hoses going through the fire wall to the heater core and the fitting coming off the back passenger side of the head is connected to the water fitting going through the intake manifold. had to cam the water inlet too. you can get the water caps in the gardening section at home depot where the stuff is for hoses and adapters and fittings. hope this helps, if you would like pictures of my build or any more specifics PM me.
Scott
Scott
06-23-2013, 05:18 PM
#6
Registered User
Thread Starter
Join Date: Apr 2013
Location: Tucson, Arizona USA
Posts: 576
your engine setup sounds very similar to mine. I have an header and the bell type SU carbs. all of my smog, heating and cooling and whatever else isn't necessary removed. I run one belt and it goes to the water pump and alternator (no fan as I went dual electric 20" fans) I did have the l24 block but upgraded to an F-54 l28. head is the original late e-88. my balance tube has 2 hoses, one for the brake booster and the other for the pcv valve. also I eliminated the water hoses going through the fire wall to the heater core and the fitting coming off the back passenger side of the head is connected to the water fitting going through the intake manifold. had to cam the water inlet too. you can get the water caps in the gardening section at home depot where the stuff is for hoses and adapters and fittings. hope this helps, if you would like pictures of my build or any more specifics PM me.
Scott
Scott
As I get back into it within the next week or so I'm sure very specific questions will come up. The Home Depot tip is going to be helpful.
I have decided to rebuild the carbs based on the encouragement I've received. The rebuild kits aren't very expensive and if I botch it and get them professionally done, it's worth the risk and education.
I'll keep the heater and A/C on this one so I won't have an engine compartment as clean as yours.
I've decided to blast the headers and paint them silver with VHT's ceramic header paint. Unfortunately I won't be able to bake them on the motor as it won't be reinstalled for some time yet and these headers are too big for our home oven. Waiting to paint after the motor is installed and running means mounting the headers and intake and such with the motor in the car - that's a huge pain IMHO. Not only that but with fresh body paint all around, not worth it. I will go the heat gun route for curing, possibly with a torch as well. Not really too concerned about discoloration, just want them protected from further rust.
 06-28-2013, 08:04 AM
#8
Registered User
Thread Starter
Join Date: Apr 2013
Location: Tucson, Arizona USA
Posts: 576
Thanks Goldie. Interesting sites, especially nice to see another forum site as well.
Zhome is a bit different though. Seems to pretty much ignore the 260Z. Is there some kind of issue with 260s, do you think it's a quirk of this site or am I just daft?
Zhome is a bit different though. Seems to pretty much ignore the 260Z. Is there some kind of issue with 260s, do you think it's a quirk of this site or am I just daft?
07-13-2013, 04:16 PM
#9
Registered User
Thread Starter
Join Date: Apr 2013
Location: Tucson, Arizona USA
Posts: 576
Metalwork In Progress
Sent the car off the a guy here in Tucson who works by word-of-mouth only. You should see some of his stuff.
I'm not even pretending to be good at metalwork, welding, shaping and such. It's too expensive in my book to make learning mistakes so that's what a pro is for.
He is currently working the major body work, rear quarter, some frame rail work in the front, clean up of floor pans, minor rust bubbles here and there. He's going to scrap the passenger door and use the one from my parts car.
The photos I took over there didn't come out well. I'll sure I'll be back in a week or two and will update the progress.
Meanwhile back at the ranch, I've been invaded by grandchildren. No work on the motor at all. Once they leave in two weeks I'll get that block painted and resume work on the carbs, intake and exhaust headers.
 07-15-2013, 11:59 AM
#11
Registered User
Thread Starter
Join Date: Apr 2013
Location: Tucson, Arizona USA
Posts: 576
I hear you regarding the 260Z being a red headed stepchild. Even my two 260Zs are different, one being and early and the other being a late model.
There are inconsistencies even in the year designations. Some will tell you all 260Zs are 1974 models while others will include 1975 for the late models.
The late models started production in September of 1974 which for most cars would be considered a 1975 model.
Already been bitten by not paying close enough attention to the sometimes subtle differences. Bought and had to return early-model struts which do not fit in the late model cars.
07-23-2013, 12:57 PM
#12

cool.. sounds like we got some projects in common.
i got a 71 240.. i just mailed my carbs to ztherapy located in oregon.. they got there own website too. im excited to see the restored carbs from them as they sound like they do a great job.
i just posted a thread above yours about my 240. basically lists what im doing with restoring mine.. figured id let you know so u can maybe get some ideas on your build.
goodluck!
07-31-2013, 07:38 PM
#13
Registered User
Thread Starter
Join Date: Apr 2013
Location: Tucson, Arizona USA
Posts: 576
Headers
Wire wheeled the headers and then sand blasted them.
Used VHT Ceramic Header paint, flat aluminum. I think they look nice. Will wait a week and then attempt some heat curing. I don't have an oven large enough nor can I put them on the motor for at least six months though. I'll use a very hot heat gun and do the best I can.
Wire wheeled the block and hit it with Rustoleum Rust Reformer. Will paint it with original blue tomorrow.
07-31-2013, 07:39 PM
#14
Registered User
Thread Starter
Join Date: Apr 2013
Location: Tucson, Arizona USA
Posts: 576
Have you got them back yet? I'm quite interested. As I don't have any history on my round tops, I might just send them out to be done right rather than futz with them once everything is back together.
08-02-2013, 07:44 PM
#15
Registered User
Thread Starter
Join Date: Apr 2013
Location: Tucson, Arizona USA
Posts: 576
Engine Block Painted
Wahoo! Got the block painted yesterday and today the oil pan was reattached. Flipped the motor back to right side up and next it's general clean up followed by carb work.
BTW, that's the blown 240 donor motor in the background. So far it has donated its oil pan, round-top carbs, throttle linkage and oil pressure sender.
BTW, that's the blown 240 donor motor in the background. So far it has donated its oil pan, round-top carbs, throttle linkage and oil pressure sender.
Last edited by beg3yrs; 08-03-2013 at 09:07 AM.
08-20-2013, 06:13 PM
#16
Registered User
Thread Starter
Join Date: Apr 2013
Location: Tucson, Arizona USA
Posts: 576
Visited the shop today. Went over to bring them my other hood as the one I supplied seems to be tweaked. At first glance the pros like the second one as since all the paint is pretty much gone from the top they can already see NO BONDO.
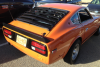
My big surprise was they've starting mock fitting the rear wing and front air dam. IMHO they look great.
On the rear wing they're recommending moving in back (as shown in the photo) so its rear line matches up with the original body lines. In its stock configuration there's about a 1.5" difference. I'm filling the antenna hole (will use something else) so the position of the antenna hole in the wing doesn't matter and we'll fill that too. The remaining problem is moving the wing backwards causes it to sit too close to the hatch latch, making it impossible to get a key inserted. Maybe we'll change it out for an electronic solenoid but we haven't decided yet.
11-22-2013, 09:03 PM
#17
Registered User

Join Date: Nov 2013
Posts: 2
Visited the shop today. Went over to bring them my other hood as the one I supplied seems to be tweaked. At first glance the pros like the second one as since all the paint is pretty much gone from the top they can already see NO BONDO.
My big surprise was they've starting mock fitting the rear wing and front air dam. IMHO they look great.
On the rear wing they're recommending moving in back (as shown in the photo) so its rear line matches up with the original body lines. In its stock configuration there's about a 1.5" difference. I'm filling the antenna hole (will use something else) so the position of the antenna hole in the wing doesn't matter and we'll fill that too. The remaining problem is moving the wing backwards causes it to sit too close to the hatch latch, making it impossible to get a key inserted. Maybe we'll change it out for an electronic solenoid but we haven't decided yet.
Nice work so far.
12-07-2013, 04:46 PM
#18
Registered User
Thread Starter
Join Date: Apr 2013
Location: Tucson, Arizona USA
Posts: 576
Not Much Of An Update
Well, we've been out of the country for a month or so. My body work guy told me he'd have everything ready for paint when we returned.
That didn't happen. I don't blame him though as I get good shop rates as he works on my Z when there aren't cars with deadlines for delivery. It's actually better for me right now as we aren't really ready to pay for paint! Expecting a big tax refund so here's fingers crossed for early in 2014.
He did get the front air dam permanently mounted. Still has to fit passenger door, gap all the panels, fit the rear wing and apply undercoat.
I still have to select some outside mirrors as I don't have any I really like in the parts bin. Suggestions / photos are welcome!
Meanwhile, I'm ready to pull the trigger with Z Therapy. Need to call them and see what we can sort out for my Franken-engine (L26 with round-top SU carbs and headers, no emissions requirements).
12-12-2013, 10:01 AM
#19
I have a present for you...
Join Date: Mar 2003
Location: dayton, nevada usa
Posts: 1,691
Vitaloni mirrors
These are pretty cool. I have a set of Vitalonis for one of my cars. It's the finishing touch. Pricey but you won't see them very often.
http://www.ebay.com/itm/datsun-240z-260z-280z-skyline-italian-made-vitaloni-mirrors-rare-discontinued-/261324013623?pt=Motors_Car_Truck_Parts_Accessories&hash=item3cd8200037&vxp=mtr
http://www.ebay.com/itm/datsun-240z-260z-280z-skyline-italian-made-vitaloni-mirrors-rare-discontinued-/261324013623?pt=Motors_Car_Truck_Parts_Accessories&hash=item3cd8200037&vxp=mtr
12-13-2013, 07:27 AM
#20
Registered User
Thread Starter
Join Date: Apr 2013
Location: Tucson, Arizona USA
Posts: 576
I've never heard of Vitaloni but regardless, they have an interesting look. I've added your link to my eBay watch list. I'll also check out Vitaloni in general.
Meanwhile, I did talk to Bruce at Z-Therapy. He's a good ol' boy who took the time to go over my mixed up motor and sort out just how we'll go forward.
Turns out I've got two kinds of intake manifolds, three kinds of balance tubes and three kinds of carbs, all for the 240 and 260Z cars! I've ordered their ZT100 remanufactured carbs and am packaging up all the carbs (except for the Hitachi flat-tops which Bruce says to throw over the fence) and shipping them to ZT. That will cover the core charge and for the extra "stuff" I'll get a little bit of credit as well.
There's a two month backlog on the carbs but that's OK as I won't need them for at least that long.
Moving forward ...
07-07-2014, 08:31 PM
#21
Registered User
Thread Starter
Join Date: Apr 2013
Location: Tucson, Arizona USA
Posts: 576
Haven't Posted for a While But Work Continues
OK, I've been off the site but ... not off the job.
Got the carbs back from Z-Therapy in only a couple of weeks. They are beautiful! They are installed on the motor which is pretty much prepped and ready to go into the car when it is ready. Replaced the 40A alternator with a 60A direct replacement.
In February of this year we finished the metal work and completed the undercoating. Door hinges were also rebuilt. At this point, we left the first shop which doesn't do final body and paint and took it to another for its beauty treatment.
Images 1842 and 1845 are its condition as it left one shop for another.
Meanwhile back at the ranch, I started work on the fuel and brake lines. Cleaned them all out and then refinished the exterior in a nice gold finish with a coat of clear on top.
The gas tank has been boiled out and refinished along with the straps. They're ready to go. Image 1959.
As I had two trannys with no history I took them to my favorite local tranny shop. We started with the cleanest looking one (highest serial number too), broke it open, inspected it carefully and nothing untoward was found. Gave it a good service, new seals and closed it back up. Cleaned up the outside and its ready to go too. Image 1980.
As we had relocated the California Wing to sit as far back as it could possibly go on the body, we ran into a problem with the lock on the hatch. The wing sat too low and the key would not fit into the lock. The solution was to relocate the lock further up the hatch and use a push-rod to release the mechanism. Image "hatch_resized.jpg"
The body shop has been doing lots of body work on this soon to be beautiful car. Take a look at this wonderful back end. Almost as nice has Pippa Middleton on her sister's wedding day. Image 3163.
Just refinished the vacuum brake booster and gave up on the master cylinders. I had three and didn't trust a single one. With a new one only being about $40, it was an easy (and safe) decision to just replace.
Finally, we just got some color in the interior. It's a Lexus/Toyota color, Riveria Red, code 3S8. IMHO it is perfect. Image 3231.
I should get the car back by the end of the month. We've decided to have it delivered unassembled (the body shop will keep the fenders, doors, hood and hatch) while I fuss all around it installing fuel and brake lines, a differential, motor and tranny and other assorted engine bay stuff. Once done with all that stuff, it goes back for final assembly and panel alignment. Hopefully we'll minimize the potential for shop damage (klutz damage) this way.
Am looking at using "Dashesonly.com" in Van Nuys, CA to make my dash like new again. Anyone have experience with them? Pricey? I'd bet. Worth it? I hope so. Comments are welcome!
BTW, most recent posts concerned outside mirror selection. I went with a racing style from MSA. I had an old pair of Vitaloni's and didn't like the look. Just my taste preference. Thanks for the input anyway.
07-08-2014, 12:03 PM
#23
Registered User
Thread Starter
Join Date: Apr 2013
Location: Tucson, Arizona USA
Posts: 576


