280Zombie build (pic heavy)
 06-05-2013, 09:43 PM
#1
Registered User
Thread Starter

Join Date: Jun 2013
Posts: 26
280Zombie build (pic heavy)
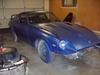
Hi all!!! I am in the process of doing a RB25 swap into my 76 280Z. I Got the car January this year and have gathered alot of the things I need to do the swap. I have a decent knowledge of mechanics and fabrication. I basically wanted to start a build thread for it.


this was the car when i picked it up right after a big snow storm

had these mirrors laying around for about 3 years

Had to bust out my sheet metal skills to get rid of the door panels

panels finished and installed, flat black aluminum

pulled the suspension off


my man Matt powdercoating the pieces


oh so pretty!!!

everything all put back together

fender flare install...

finally got the hang of it about top of this wheel
the car is COVERED in body filler from the last owner im not looking forward to doing the bodywork on it

flares installed

bracket measurement for the Wilwood disc brake conversion

stock rear drums

Wilwood disc brakes in the rear!!!
this was the car when i picked it up right after a big snow storm
had these mirrors laying around for about 3 years
Had to bust out my sheet metal skills to get rid of the door panels
panels finished and installed, flat black aluminum
pulled the suspension off
my man Matt powdercoating the pieces
oh so pretty!!!
everything all put back together
fender flare install...
finally got the hang of it about top of this wheel
the car is COVERED in body filler from the last owner im not looking forward to doing the bodywork on it
flares installed
bracket measurement for the Wilwood disc brake conversion
stock rear drums
Wilwood disc brakes in the rear!!!
 06-05-2013, 10:00 PM
#2
Registered User
Thread Starter
Join Date: Jun 2013
Posts: 26

had a leak in the gas tank so installed a fuel cell i had laying around from another project

just had it tied into stock lines until swap and then all new fuel lines

bought purple plastidip for the wheels, testing it out on my room mates john deere

and the wheels...

after the excess was peeled off

Plastidipping in the driveway


i like the look in white

the RB25 that is going in the car

visited matt again and spruced up the motor…

Im keeping with the black purple of the suspension

looking all better now

decided I need to just jump in and start the swap

rad support is a bit rusted out….

so I cut it out!!!

this was going to be the bottom mount for the intercooler but I am going to be cutting the bottom support out as well and I will fab up a new mount

pulling the L28

Empty bay….
06-05-2013, 10:00 PM
#3
Registered User
Thread Starter
Join Date: Jun 2013
Posts: 26

motor sitting in on Swap mounts

I love how this looks in an empty bay!!!!

with the new Rad and intercooler, just sitting in there for reference
now the 280 was an automatic, I am using the RB25 transmission and it seems to fit perfect to the stock driveshaft in the car…. I don't know if it actually will work if anyone has any knowledge I would much appreciate the feedback

Looks like it is a perfect fit to the transmission
I need to fab up a better header, I cheaped out and got an ebay one and I should have just waited. Not sure how fast more progress will be on the car, this is all from the past 6 months
I am open to any ideas and input, I still have a far way to go but I'm hoping it starts moving along faster
06-05-2013, 10:06 PM
#4
Registered User
Thread Starter
Join Date: Jun 2013
Posts: 26
So I decided to draw some Walking Dead comic scenes on the car along with some song lyrics. I figured if I didn't like how it was coming out i could always pull the plastidip off and put the car back to black but I love how it looks.


Sharpies on the Plastidip work pretty good


Everyone loves how it came out, I have a time-lapse video of me doing one side ill try and upload

I liked it so much I'm doing the same to my bike so it matches the car
Sharpies on the Plastidip work pretty good
Everyone loves how it came out, I have a time-lapse video of me doing one side ill try and upload
I liked it so much I'm doing the same to my bike so it matches the car
 06-06-2013, 03:25 PM
#6
Registered User
Thread Starter
Join Date: Jun 2013
Posts: 26
Thanks. It has taken me many years and MANY started and scrapped projects to get to one that is actually worth completing.
I did a little bit more today.

I cut out the bottom support, tack welded in a bar just to keep the rails from moving after I cut the support out.


I snagged a scrap piece from my old work to use for brackets and what not

I cut an angle piece out to plate the rail for the new support

Now I just need to swing by the old shop again and buy a piece to fit in.
Im dead tired from the past week so I am going to call it for tonight
I did a little bit more today.
I cut out the bottom support, tack welded in a bar just to keep the rails from moving after I cut the support out.
I snagged a scrap piece from my old work to use for brackets and what not
I cut an angle piece out to plate the rail for the new support
Now I just need to swing by the old shop again and buy a piece to fit in.
Im dead tired from the past week so I am going to call it for tonight
 06-07-2013, 09:35 PM
#9
Registered User
Thread Starter
Join Date: Jun 2013
Posts: 26
Well another night down and I am pleased to say that it was worth it
Visited my old work to say hi and grab a couple little things, ended up leaving with an old rear clip from a wreck last week at the race track

My first instinct was to use the crossbar on the clip as the new bottom rad support. Once that was cut and tacked into place I started coming up with cooler and cooler ideas.


I threw in some angle braces and semi-down tube from the shock tower to the rail

End result is pretty cool I think

Next is to mount the rad and intercooler to the new front end and then weld it all up. I may stick with the green and do the bay that lime green, I kinda just want the whole car to be obnoxious lol
Visited my old work to say hi and grab a couple little things, ended up leaving with an old rear clip from a wreck last week at the race track
My first instinct was to use the crossbar on the clip as the new bottom rad support. Once that was cut and tacked into place I started coming up with cooler and cooler ideas.
I threw in some angle braces and semi-down tube from the shock tower to the rail
End result is pretty cool I think
Next is to mount the rad and intercooler to the new front end and then weld it all up. I may stick with the green and do the bay that lime green, I kinda just want the whole car to be obnoxious lol

 06-09-2013, 09:06 PM
#13
Registered User
Thread Starter
Join Date: Jun 2013
Posts: 26
Thanks for all the comments and looks. There are not many Z people in my area so it is great to share with people who appreciate the Z.
The X's on the headlights are just something I did. I am Straight Edge (dont drink, smoke, or do drugs) and the X is a symbol of that so it kind of fits me.
I pretty much finished up the front of the car this weekend. Had to have 1x piece made for the top rad support. My friend Steveo came over and helped. He is one of the best fabricators I have ever met, I wish I could be as good as him.

Bending up a piece for the top rad support

Steveo cleaning up some stuff I missed lol

Installing the new top bar

Tube mount for the top of the intercooler
I didnt get a picture of it but the bottom mount is just tube stands the plugs of the intercooler fit into.

Another shot of the mounts

Test fit the hood and its pretty good to me. I didnt plan on it but the stock hood hinges actually work and still fit!!

Getting an idea of what she will look like when she is done

Im thinking it is a little Sleeper looking lol. Im going to be making sheet metal ductwork to help just flow the air through nice nice

Making up a template for the cover and also act as a rad mount. You can see the bottom intercooler mounts on the crossbar in this pic.
The X's on the headlights are just something I did. I am Straight Edge (dont drink, smoke, or do drugs) and the X is a symbol of that so it kind of fits me.
I pretty much finished up the front of the car this weekend. Had to have 1x piece made for the top rad support. My friend Steveo came over and helped. He is one of the best fabricators I have ever met, I wish I could be as good as him.
Bending up a piece for the top rad support
Steveo cleaning up some stuff I missed lol
Installing the new top bar
Tube mount for the top of the intercooler
I didnt get a picture of it but the bottom mount is just tube stands the plugs of the intercooler fit into.
Another shot of the mounts
Test fit the hood and its pretty good to me. I didnt plan on it but the stock hood hinges actually work and still fit!!
Getting an idea of what she will look like when she is done
Im thinking it is a little Sleeper looking lol. Im going to be making sheet metal ductwork to help just flow the air through nice nice
Making up a template for the cover and also act as a rad mount. You can see the bottom intercooler mounts on the crossbar in this pic.
06-28-2013, 07:40 PM
#15
Registered User
Thread Starter
Join Date: Jun 2013
Posts: 26
Well I havent really had a chance to work on the car recently. I busted my wrist at work and am kinda halted at the moment. I did order a rear sump oil pan so once that gets here i can finish the fab work for the trans mount and new header.


 01-12-2014, 09:14 PM
#19
Registered User
Thread Starter
Join Date: Jun 2013
Posts: 26
Sorry I haven't been around for awhile (went through a divorce and some family things) but I have some updates and pics to share with the progress of my car. Unfortunately the engine has not been worked on much due to I keep finding rust and keep having to make repairs to hold the car together.


Stripped the car interior and some of the engine bay
Stripped the car interior and some of the engine bay
01-12-2014, 09:17 PM
#20
Registered User
Thread Starter
Join Date: Jun 2013
Posts: 26
Made a template for the main hoop to put in to keep the car together while I replaced the rocker panels....well the rocker panels were NOT the end of the rust like i thought.....


Last edited by xphiledgex; 01-12-2014 at 09:44 PM.


 01-12-2014, 09:39 PM
#23
Registered User
Thread Starter
Join Date: Jun 2013
Posts: 26
Well from looking from under the car I saw the inner frame rails were very worn out and rusted away. I decided to cut them out and replace with 2x2 square tubing.


No clue what this red stuff is...


Supports for the new floors...


Still working on getting this rail out of the driver side

This is how she is sitting right now. I am hoping to get the drivers side rail, floor supports, new trans tunnel supports, and floor templates made this week at night after work. Hopefully it won't be too long between updates....it is hard fitting everything by myself but so much more satisfying being able to say I did it all myself.
No clue what this red stuff is...
Supports for the new floors...
Still working on getting this rail out of the driver side
This is how she is sitting right now. I am hoping to get the drivers side rail, floor supports, new trans tunnel supports, and floor templates made this week at night after work. Hopefully it won't be too long between updates....it is hard fitting everything by myself but so much more satisfying being able to say I did it all myself.
01-16-2014, 07:16 PM
#25
Registered User
Thread Starter
Join Date: Jun 2013
Posts: 26
I was able to get the driver side rail in and the rest of the floor out. Next is to make a X for the center of the car, make new trans mounts, and make templates for the new floor.......this is way deeper then I ever wanted to get with this swap but I will NOT have my car rusted and falling apart lol


