Body work
 03-28-2014, 03:23 PM
#1
I have a present for you...
Thread Starter

Join Date: Mar 2003
Location: dayton, nevada usa
Posts: 1,691
Body work
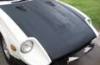
I bought this car last year and made a nice driver out of it and planned on selling it right away. I refurbised the dash, new seats, sold off the Webers and installed a custom cold air intake with SUs. Put on Tokico lowering springs ans shocks. When the weather cleared up I started driving it to work. To my surprise it runs real strong. The car is originally yellow, not my favorite but as you can see it was repainted dark blue. They didn't bother painting the engine bay or the jams. Looks like crap. So here we go. The car is straight with little rust or damage. With the dark blue I could see the imperfections clearly. The hood had been bondoed and it was lifting. I sanded it all off and was able to bump out the dents. The top of the ds fender has some ripples so I bumped most of it out without having ot remove it.
By using the dark paint as a guide I sanded the areas to expose the low spots. Once identified I sanded the rest off and wiped it with filler. There was one small dent in the roof that I was able to massage out with plastis pry sticks.
When I get all of the dings fixed I will sand it all down and primer the whole car for a bright yellow finish.


 03-31-2014, 06:18 AM
#8
I have a present for you...
Thread Starter
Join Date: Mar 2003
Location: dayton, nevada usa
Posts: 1,691
Bondo is ok if you sand first with 80 grit to give it some "tooth" to cling to. The bondo was lifted on my hood so I had to sand it all off. I prefer to use Evercoat.
03-31-2014, 11:55 AM
#10
I have a present for you...
Thread Starter
Join Date: Mar 2003
Location: dayton, nevada usa
Posts: 1,691
Next step, removed the trim carefully. I scrapped the paint away from the rubber window moldings so I can mask up to the edges and not get paint on the rubber. This way I don't have to pull all the glass. I used a surgical knife for this to avoid going to deep. There was some blue paint on them too so then I sanded up to the edge with a piece of 120 grit folded over a plastic spreader. Did the same around the door locks and mirror. This took several hours but saves time unless you're going to replace the molding.
03-31-2014, 12:03 PM
#11
I have a present for you...
Thread Starter
Join Date: Mar 2003
Location: dayton, nevada usa
Posts: 1,691
Here is a common problem on the S30 cars. It's where the body panels were welded together and filled with lead. The lead separates and leaves a crack. I took my surgical knife and opened it up and beveled the edges. Then I filled it.
04-01-2014, 09:35 AM
#12
I have a present for you...
Thread Starter
Join Date: Mar 2003
Location: dayton, nevada usa
Posts: 1,691
I blocked the sides with the long flexible sanding block to reveal the dings and other imperfections. It's important to sand in a diagonal stroke and stay off the sharp edges of the body lines.
04-02-2014, 03:40 PM
#13
I have a present for you...
Thread Starter
Join Date: Mar 2003
Location: dayton, nevada usa
Posts: 1,691
Here are some more obvious low spots. After blending all these spots I will sand the whole car. It's important to "feather" the edges.
Primer with high build primer and block sand the whole car.
Primer with high build primer and block sand the whole car.
04-02-2014, 06:53 PM
#15
I have a present for you...
Thread Starter
Join Date: Mar 2003
Location: dayton, nevada usa
Posts: 1,691
I sanded that way just to show the imperfections. Normally I would take the whole car down to just shy of the primer, bump out what I can and fill the low spots. Then wipe the whole car with filler, block it out then paint with high build primer, block again then paint. On this car I don't have to replace any metal. The last car I did looked like a fat guy walked on the deck, roof and hood. I also cut out a lot of metal and made new pieces and welded them in. This car is easy compared to that one. It came out pretty straight as you can see.
Last edited by theramz; 04-05-2017 at 08:20 PM.
04-02-2014, 07:34 PM
#16
Registered User
Join Date: Aug 2013
Posts: 1,103
Yeah, I see that. But it must be harder to do than you make it sound. My repaint in 2006 of my '86na ended up showing where every door ding and dent was before, they just looked shallower. It's like there are waves in the clear coat reflection when you sight along the repair. I was disappointed. I wanted it to look brand new for that price. It just looked repaired.
If you "wipe the whole car down with filler" doesn't that leave the whole car easier to chip because filler under paint is softer than metal under paint?
Thanks for your input.
If you "wipe the whole car down with filler" doesn't that leave the whole car easier to chip because filler under paint is softer than metal under paint?
Thanks for your input.
04-02-2014, 08:45 PM
#17
I have a present for you...
Thread Starter
Join Date: Mar 2003
Location: dayton, nevada usa
Posts: 1,691
Yeah, I see that. But it must be harder to do than you make it sound. My repaint in 2006 of my '86na ended up showing where every door ding and dent was before, they just looked shallower. It's like there are waves in the clear coat reflection when you sight along the repair. I was disappointed. I wanted it to look brand new for that price. It just looked repaired.
If you "wipe the whole car down with filler" doesn't that leave the whole car easier to chip because filler under paint is softer than metal under paint?
Thanks for your input.
If you "wipe the whole car down with filler" doesn't that leave the whole car easier to chip because filler under paint is softer than metal under paint?
Thanks for your input.
04-02-2014, 08:59 PM
#18
Registered User
Join Date: Aug 2013
Posts: 1,103
I think the key is 'longest flexible block' as you said. Now it begins to make sense. You are sanding/smoothing over the largest stretch of surface possible with each pass. If you do it with just one-hand sanding/smoothing tools, you will get differential evenness over the larger surface.
Will wait for your progress photos. Thanks again for your pro perspective. We live and learn.
Will wait for your progress photos. Thanks again for your pro perspective.
04-03-2014, 05:20 PM
#19
OOOOh
Looks really nice, please elaborate as much as you possibly can, I plan on doing all my body work, and in my wildest dreams it would look as smooth as your picture above, proof is in the pudding, and brother that is pro work !!
Cheers RamZ
Cheers RamZ
 04-07-2014, 07:58 PM
#21
I have a present for you...
Thread Starter
Join Date: Mar 2003
Location: dayton, nevada usa
Posts: 1,691
I painted the last car in a month allowing time to harden between color sanding and clear coat. I spent several hundred hours on the prep work.
On the '77 I did the following-
Remove all trim, lights, headlight surrounds, glass, bumpers and front clip.
Cut out cancer spots and make new patch panels then weld them in. I replaced part of the firewall, inner fender, floor and all 4 corners around the wheel wells.
Bumped out the dents and wiped almost the whole car with filler.
Block sanded it almost all off, not leaving enough to catch a magnet.
Painted it with high build primer 2 coats.
Sanded it with 400 paper.
Painted 2 coats of base and color sanded it.
Put the front clip back on and one more coat of base.
Color sanded with 800.
Painted it with 2 coats of clear.
Sanded it with 1200.
Buffed it with buffing compound and then with polishing compound.
For this car I won't have to do so much metal work but the outcome depends on the prep. Bad prep = a bad paint job.
Normally I wouldn't do the car this way but it shows the work more clearly.
04-08-2014, 08:05 AM
#25
I have a present for you...
Thread Starter
Join Date: Mar 2003
Location: dayton, nevada usa
Posts: 1,691
Yes, and that presents a whole set of problems. I cleaned everything, blew out all the pockets that might have dust, wet the floor down. I had a respirator on but the 2 little tiny nats did not. When they died on the paint it left a little tiny image of them with metallic highlights. Barely noticeable but there. I will drape the inside with plastic next time or rent a spray booth at the college.


