Body work
 05-15-2014, 07:23 AM
#26
I have a present for you...
Thread Starter

Join Date: Mar 2003
Location: dayton, nevada usa
Posts: 1,691
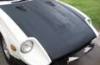
Didn't see this coming. Both fenders and one rear. So in the interest of time I'm going to replace these fenders with some rust free ones I have in the barn. I will have to cut out and patch the rear. You can see that the holes were filled with bondo. A big gob of it made things worse by blocking drainage. Behind the rust the core support has some rust but I cleaned that out and I will paint it with rust converter. This is a result of halfass body shops. I also found that the car was painted yellow over the oem paint. That means I have a lot of sanding to do because I can't trust the other coats of paint to adhere the new paint. The new paints can react to the crap underneath and ruin the whole job.
 05-16-2014, 12:31 AM
#27
Registered User
Join Date: Aug 2013
Posts: 1,103
Well, better you found this now than later... it's a weird kinda rot. Not too big a job to fix it - but if you have other parts to sub, great.
Your work on this Z is still impressive, top drawer at every step. I hope you keep it up - and keep us all in this thread you got going here! Thanks.
Your work on this Z is still impressive, top drawer at every step. I hope you keep it up - and keep us all in this thread you got going here! Thanks.
05-27-2014, 08:30 PM
#28
I have a present for you...
Thread Starter
Join Date: Mar 2003
Location: dayton, nevada usa
Posts: 1,691
Got the inner fenders cleaned up and sprayed them with underseal. I took the small pieces to work and left them in the cleaner tank for the week. Sanded around the glass molding. Note the sand paper on the spreader. This allows close to the edge work without touching the rubber.
06-23-2014, 12:10 PM
#29
I have a present for you...
Thread Starter
Join Date: Mar 2003
Location: dayton, nevada usa
Posts: 1,691
Got some time in yesterday and straightened the lower valances. This is called bumping. I used a planishing hammer and a shrinking dolley. I worked it gradually over the dings and where the spoiler stressed around the mounting holes. It is important to hold the dolly against the metal and gently bump it with the hammer. Listening for the "clinking" sound. Notice the waffle like pattern. When metal gets bent it stretches so to get it back you need to unfold it slowly and shrink it back.
Last edited by theramz; 06-24-2014 at 02:41 PM.
 06-24-2014, 10:21 AM
#31
I have a present for you...
Thread Starter
Join Date: Mar 2003
Location: dayton, nevada usa
Posts: 1,691
The ps fender was caved in and the hole for the head light bucket were elongated to make it fit. I bumped out the front gradually to "unfold " the metal. Then I bumped back the head light mounting surface to get it square and flat again. Then I bumped the front edge to even it out to fit the bucket. next I can straighten the rest of the fender and weld up the holes.
06-30-2014, 03:38 PM
#32
I have a present for you...
Thread Starter
Join Date: Mar 2003
Location: dayton, nevada usa
Posts: 1,691
The inspection covers were a little bent up so I bumped out the middle and gently pushed on them over the edge of the table. Welded up the holes. For this I turned the Mig way down. Note the angle of the head. I weld from the back of the hole and circle toward the wire. This keeps from blowing more holes in it.
Future Z builder is learning how to mask for paint.
Future Z builder is learning how to mask for paint.
06-30-2014, 03:56 PM
#33
Nice
Wish I had a body working apprentice, I have been doing a lot of sanding lately, it is extremely difficult (for me) to get my panels perfectly flat, they are slowing conforming to my will, but somewhat slowly. I have had to learn to be more patient with my results, your work has helped inspire me to work harder !
07-30-2014, 06:21 AM
#35
I have a present for you...
Thread Starter
Join Date: Mar 2003
Location: dayton, nevada usa
Posts: 1,691
Back to it. I knew there was rust on the ds wheel arch but not this bad. As I cut it out I decided that a new replacement panel might be a better choice since it was rusted through the inner fender. Ordered some new panels from fixmyrust.com. Got the wheel arch and both lower fender panels. I won't use the fender panels on this build but they were only $22 each.
08-05-2014, 11:38 AM
#36
I have a present for you...
Thread Starter
Join Date: Mar 2003
Location: dayton, nevada usa
Posts: 1,691
So after a week the fixmyrust tells me the parts are back ordered so I canceled and ordered from Motor Sport Auto. Got the hood straight. I'm going to use the donor fenders for the lower corners. The one fender is an after market replacement and I noticed the arch lip was narrower. I cut around the oem fender as shown and will weld in the piece from the after market one.
Last edited by theramz; 03-26-2015 at 07:03 AM.
09-09-2014, 06:33 AM
#38
I have a present for you...
Thread Starter
Join Date: Mar 2003
Location: dayton, nevada usa
Posts: 1,691
The rust on the left quarter is much worse on the inner fender. I'll have to cut that out and rebuild it since it is gone. Stitched in the right front fender lower corner. Got a piece for the other side maybe next weekend. When I got the car this was all just "surface rust."
 10-08-2014, 08:36 AM
#41
Registered User

Join Date: Apr 2013
Location: Tucson, Arizona USA
Posts: 576
Again, great thread and information, thanks.
BTW, I noticed from your 5/27 post, you've got the same kind of wheels that came with my parts car. I'm missing a single center cap. Do you know what the name of the manufacturer and what the style is? That will help with my search.
Not sure if I'm going to sell or keep the wheels when all is said and done on my current project, but I like to have things complete.
10-08-2014, 09:42 AM
#42
I have a present for you...
Thread Starter
Join Date: Mar 2003
Location: dayton, nevada usa
Posts: 1,691
Again, great thread and information, thanks.
BTW, I noticed from your 5/27 post, you've got the same kind of wheels that came with my parts car. I'm missing a single center cap. Do you know what the name of the manufacturer and what the style is? That will help with my search.
Not sure if I'm going to sell or keep the wheels when all is said and done on my current project, but I like to have things complete.
BTW, I noticed from your 5/27 post, you've got the same kind of wheels that came with my parts car. I'm missing a single center cap. Do you know what the name of the manufacturer and what the style is? That will help with my search.
Not sure if I'm going to sell or keep the wheels when all is said and done on my current project, but I like to have things complete.
10-08-2014, 02:41 PM
#43
Registered User
Join Date: Apr 2013
Location: Tucson, Arizona USA
Posts: 576
Someday I'll get the courage to develop bodywork skills but right now my hands are full with all the other bits and pieces of my project.
10-13-2014, 06:59 AM
#44
I have a present for you...
Thread Starter
Join Date: Mar 2003
Location: dayton, nevada usa
Posts: 1,691
Cut the patch, fitted it and welded it in. When I sanded it I saw some little holes from rust so I decided to use the other fender for now and wait for new panels to become available. Such a waste of time but I got some of the rust off of myself practicing lol.
Last edited by theramz; 12-13-2017 at 06:35 AM.
10-20-2014, 11:51 AM
#45
I have a present for you...
Thread Starter
Join Date: Mar 2003
Location: dayton, nevada usa
Posts: 1,691
Unable to do much this week but I cut out some more rust to get to good metal. I will have to make the inner pieces by hand. This is where several panels come together. Looks won't matter except for the inner fender piece. I've done that before.
Last edited by theramz; 12-13-2017 at 06:35 AM.
01-18-2015, 03:47 PM
#46
I have a present for you...
Thread Starter
Join Date: Mar 2003
Location: dayton, nevada usa
Posts: 1,691
The inner fender is rusted through in places and the inside of the outer fender has some bad spots as well. I decided the best way to stop the rust would be to cut out the inner fender, treat and patch all the holes and weld it back in. I used a spot weld remover drill and seperated the two pieces of the fender as shown. They have a seam seal as you can see and this is where the water barrier is. I don't understand why they put it so far up the panel. Water can get in and stay in that area. The whole inside above the seam seal is like new metal.
First I cut the inner fender up half way and drilled out the spot welds. Once I realized how it was built I cut out the rest. I split it in three pieces so I can get it in the bead blast cabinet at work.
I can weld in smaller pieces on the back side of th outer edge. I can see why most shops just fill it in with plastic filler. I just can't see putting a nice paint over something that will soon fail.
03-23-2015, 11:58 AM
#48
I have a present for you...
Thread Starter
Join Date: Mar 2003
Location: dayton, nevada usa
Posts: 1,691
Got back to it this weekend. Started welding up all the holes. The inner fender was easier because I could piece in some narrow strips to prevent just blowing out the holes more. Got going pretty good til I ran out of 02. Looks like a lava flow when that happens. Try again next weekend.
04-13-2015, 01:00 PM
#50
I have a present for you...
Thread Starter
Join Date: Mar 2003
Location: dayton, nevada usa
Posts: 1,691
Got some more welding gas and some time. My expert welding guru reminded me that the weld is dependent on how clean the hole is including the edges. So I took my little Dremel and carbide bit and cleaned the holes out. This made the process much better. I made back up pieces and welded then in and filled the holes. This left quite a bit of weld material on the surface. I ground off the high spots and then used a metal rasp file to sooth them down. The holes got bigger until I could eventually close them around good metal. This is a long process but I'm getting better at it.


